Khi vận hành một website thương mại điện tử, việc phản hồi nhanh chóng và kịp thời các thắc mắc, yêu cầu hỗ trợ từ khách hàng đóng vai trò cực kỳ quan trọng. Điều này không chỉ tạo dựng niềm tin mà còn giúp tăng tỉ lệ chuyển đổi. Tuy nhiên, việc quản lý nhiều kênh giao tiếp như live chat, messenger, email lại tốn rất nhiều thời gian và dễ dẫn đến tình trạng bỏ sót yêu cầu.
Đây chính là thử thách mình đã gặp phải trong nhiều năm quản lý YCB.vn. Mọi thứ chỉ thực sự được giải quyết kể từ khi mình bắt đầu sử dụng Chatwoot. Công cụ này nhanh chóng trở thành “trợ thủ đắc lực” giúp team của mình xử lý yêu cầu từ khách hàng trên nhiều nền tảng khác nhau một cách dễ dàng và hiệu quả.
Trong bài viết này, mình sẽ chia sẻ trải nghiệm sử dụng Chatwoot và hướng dẫn bạn cách tự cài đặt, để giúp tối ưu hóa việc giao tiếp khách hàng trên website của chính bạn
Mục Lục
1. Giới thiệu Chatwoot
Chatwoot là một nền tảng mã nguồn mở giúp doanh nghiệp quản lý và phản hồi yêu cầu của khách hàng một cách dễ dàng thông qua nhiều kênh giao tiếp như email, mạng xã hội, và live chat. Với khả năng tùy chỉnh linh hoạt và tích hợp mạnh mẽ, Chatwoot là lựa chọn lý tưởng cho những ai muốn kiểm soát hoàn toàn dữ liệu và trải nghiệm khách hàng của mình.
Chatwoot hỗ trợ các kênh giao tiếp sau
- Email: Chuyển tiếp toàn bộ email đến Chatwoot để quản lý và trả lời ngay trên bảng điều khiển tích hợp.
- Website: Sử dụng widget live chat để trò chuyện với khách hàng và tích hợp SDK nhằm nhận diện người dùng, cung cấp hỗ trợ theo ngữ cảnh.
- Facebook: Kết nối với các trang Facebook và trả lời tin nhắn trực tiếp trên trang.
- Instagram: Kết nối với tài khoản Instagram để trả lời tin nhắn trực tiếp.
- Twitter: Kết nối với tài khoản Twitter để trả lời tin nhắn trực tiếp hoặc các tweet có nhắc đến bạn.
- Telegram: Kết nối bot Telegram và quản lý các tin nhắn từ một bảng điều khiển duy nhất.
- WhatsApp: Kết nối tài khoản WhatsApp Business để quản lý hội thoại trong Chatwoot.
- Line: Kết nối tài khoản Line và xử lý tin nhắn ngay trong Chatwoot.
- SMS: Kết nối tài khoản Twilio SMS và trả lời các câu hỏi qua SMS trong Chatwoot.
- API Channel: Tạo các kênh giao tiếp tùy chỉnh thông qua API của Chatwoot.
Ngoài ra, Chatwoot còn có thêm rất nhiều các tính năng hữu ích khác, bạn có thể kham khảo trên trang chủ Chatwoot.
Ưu điểm của Chatwoot
Một trong những ưu điểm lớn nhất của Chatwoot là chúng ta có thể tự cài đặt trên server riêng, cho phép bạn hoàn toàn kiểm soát dữ liệu của mình mà không phải phụ thuộc vào các dịch vụ bên thứ ba. Điều này đặc biệt quan trọng đối với các doanh nghiệp muốn đảm bảo tính bảo mật thông tin khách hàng và tuân thủ các quy định về quyền riêng tư.
Khi sử dụng Chatwoot, toàn bộ dữ liệu hội thoại được lưu trữ trên máy chủ của bạn, giúp loại bỏ rủi ro rò rỉ thông tin và mang lại sự an tâm tuyệt đối. Với Chatwoot, bạn không chỉ quản lý giao tiếp hiệu quả mà còn bảo vệ tốt hơn tài sản dữ liệu quan trọng của doanh nghiệp.
2. Cài đặt Chatwoot bằng Docker
Bước 1: Chuẩn bị máy chủ
- Đảm bảo bạn đã cài đặt Docker và Docker Compose trên server.
- Tạo một thư mục mới để chứa các file cấu hình Chatwoot, có tên gọi
chatwoot
Bước 2: Tạo file cấu hình
Trong thư mục chatwoot vừa tạo, tạo một file compose.yml với nội dung sau:
services:
  base: &base
    image: chatwoot/chatwoot:latest
    env_file: .env ## Change this file for customized env variables
    volumes:
      - /data/storage:/app/storage

  rails:
    <<: *base
    depends_on:
      - postgres
      - redis
    ports:
      - '3000:3000'
    environment:
      - NODE_ENV=production
      - RAILS_ENV=production
      - INSTALLATION_ENV=docker
    entrypoint: docker/entrypoints/rails.sh
    command: ['bundle', 'exec', 'rails', 's', '-p', '3000', '-b', '0.0.0.0']
    restart: always

  sidekiq:
    <<: *base
    depends_on:
      - postgres
      - redis
    environment:
      - NODE_ENV=production
      - RAILS_ENV=production
      - INSTALLATION_ENV=docker
    command: ['bundle', 'exec', 'sidekiq', '-C', 'config/sidekiq.yml']
    restart: always

  postgres:
    image: pgvector/pgvector:pg16
    restart: always
    ports:
      - '127.0.0.1:5432:5432'
    volumes:
      - /data/postgres:/var/lib/postgresql/data
    environment:
      - POSTGRES_DB=chatwoot
      - POSTGRES_USER=postgres
      # Please provide your own password.
      - POSTGRES_PASSWORD=password

  redis:
    image: redis:alpine
    restart: always
    command: ["sh", "-c", "redis-server --requirepass \"$REDIS_PASSWORD\""]
    env_file: .env
    volumes:
      - /data/redis:/data
    ports:
- '127.0.0.1:6379:6379'Code language: YAML (yaml)Tạo thêm file .env để cấu hình thông số
# Learn about the various environment variables at
# https://www.chatwoot.com/docs/self-hosted/configuration/environment-variables/#rails-production-variables

# Used to verify the integrity of signed cookies. so ensure a secure value is set
# SECRET_KEY_BASE should be alphanumeric. Avoid special characters or symbols.
# Use `rake secret` to generate this variable
SECRET_KEY_BASE=replace_with_lengthy_secure_hex

# Replace with the URL you are planning to use for your app
FRONTEND_URL=https://chat.thuanbui.me
# To use a dedicated URL for help center pages
# HELPCENTER_URL=http://0.0.0.0:3000

# If the variable is set, all non-authenticated pages would fallback to the default locale.
# Whenever a new account is created, the default language will be DEFAULT_LOCALE instead of en
# DEFAULT_LOCALE=en

# If you plan to use CDN for your assets, set Asset CDN Host
ASSET_CDN_HOST=

# Force all access to the app over SSL, default is set to false
FORCE_SSL=false

# This lets you control new sign ups on your chatwoot installation
# true : default option, allows sign ups
# false : disables all the end points related to sign ups
# api_only: disables the UI for signup, but you can create sign ups via the account apis
ENABLE_ACCOUNT_SIGNUP=false

# Redis config
# specify the configs via single URL or individual variables
# ref: https://www.iana.org/assignments/uri-schemes/prov/redis
# You can also use the following format for the URL: redis://:password@host:port/db_number
REDIS_URL=redis://redis:6379
# If you are using docker-compose, set this variable's value to be any string,
# which will be the password for the redis service running inside the docker-compose
# to make it secure
REDIS_PASSWORD=
# Redis Sentinel can be used by passing list of sentinel host and ports e,g. sentinel_host1:port1,sentinel_host2:port2
REDIS_SENTINELS=
# Redis sentinel master name is required when using sentinel, default value is "mymaster".
# You can find list of master using "SENTINEL masters" command
REDIS_SENTINEL_MASTER_NAME=

# By default Chatwoot will pass REDIS_PASSWORD as the password value for sentinels
# Use the following environment variable to customize passwords for sentinels.
# Use empty string if sentinels are configured with out passwords
# REDIS_SENTINEL_PASSWORD=

# Redis premium breakage in heroku fix
# enable the following configuration
# ref: https://github.com/chatwoot/chatwoot/issues/2420
# REDIS_OPENSSL_VERIFY_MODE=none

# Postgres Database config variables
# You can leave POSTGRES_DATABASE blank. The default name of
# the database in the production environment is chatwoot_production
# POSTGRES_DATABASE=
POSTGRES_HOST=postgres
POSTGRES_USERNAME=postgres
POSTGRES_PASSWORD=password
RAILS_ENV=development
# Changes the Postgres query timeout limit. The default is 14 seconds. Modify only when required.
# POSTGRES_STATEMENT_TIMEOUT=14s
RAILS_MAX_THREADS=5

# The email from which all outgoing emails are sent
# could user either  `email@yourdomain.com` or `BrandName <email@yourdomain.com>`
MAILER_SENDER_EMAIL=YCB <hi@ycb.vn>

#SMTP domain key is set up for HELO checking
SMTP_DOMAIN=
# Set the value to "mailhog" if using docker-compose for development environments,
# Set the value as "localhost" or your SMTP address in other environments
# If SMTP_ADDRESS is empty, Chatwoot would try to use sendmail(postfix)
SMTP_ADDRESS=
SMTP_PORT=
SMTP_USERNAME=
SMTP_PASSWORD=
# plain,login,cram_md5
SMTP_AUTHENTICATION=
SMTP_ENABLE_STARTTLS_AUTO=true
# Can be: 'none', 'peer', 'client_once', 'fail_if_no_peer_cert', see http://api.rubyonrails.org/classes/ActionMailer/Base.html
SMTP_OPENSSL_VERIFY_MODE=peer
# Comment out the following environment variables if required by your SMTP server
# SMTP_TLS=
# SMTP_SSL=
# SMTP_OPEN_TIMEOUT
# SMTP_READ_TIMEOUT

# Mail Incoming
# This is the domain set for the reply emails when conversation continuity is enabled
MAILER_INBOUND_EMAIL_DOMAIN=
# Set this to the appropriate ingress channel with regards to incoming emails
# Possible values are :
# relay for Exim, Postfix, Qmail
# mailgun for Mailgun
# mandrill for Mandrill
# postmark for Postmark
# sendgrid for Sendgrid
RAILS_INBOUND_EMAIL_SERVICE=
# Use one of the following based on the email ingress service
# Ref: https://edgeguides.rubyonrails.org/action_mailbox_basics.html
# Set this to a password of your choice and use it in the Inbound webhook
RAILS_INBOUND_EMAIL_PASSWORD=

MAILGUN_INGRESS_SIGNING_KEY=
MANDRILL_INGRESS_API_KEY=

# Creating Your Inbound Webhook Instructions for Postmark and Sendgrid:
# Inbound webhook URL format:
#    https://actionmailbox:[YOUR_RAILS_INBOUND_EMAIL_PASSWORD]@[YOUR_CHATWOOT_DOMAIN.COM]/rails/action_mailbox/[RAILS_INBOUND_EMAIL_SERVICE]/inbound_emails
# Note: Replace the values inside the brackets; do not include the brackets themselves.
# Example: https://actionmailbox:mYRandomPassword3@chatwoot.example.com/rails/action_mailbox/postmark/inbound_emails
# For Postmark
# Ensure the 'Include raw email content in JSON payload' checkbox is selected in the inbound webhook section.

# Storage
ACTIVE_STORAGE_SERVICE=local

# Amazon S3
# documentation: https://www.chatwoot.com/docs/configuring-s3-bucket-as-cloud-storage
S3_BUCKET_NAME=
AWS_ACCESS_KEY_ID=
AWS_SECRET_ACCESS_KEY=
AWS_REGION=

# Log settings
# Disable if you want to write logs to a file
RAILS_LOG_TO_STDOUT=true
LOG_LEVEL=info
LOG_SIZE=500
# Configure this environment variable if you want to use lograge instead of rails logger
#LOGRAGE_ENABLED=true

### This environment variables are only required if you are setting up social media channels

# Facebook
# documentation: https://www.chatwoot.com/docs/facebook-setup
FB_VERIFY_TOKEN=
FB_APP_SECRET=
FB_APP_ID=

# https://developers.facebook.com/docs/messenger-platform/instagram/get-started#app-dashboard
IG_VERIFY_TOKEN=

# Twitter
# documentation: https://www.chatwoot.com/docs/twitter-app-setup
TWITTER_APP_ID=
TWITTER_CONSUMER_KEY=
TWITTER_CONSUMER_SECRET=
TWITTER_ENVIRONMENT=

#slack integration
SLACK_CLIENT_ID=
SLACK_CLIENT_SECRET=

# Google OAuth
GOOGLE_OAUTH_CLIENT_ID=
GOOGLE_OAUTH_CLIENT_SECRET=
GOOGLE_OAUTH_CALLBACK_URL=

### Change this env variable only if you are using a custom build mobile app
## Mobile app env variables
IOS_APP_ID=L7YLMN4634.com.chatwoot.app
ANDROID_BUNDLE_ID=com.chatwoot.app

# https://developers.google.com/android/guides/client-auth (use keytool to print the fingerprint in the first section)
ANDROID_SHA256_CERT_FINGERPRINT=AC:73:8E:DE:EB:56:EA:CC:10:87:02:A7:65:37:7B:38:D4:5D:D4:53:F8:3B:FB:D3:C6:28:64:1D:AA:08:1E:D8

### Smart App Banner
# https://developer.apple.com/library/archive/documentation/AppleApplications/Reference/SafariWebContent/PromotingAppswithAppBanners/PromotingAppswithAppBanners.html
# You can find your app-id in https://itunesconnect.apple.com
#IOS_APP_IDENTIFIER=1495796682

## Push Notification
## generate a new key value here : https://d3v.one/vapid-key-generator/
# VAPID_PUBLIC_KEY=
# VAPID_PRIVATE_KEY=
#
# for mobile apps
# FCM_SERVER_KEY=

### APM and Error Monitoring configurations
## Elastic APM
## https://www.elastic.co/guide/en/apm/agent/ruby/current/getting-started-rails.html
# ELASTIC_APM_SERVER_URL=
# ELASTIC_APM_SECRET_TOKEN=

## Sentry
# SENTRY_DSN=


## Scout
## https://scoutapm.com/docs/ruby/configuration
# SCOUT_KEY=YOURKEY
# SCOUT_NAME=YOURAPPNAME (Production)
# SCOUT_MONITOR=true

## NewRelic
# https://docs.newrelic.com/docs/agents/ruby-agent/configuration/ruby-agent-configuration/
# NEW_RELIC_LICENSE_KEY=
# Set this to true to allow newrelic apm to send logs.
# This is turned off by default.
# NEW_RELIC_APPLICATION_LOGGING_ENABLED=

## Datadog
## https://github.com/DataDog/dd-trace-rb/blob/master/docs/GettingStarted.md#environment-variables
# DD_TRACE_AGENT_URL=

# MaxMindDB API key to download GeoLite2 City database
# IP_LOOKUP_API_KEY=

## Rack Attack configuration
## To prevent and throttle abusive requests
# ENABLE_RACK_ATTACK=true
# RACK_ATTACK_LIMIT=300
# ENABLE_RACK_ATTACK_WIDGET_API=true

## Running chatwoot as an API only server
## setting this value to true will disable the frontend dashboard endpoints
# CW_API_ONLY_SERVER=false

## Development Only Config
# if you want to use letter_opener for local emails
# LETTER_OPENER=true
# meant to be used in github codespaces
# WEBPACKER_DEV_SERVER_PUBLIC=

# If you want to use official mobile app,
# the notifications would be relayed via a Chatwoot server
ENABLE_PUSH_RELAY_SERVER=true

# Stripe API key
STRIPE_SECRET_KEY=
STRIPE_WEBHOOK_SECRET=

# Set to true if you want to upload files to cloud storage using the signed url
# Make sure to follow https://edgeguides.rubyonrails.org/active_storage_overview.html#cross-origin-resource-sharing-cors-configuration on the cloud storage after setting this to true.
DIRECT_UPLOADS_ENABLED=

#MS OAUTH creds
AZURE_APP_ID=
AZURE_APP_SECRET=

## Advanced configurations
## Change these values to fine tune performance
# control the concurrency setting of sidekiq
# SIDEKIQ_CONCURRENCY=10


# AI powered features
## OpenAI key
# OPENAI_API_KEY=

# Housekeeping/Performance related configurations
# Set to true if you want to remove stale contact inboxes
# contact_inboxes with no conversation older than 90 days will be removed
# REMOVE_STALE_CONTACT_INBOX_JOB_STATUS=false
Code language: PHP (php)Bạn cần cập nhật lại các thông số sau
Dòng số 7 (SECRET_KEY_BASE=), sử dụng lệnh sau để tạo chuỗi secret mới
docker compose run --rm rails bundle exec rake secretCode language: Dockerfile (dockerfile)Kết quả sẽ trả về 1 chuỗi kí tự tương tự như bên dưới, bạn cần copy dòng này vào mục SECRET_KEY_BASE=
f01639a87f20c22ad1b958aa6548b6e9e24026065e0b6086b22f233098fa09981397a980d61b83a78fd6015a55fa6e8356eb5212e503de8d426efe1176c58219Dòng số 10 (FRONTEND_URL=), thay thế bằng tên miền bạn sẽ sử dụng để truy cập Chatwoot
Dòng số 72, 76, 77, 78, 79 (SMTP_) thay thế bằng thông số SMTP server của bạn. Chatwoot sẽ sử dụng các thông số này để gửi email.
Các thông số khác tạm thời có thể giữ nguyên.
Bước 3: Khởi động Chatwoot
Trước khi khởi động, cần chạy lệnh sau để chuẩn bị database
docker compose run --rm rails bundle exec rails db:chatwoot_prepareCode language: Dockerfile (dockerfile)Chờ vài phút để hoàn thành, sau đó khởi động Chatwoot
docker compose up -d
Code language: Nginx (nginx)Bước 4: Thiết lập ban đầu
Sau khi container chạy, truy cập vào địa chỉ http://<IP-server>:3000 hoặc để thực hiện thiết lập tài khoản quản trị viên và cấu hình cơ bản.
Đầu tiên, bạn cần phải tạo tài khoản Super Admin.
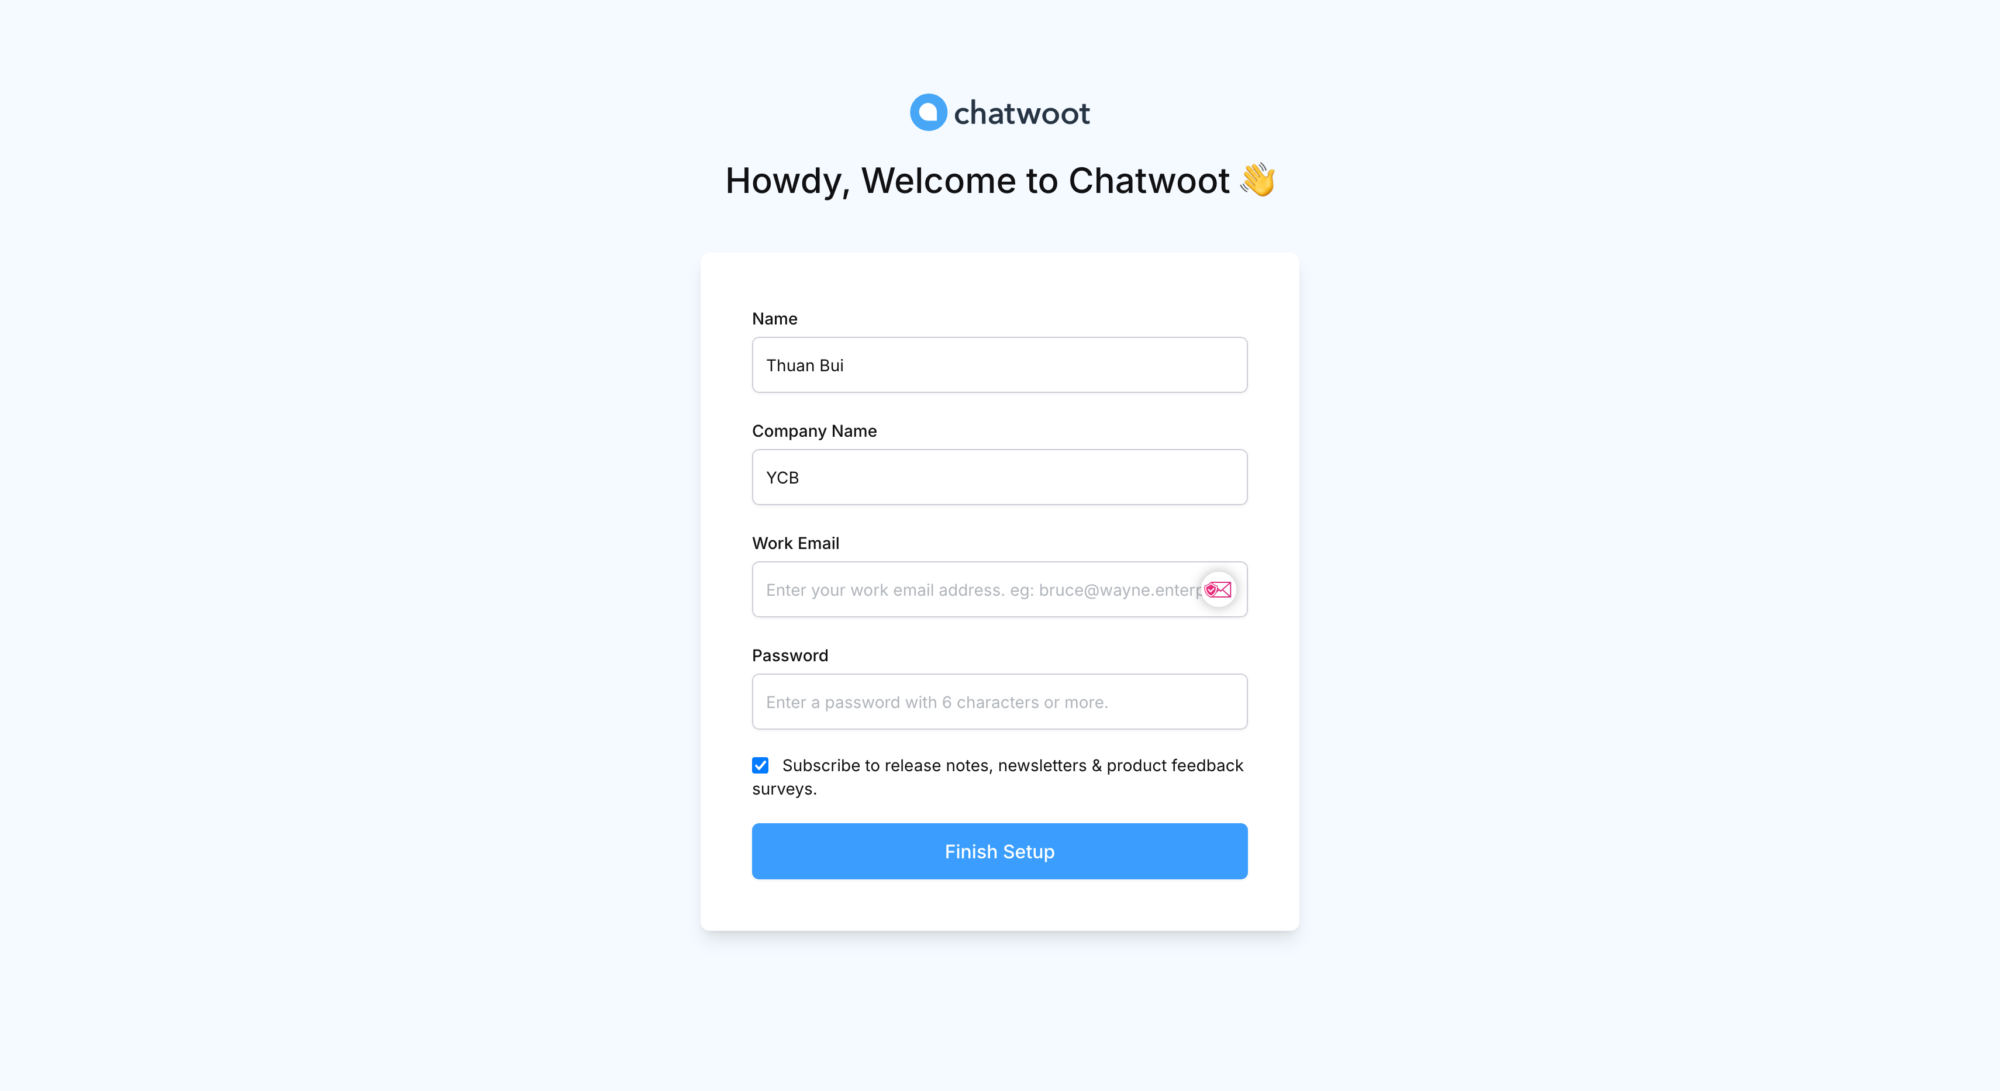
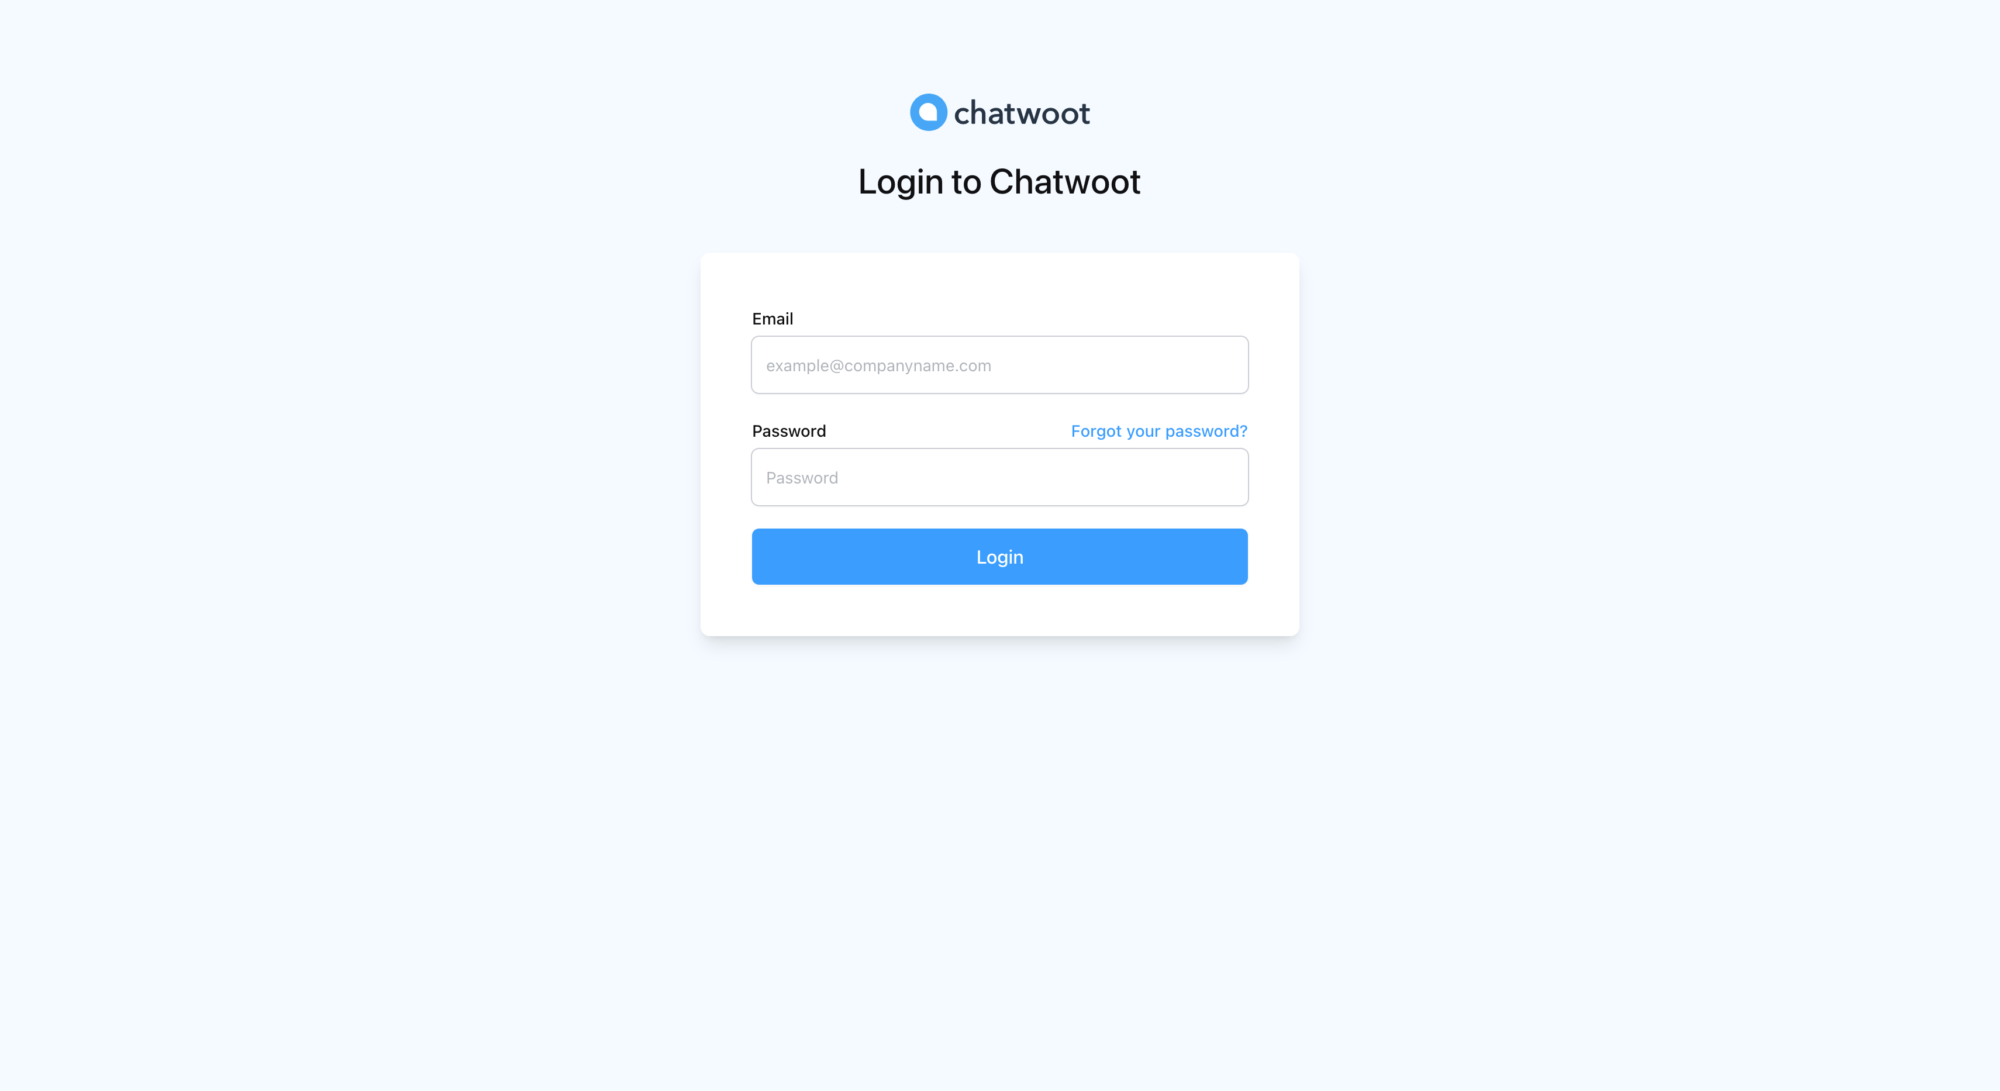
Sau khi tạo xong, hệ thống sẽ yêu cầu đăng nhập bằng tài khoản vừa tạo.
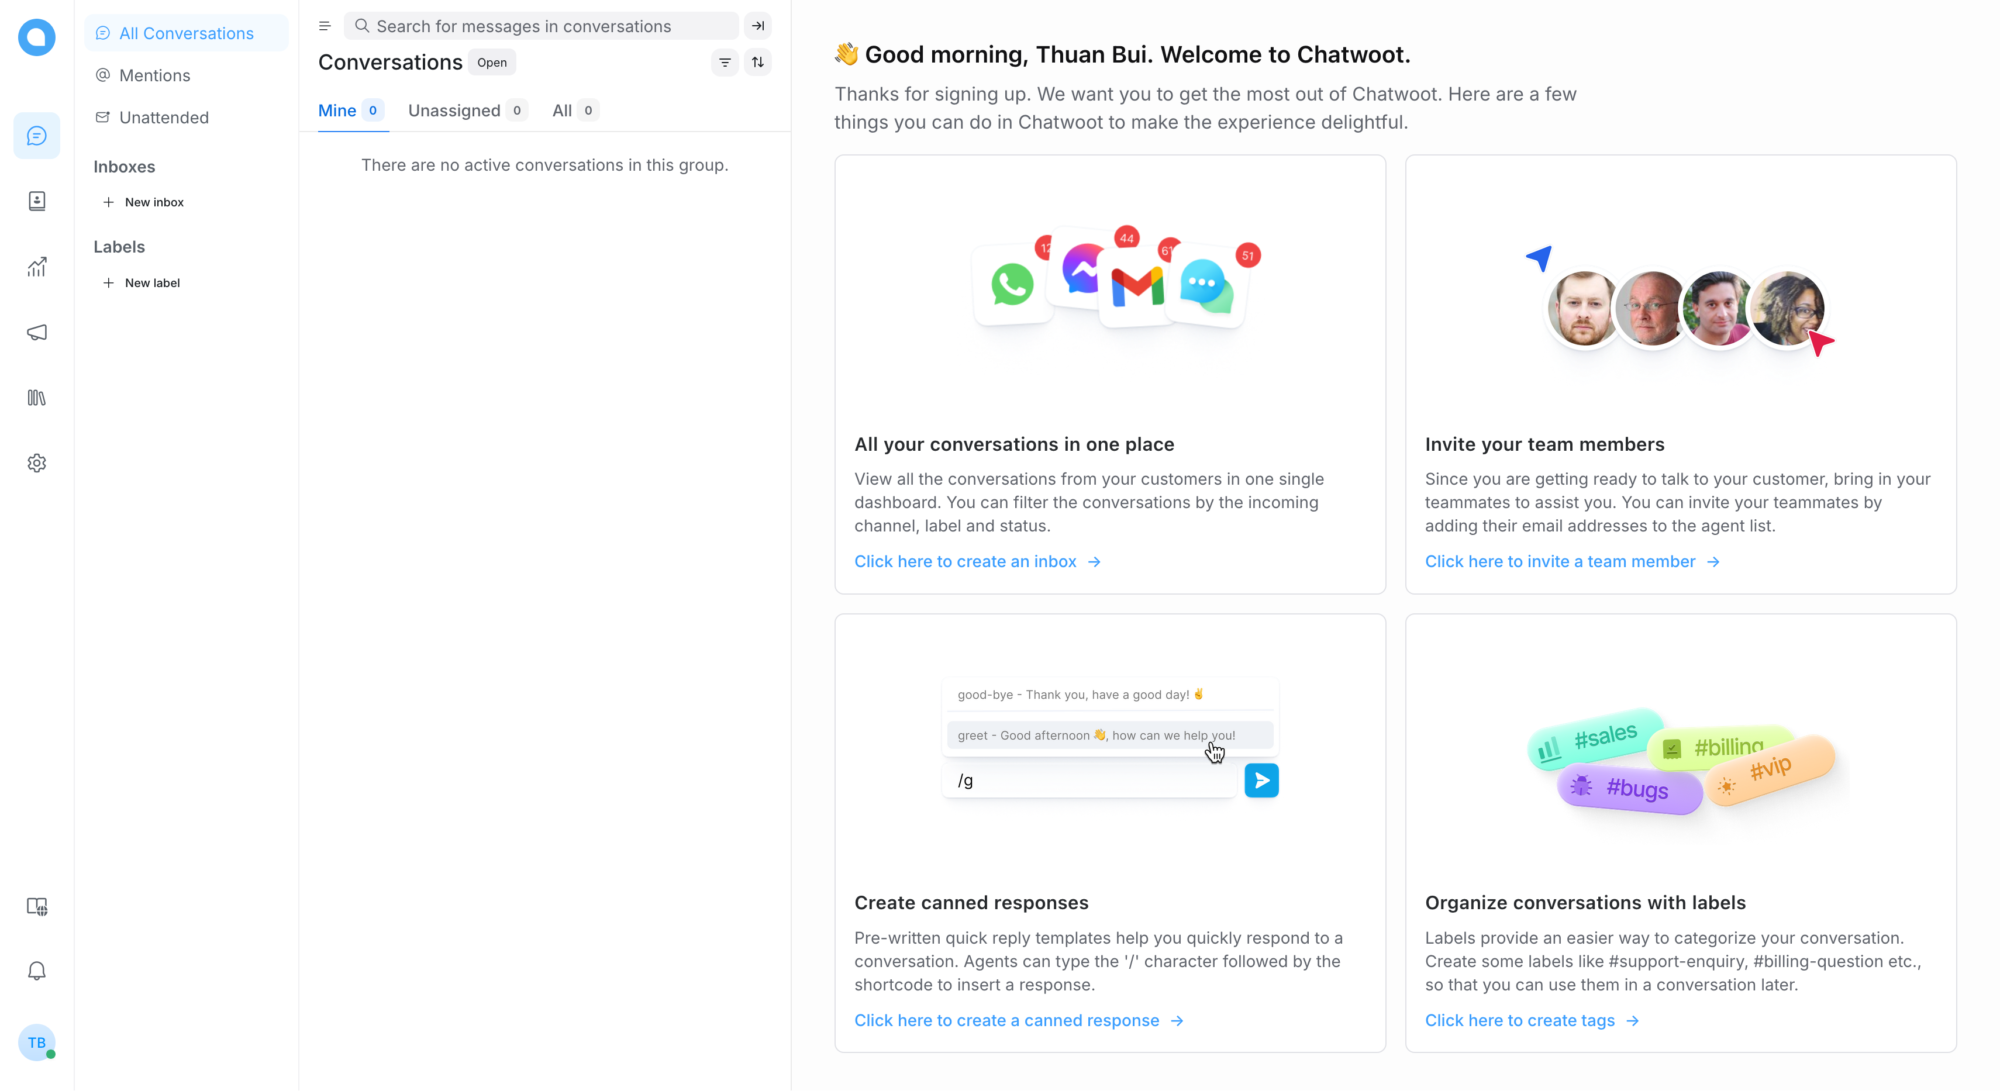
Đây là giao diện chính của Chatwoot sau khi đăng nhập.
3. Cấu hình kênh giao tiếp
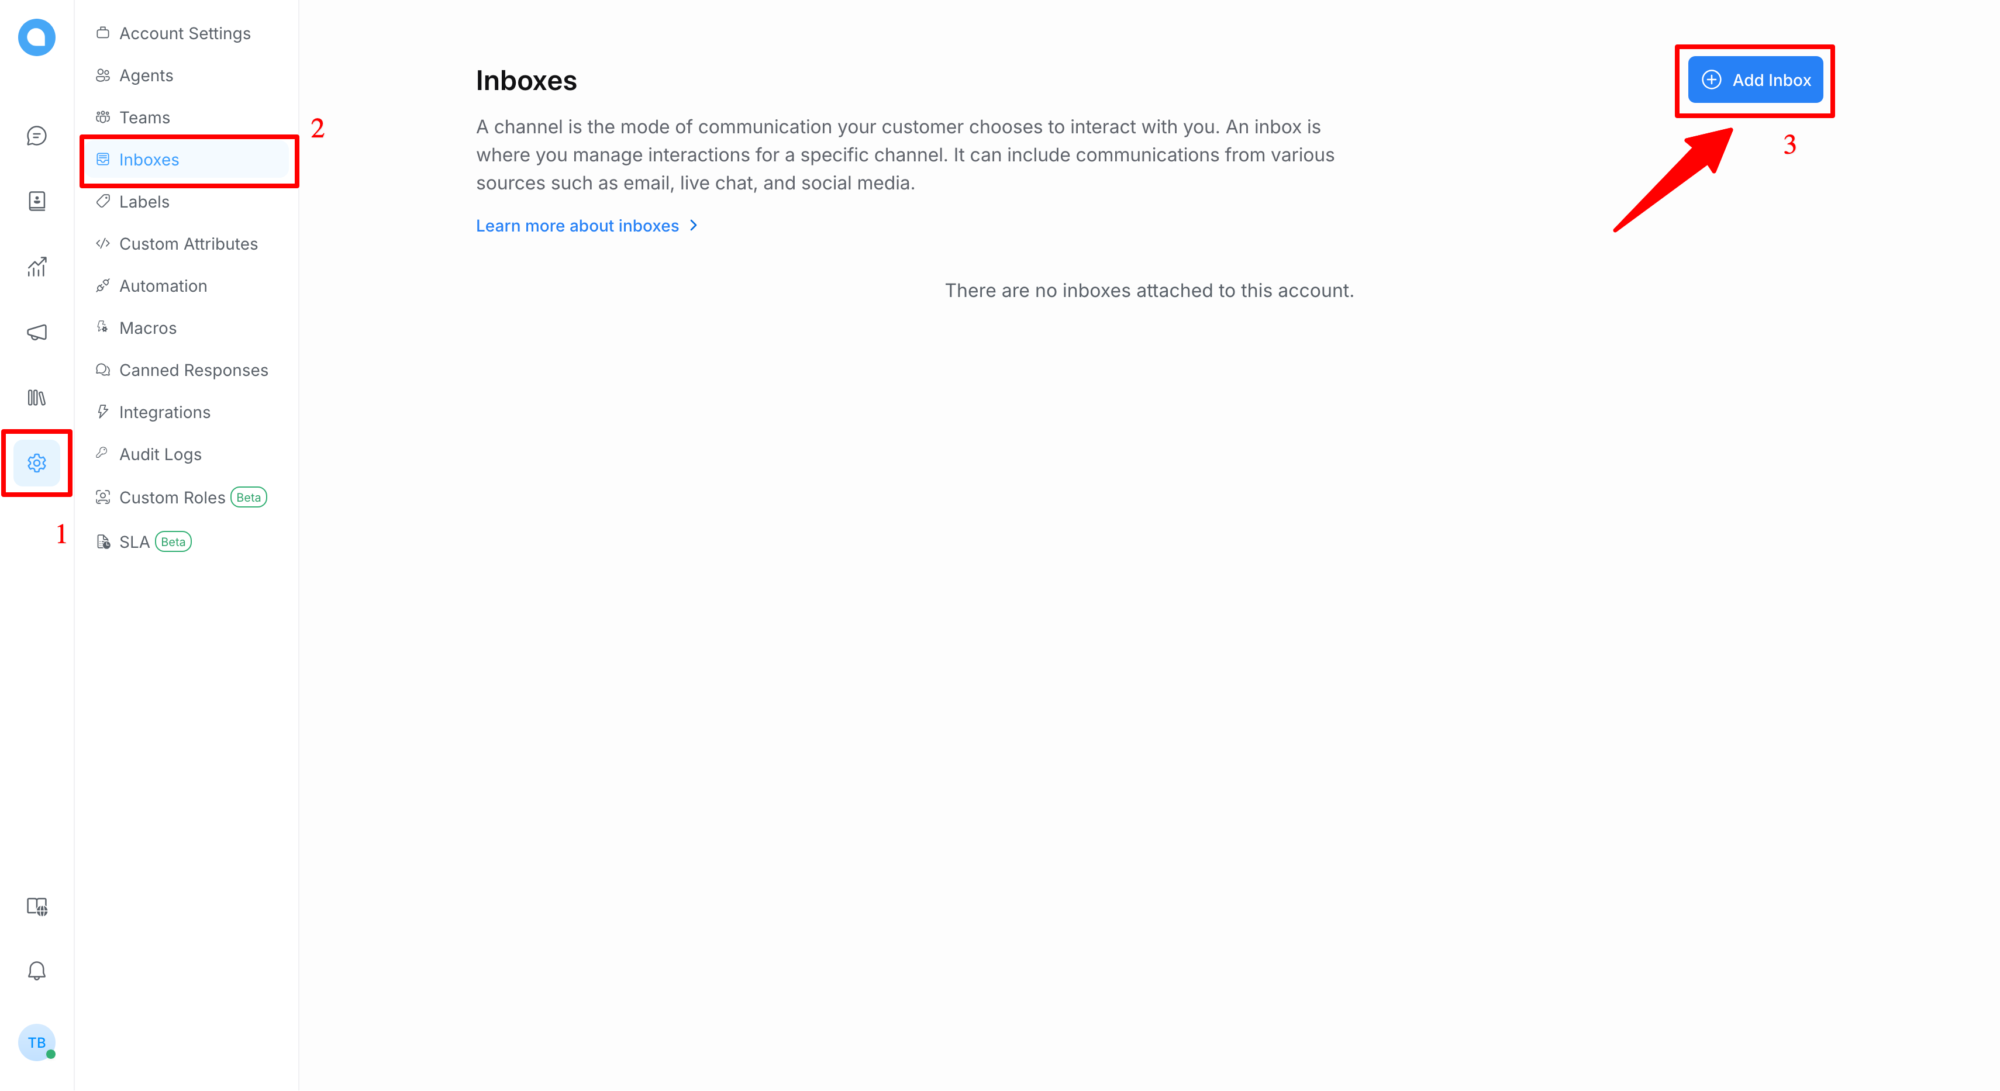
Để cấu hình kênh giao tiếp, truy cập vào 1. Settings –> 2. Inboxes –> 3. Add inbox
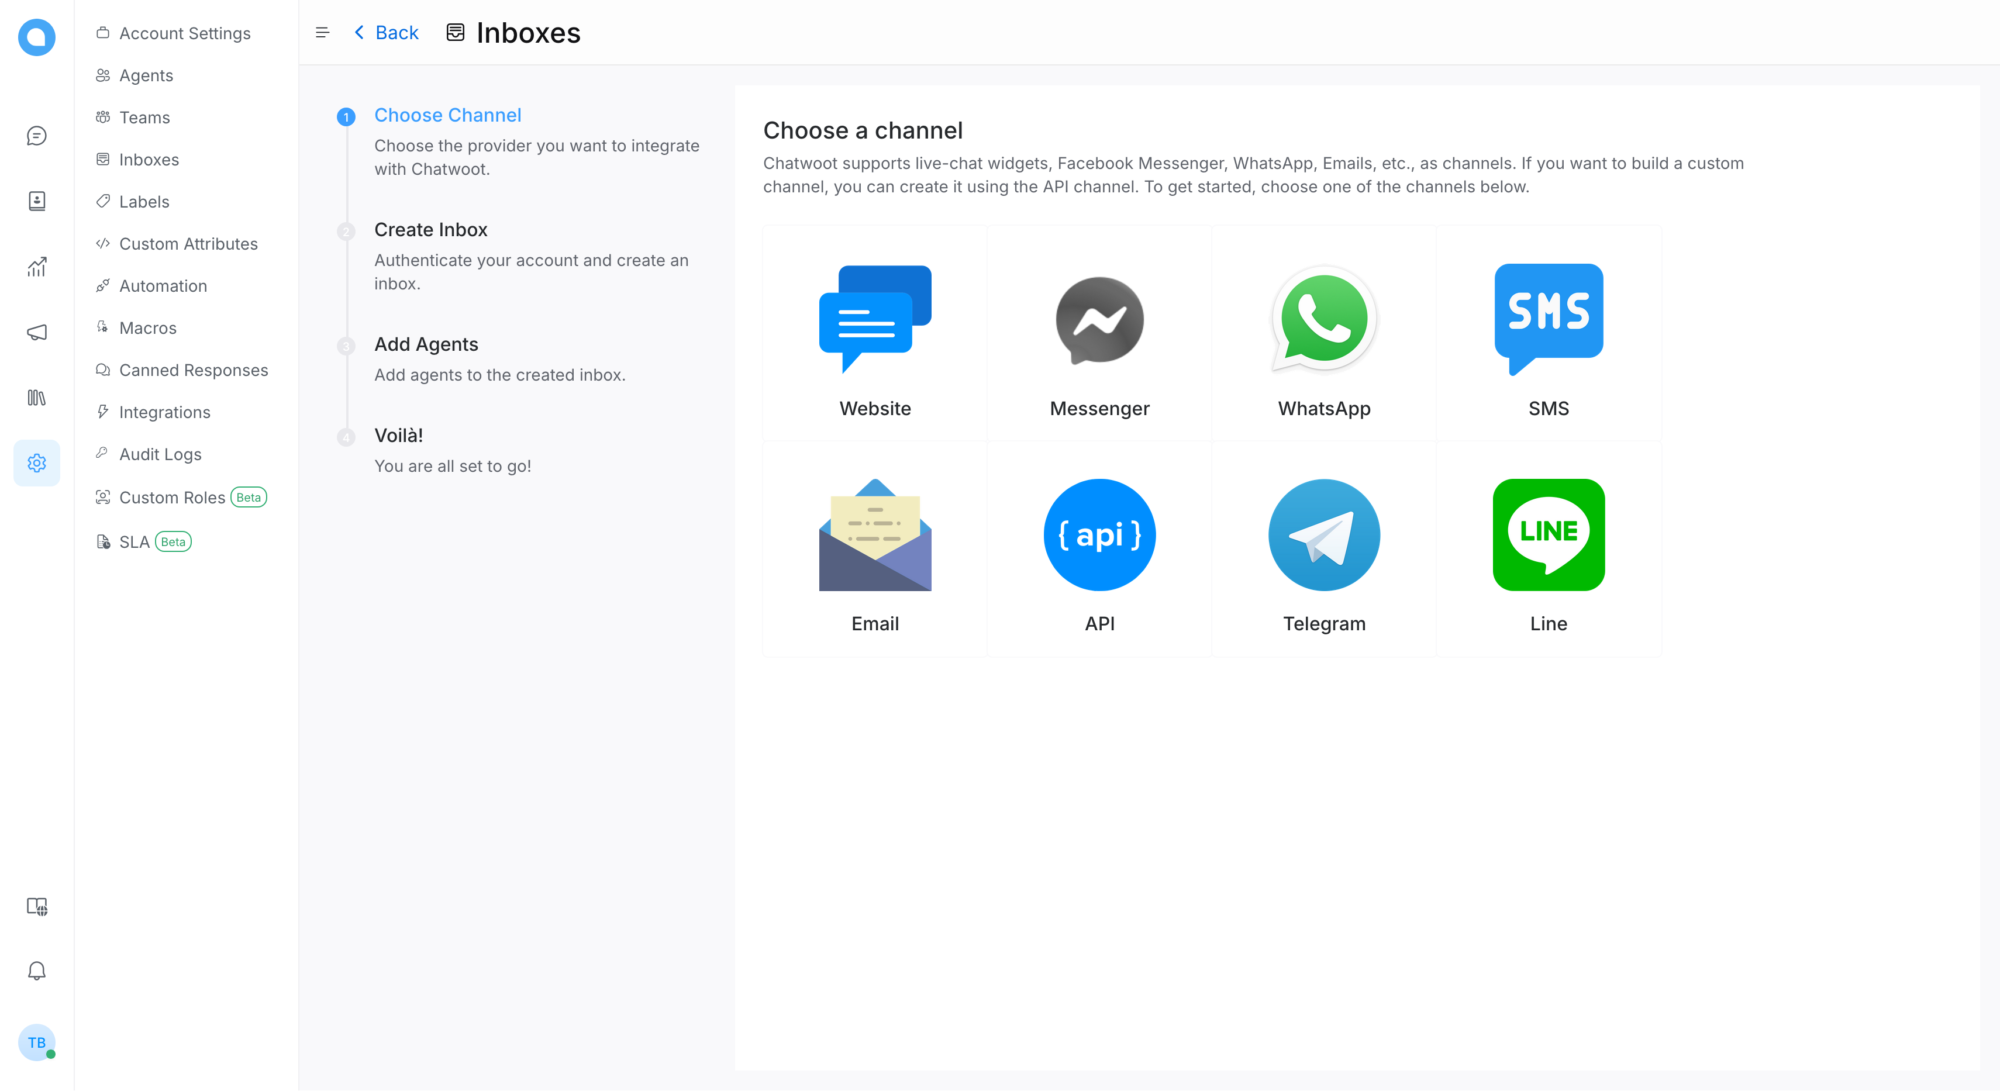
Chọn kênh giao tiếp, ở đây mình chọn Website để tạo kênh live chat cho website
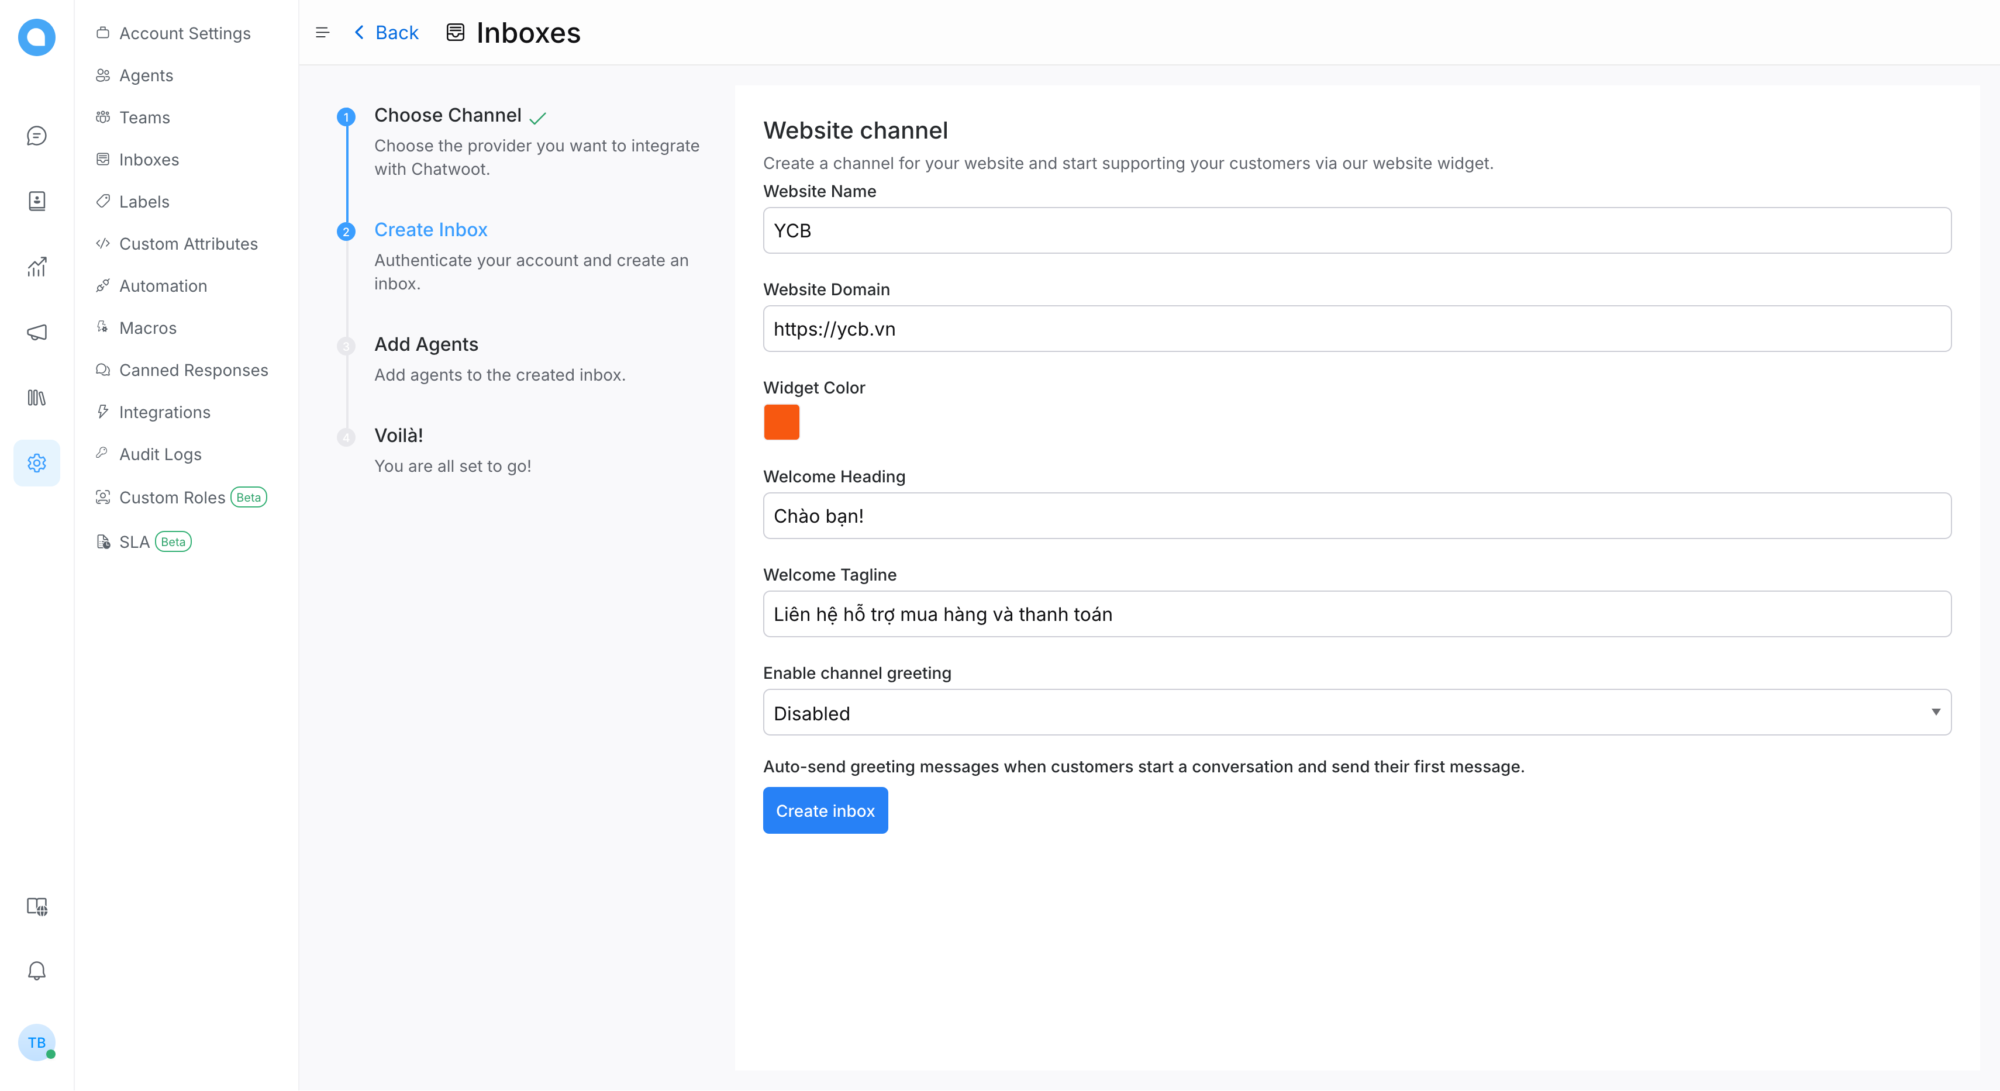
Nhập vào tên website, tên miền và các thông số liên quan, sau đó bấm Create inbox.
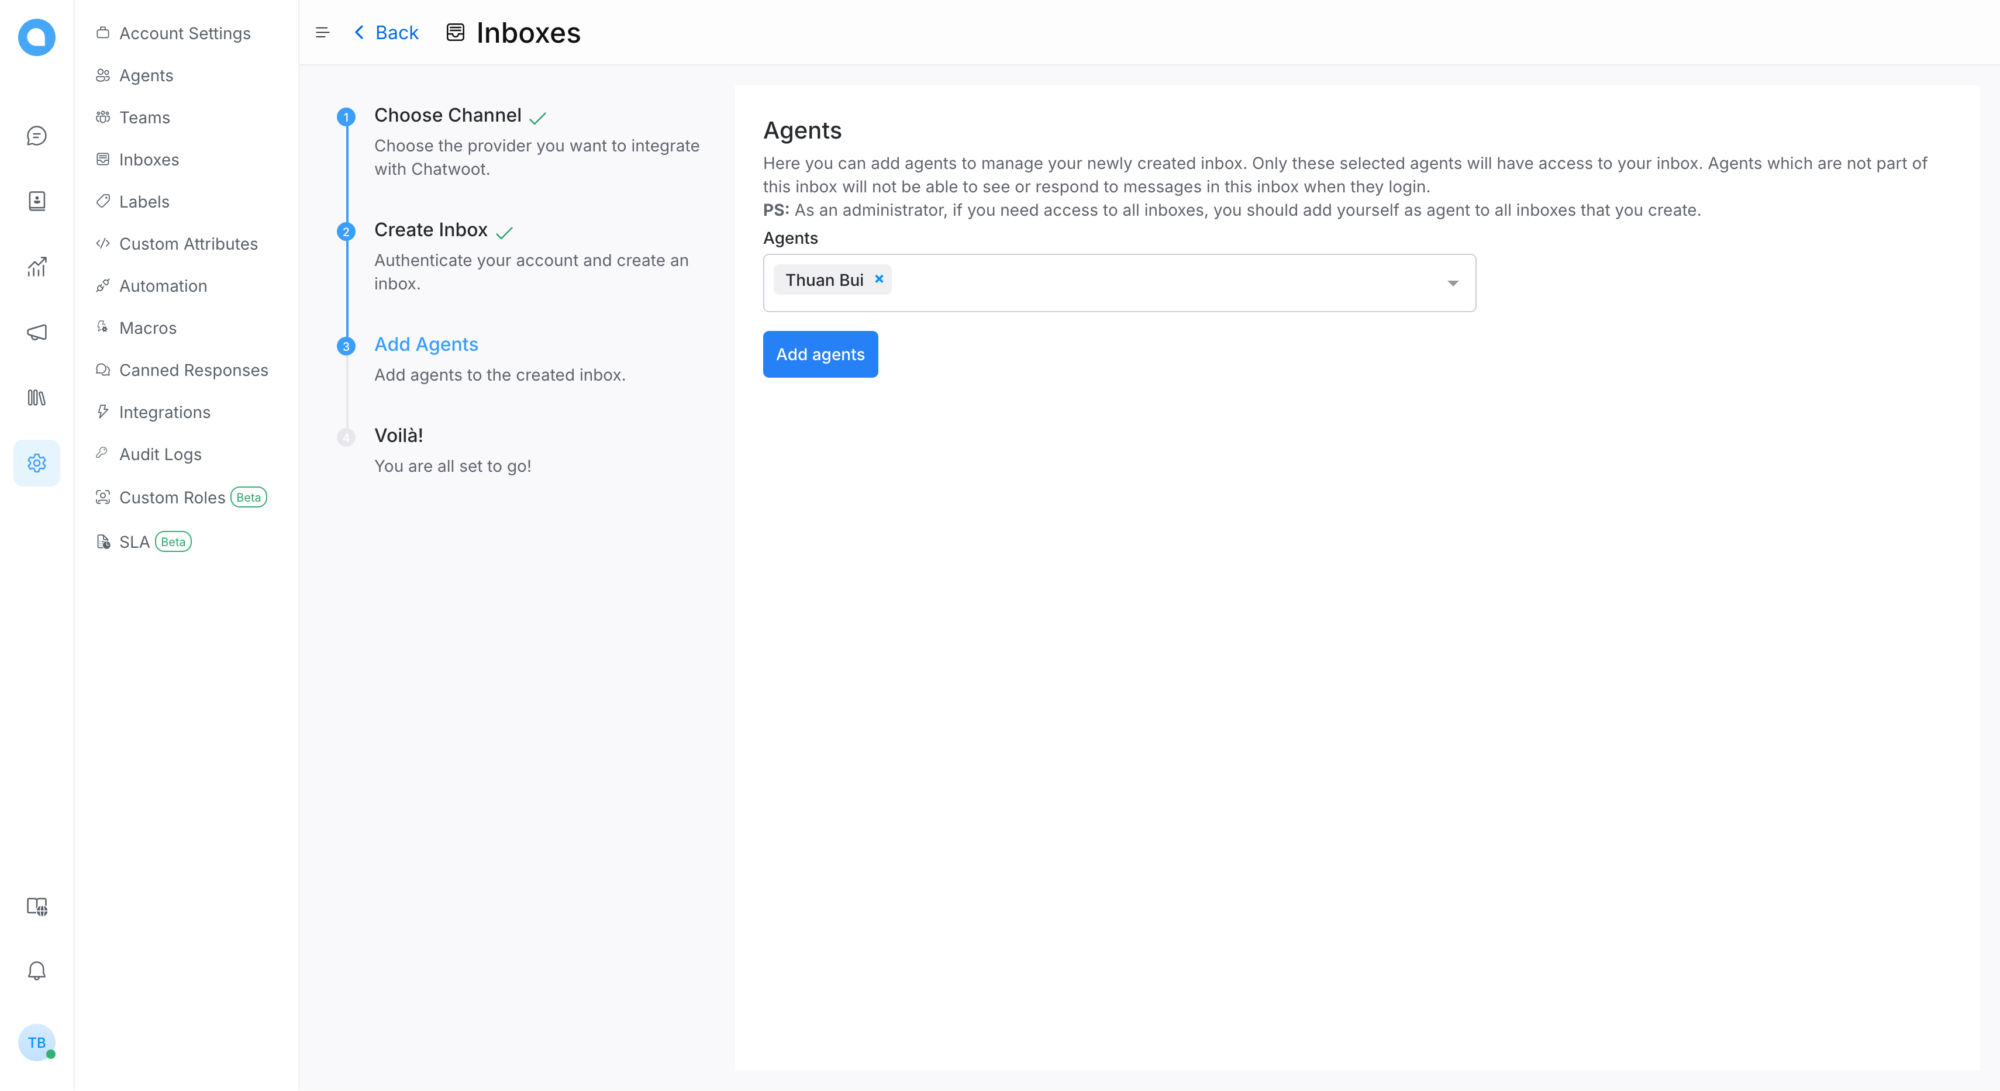
Tiếp theo, chọn nhân viên (Agents), bấm Add Agents
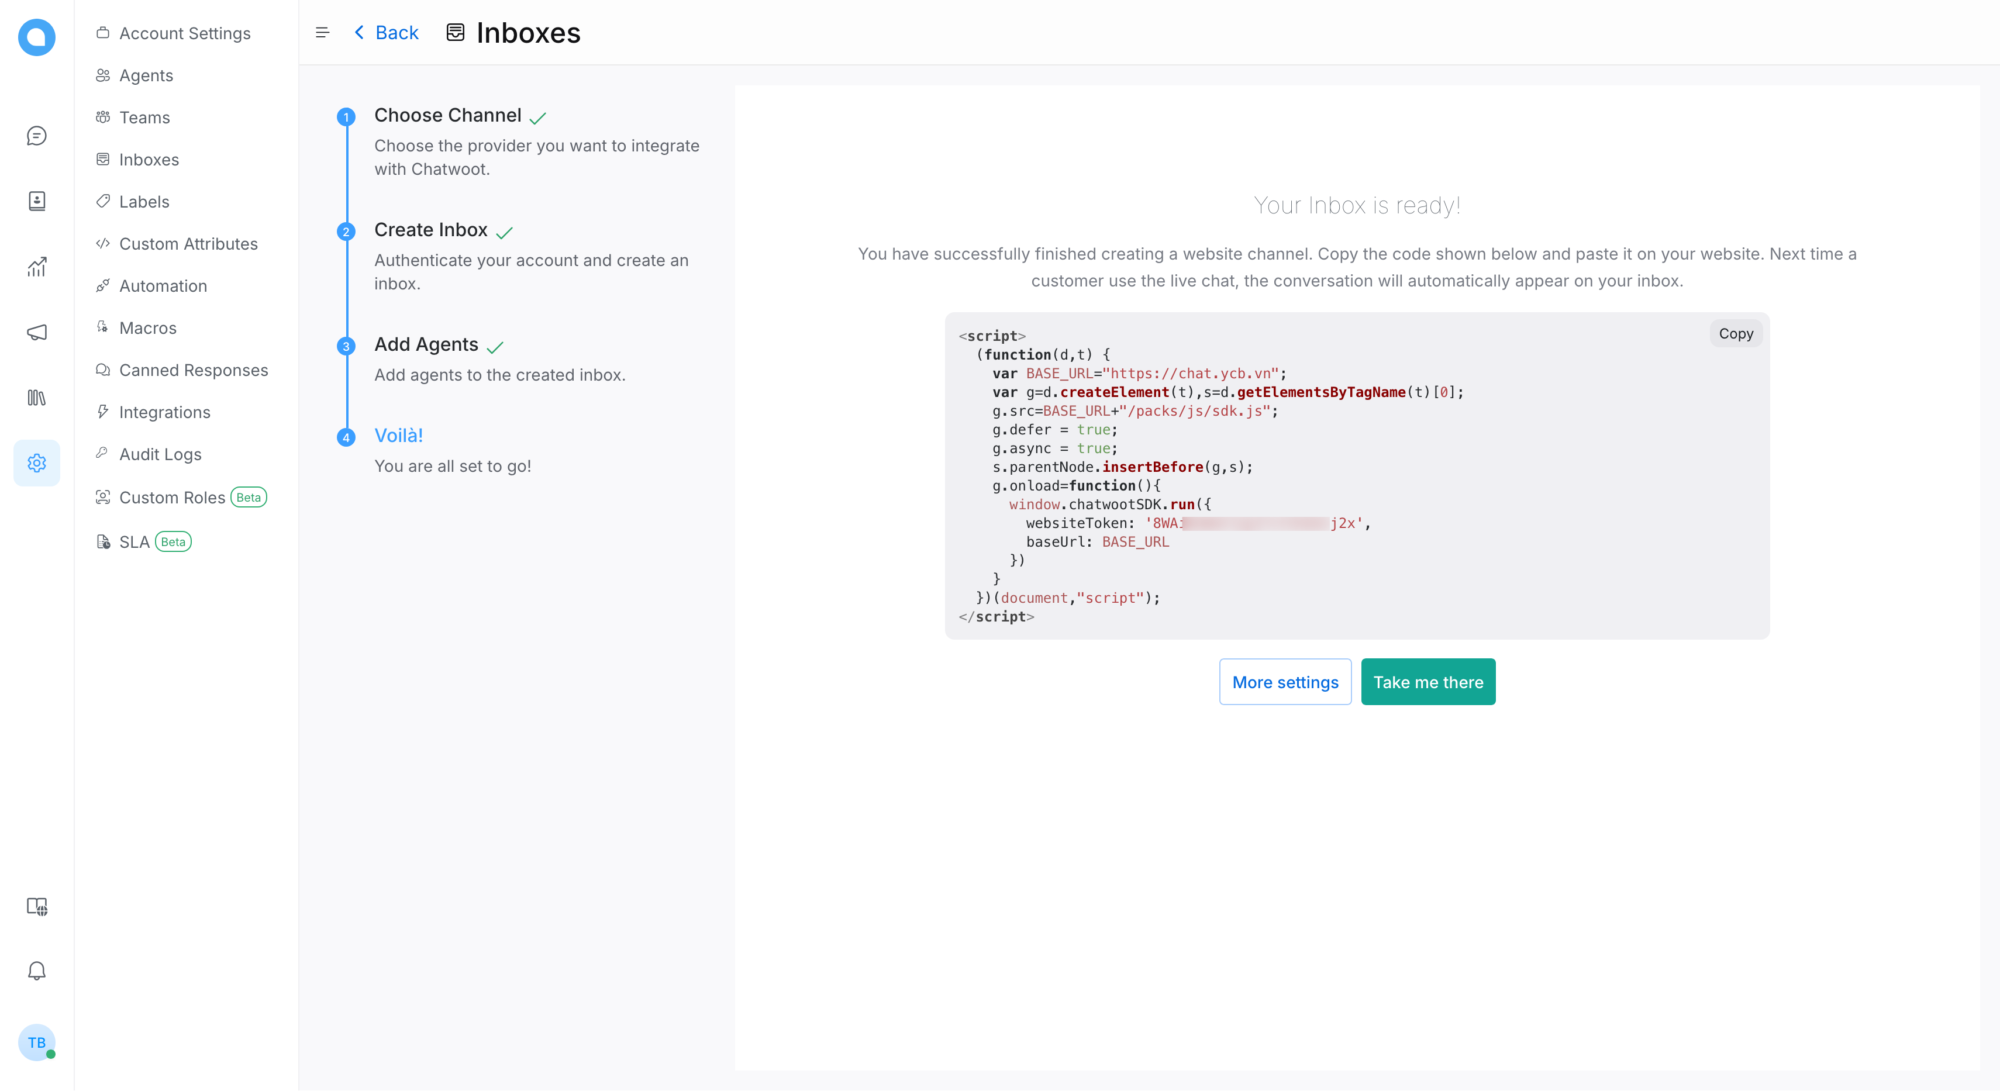
Sau khi hoàn tất, Chatwoot sẽ hiện ra một đoạn mã Javascript. Bạn cần chèn đoạn mã này vào phần <body> của website.
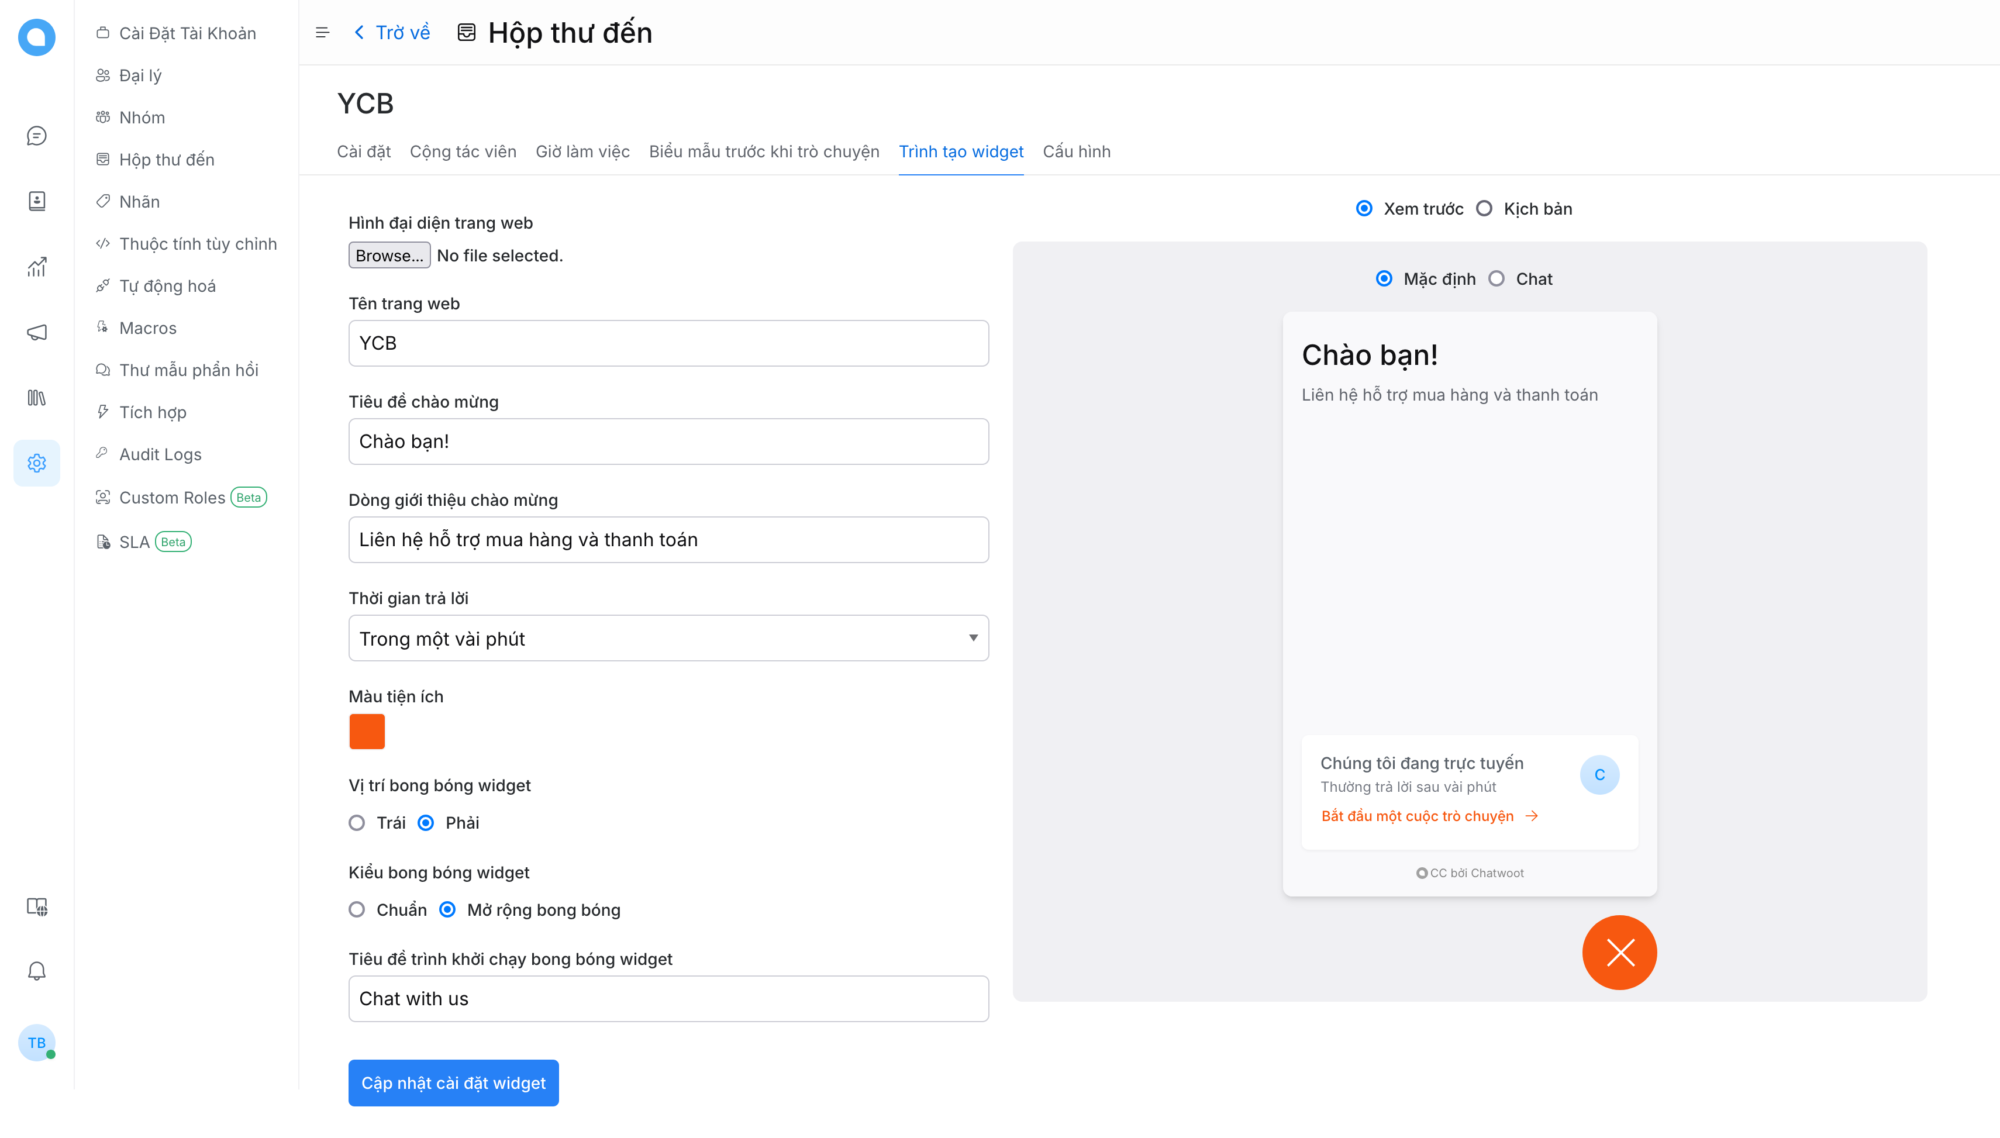
Sau khi tạo xong, bạn có thể truy cập lại kênh giao tiếp vừa tạo để cấu hình chuyên sâu hơn cho phù hợp với nhu cầu sử dụng.
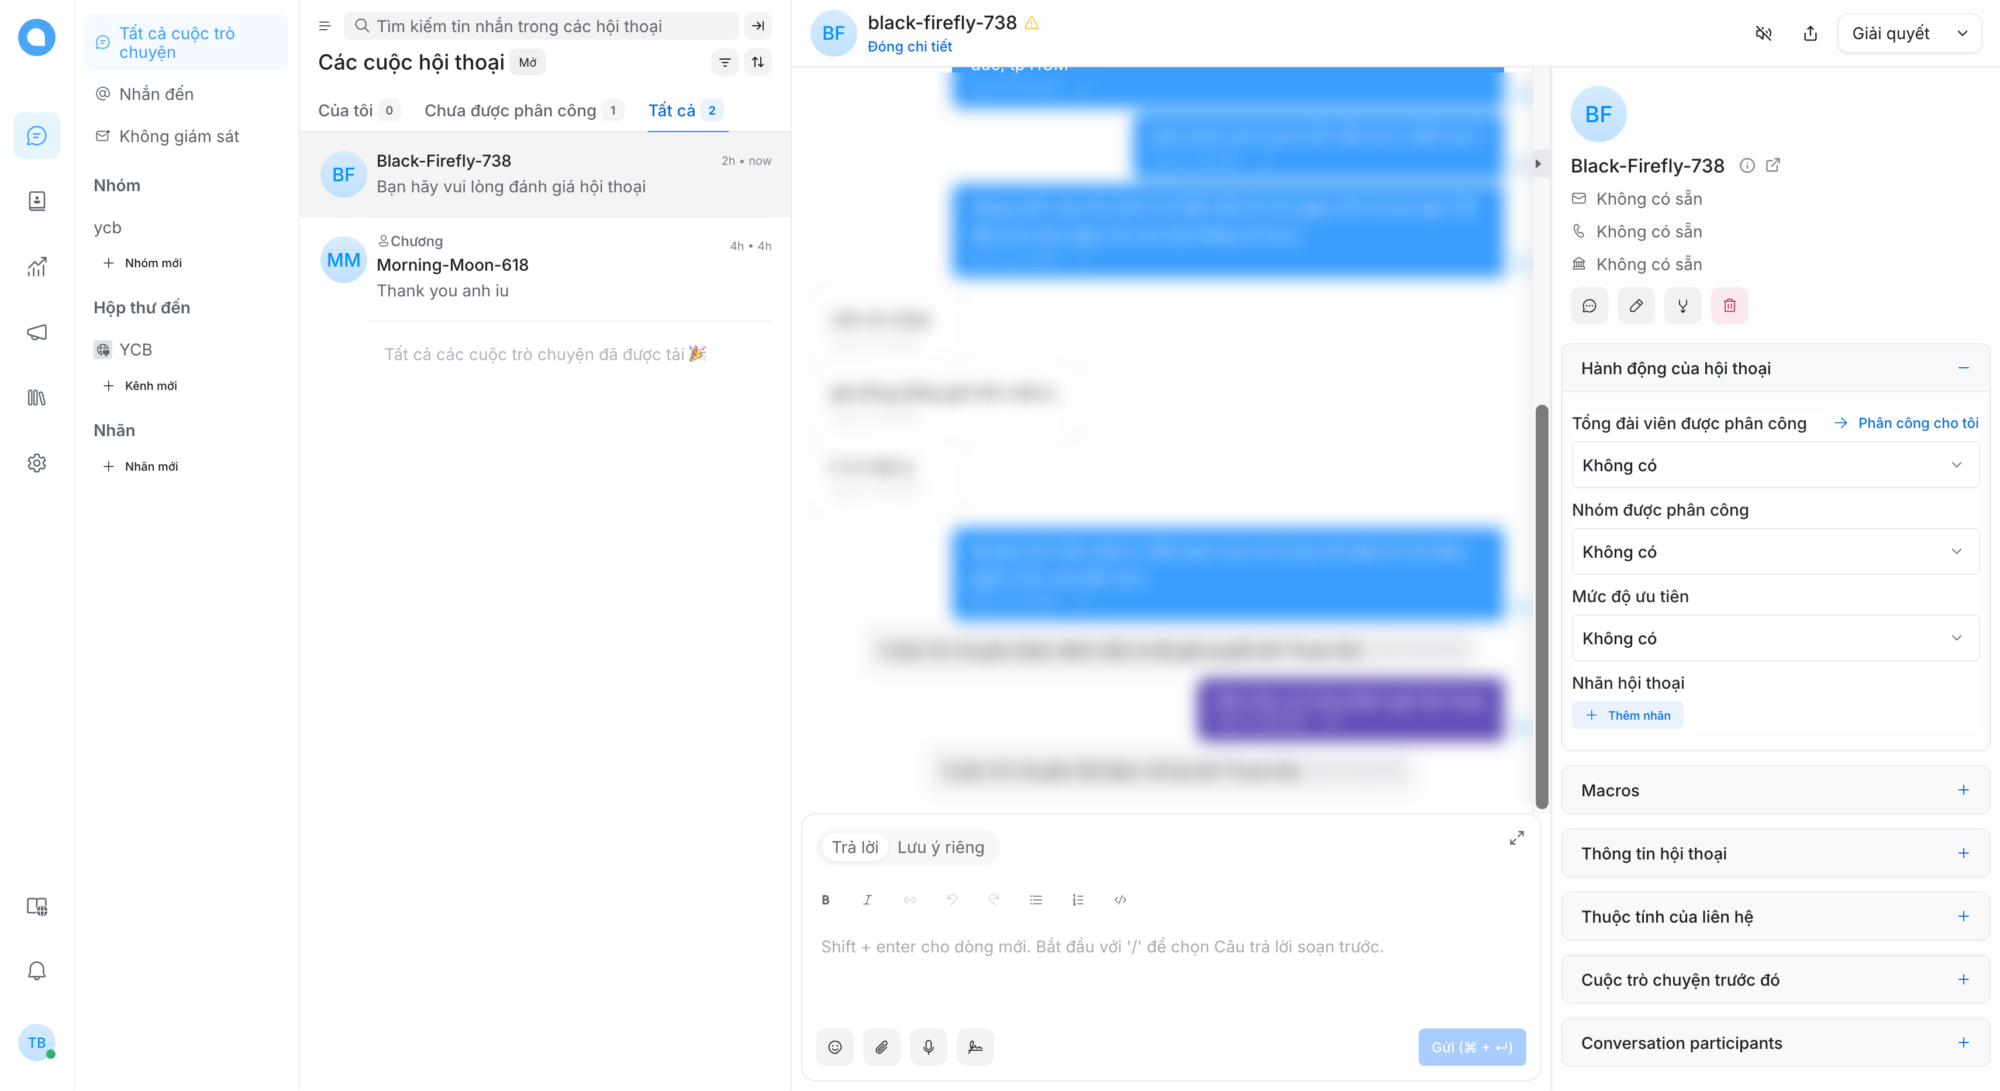
Khi khách hàng liên hệ qua mục live chat trên website, Chatwoot sẽ hiện ra hội thoại để nhân viên có thể hỗ trợ trực tiếp.
4. Cấu hình nâng cao
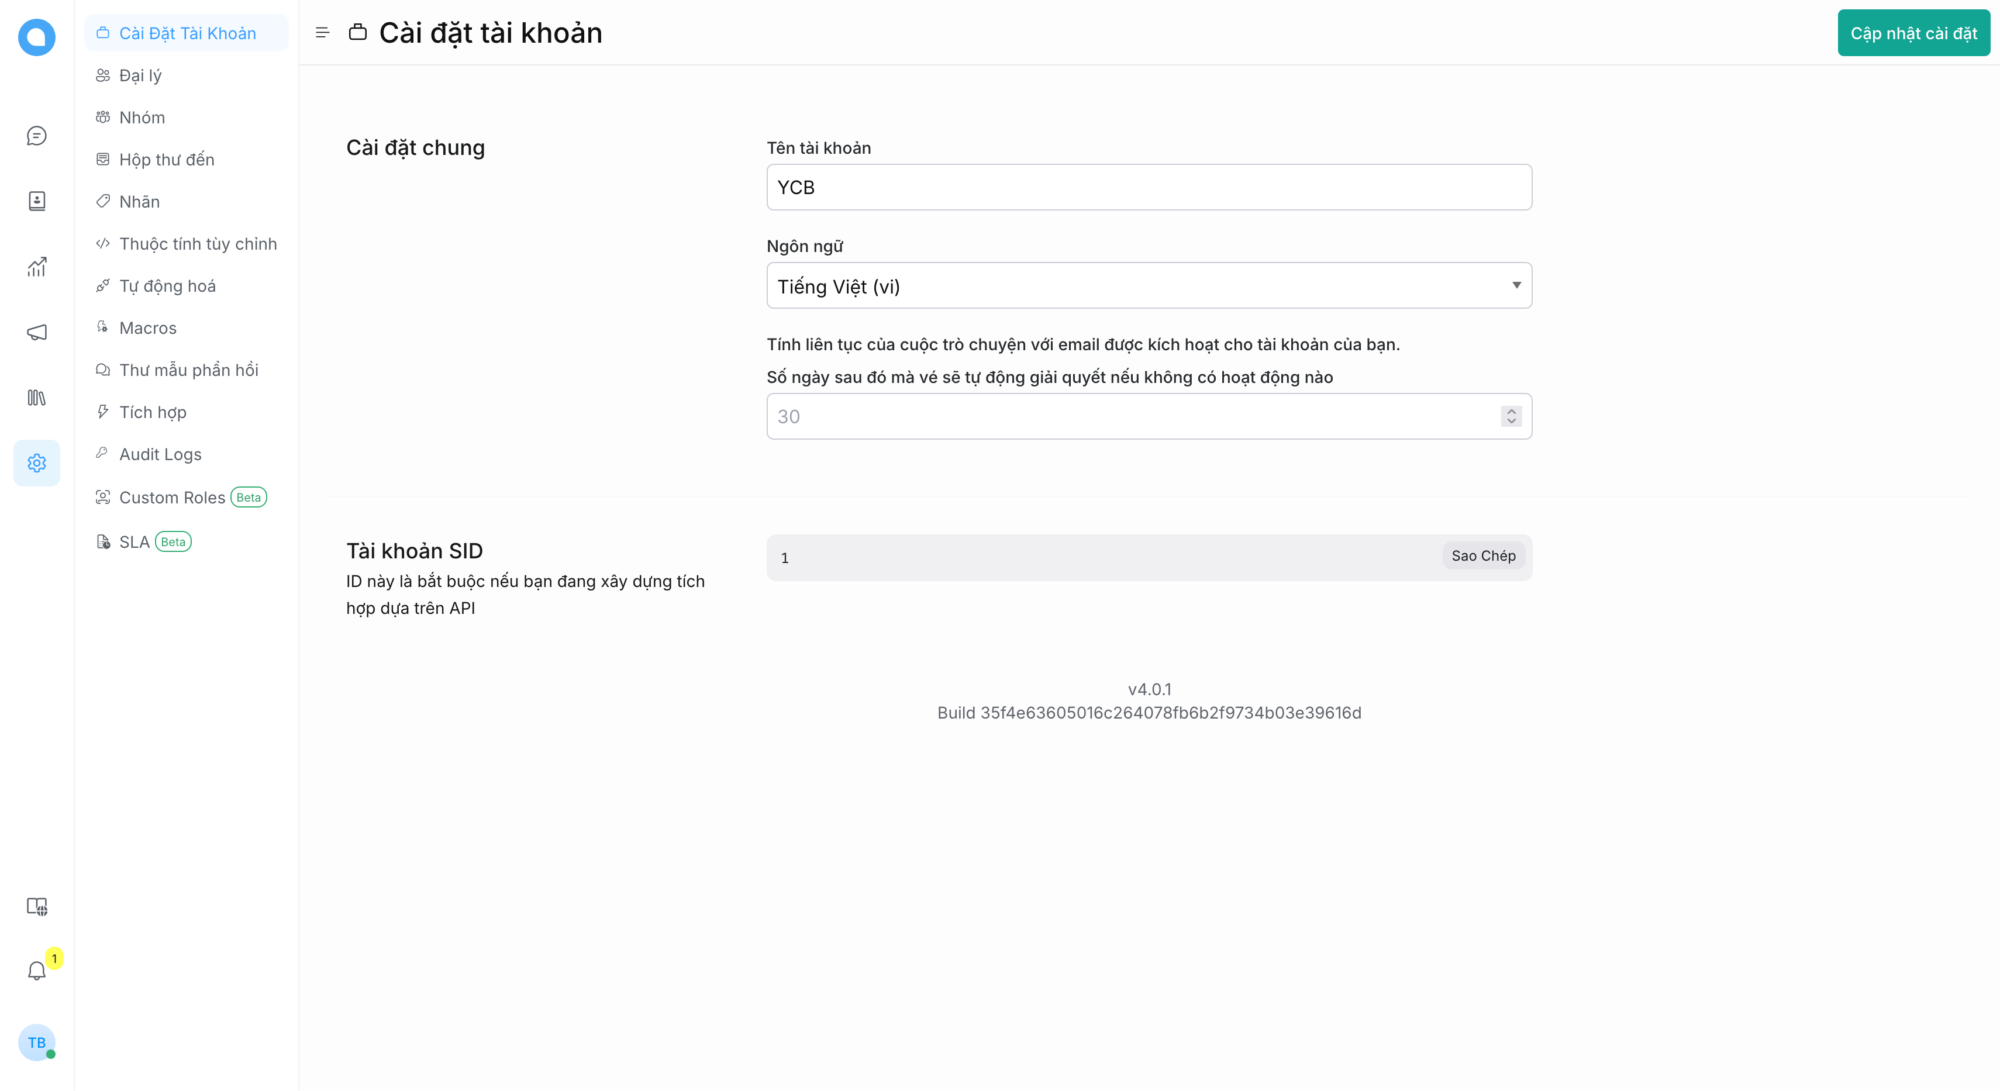
Bạn có thể truy cập vào phần Cài đặt chung để thay đổi ngôn ngữ của Chatwoot thành Tiếng Việt
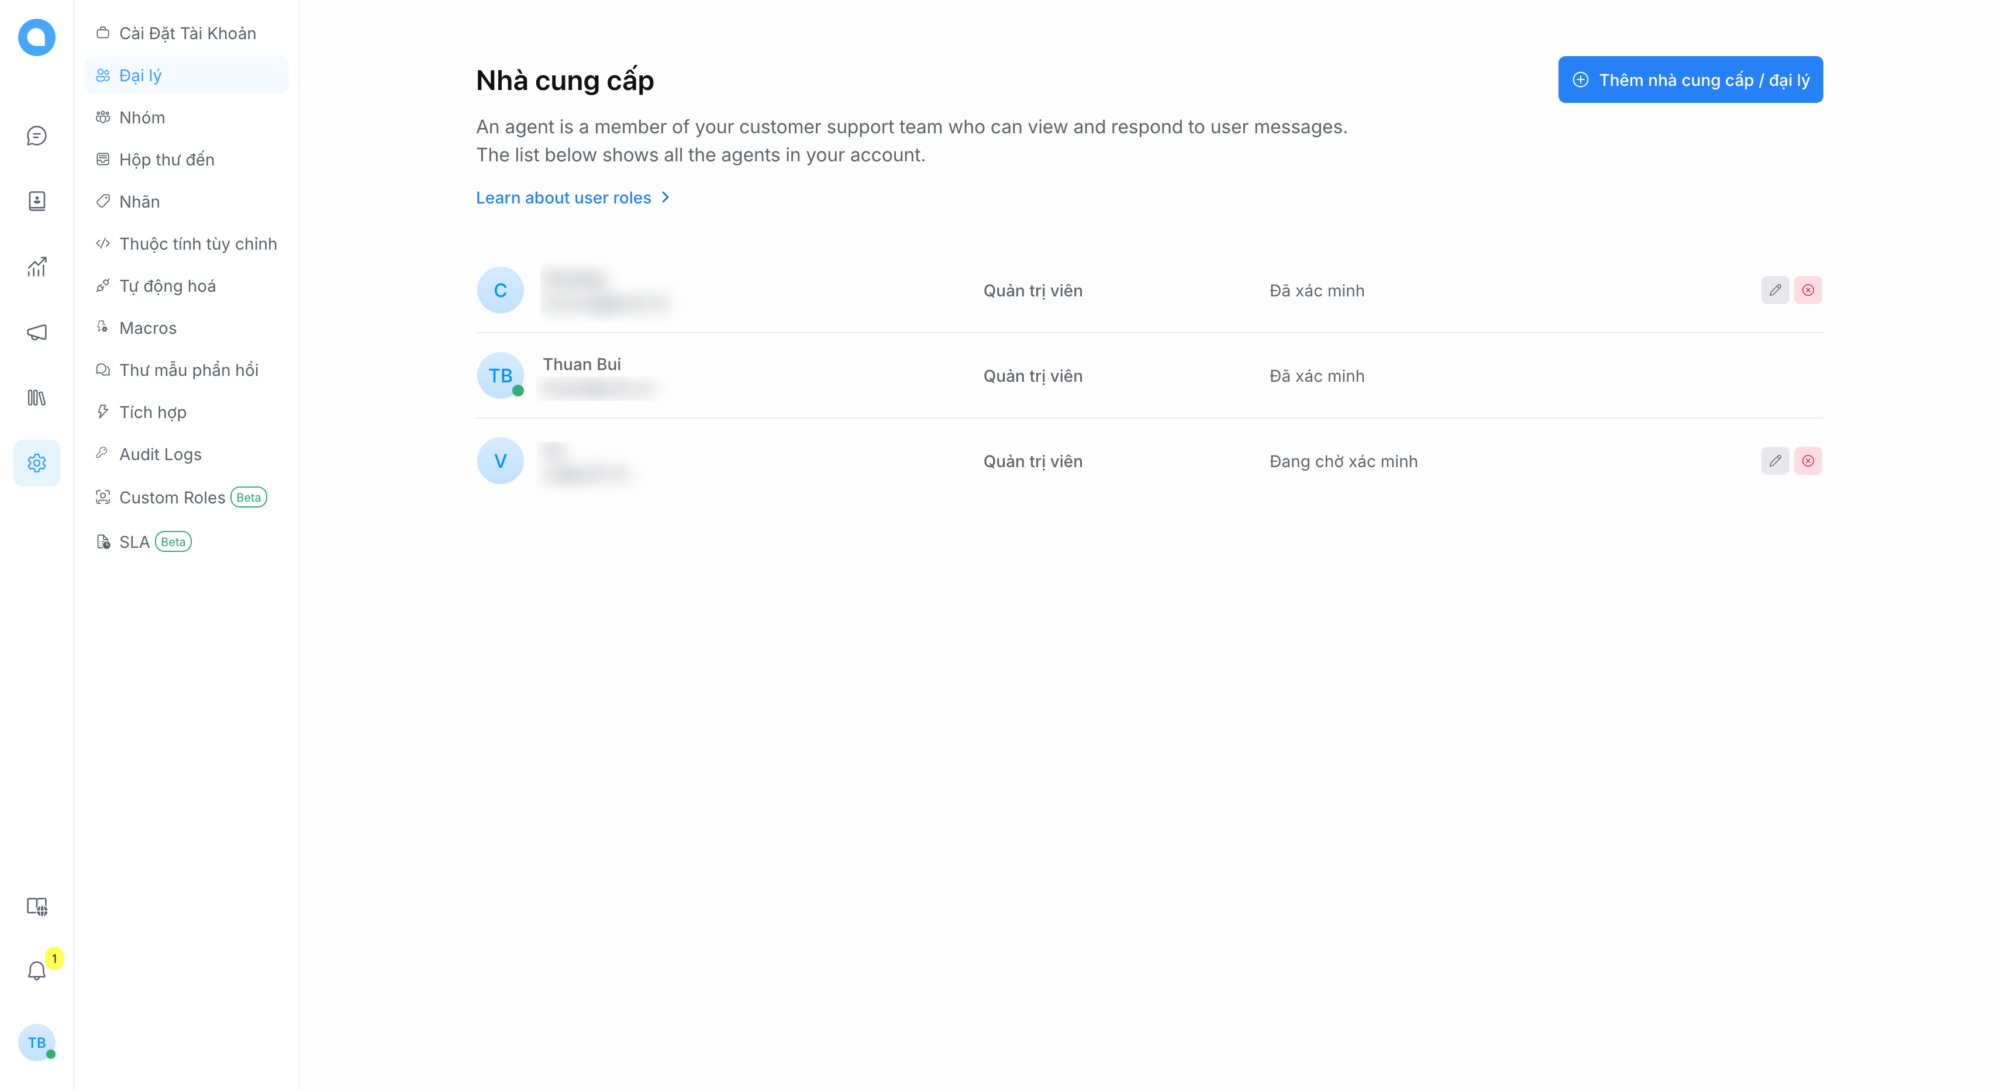
Truy cập vào phần Đại lý để tạo thêm tài khoản cho các nhân viên hỗ trợ khách hàng
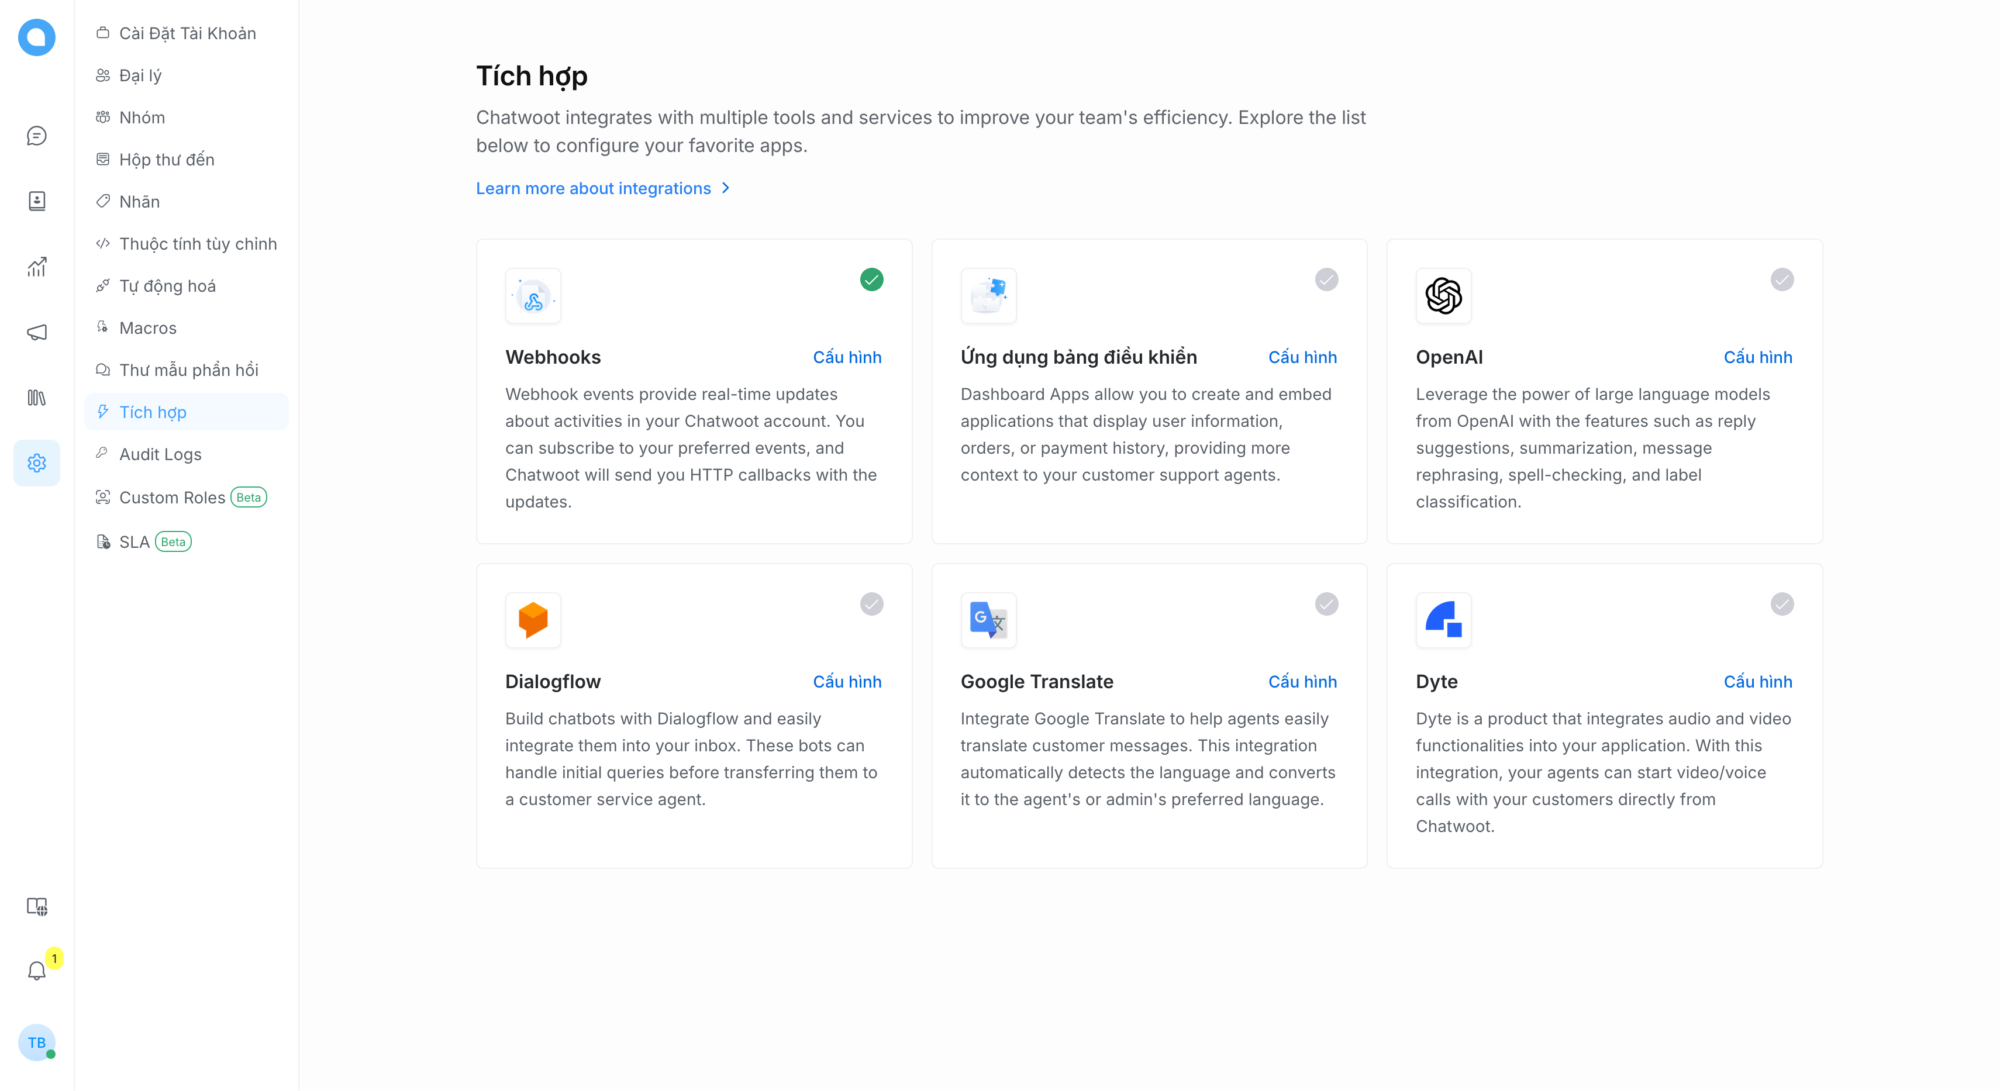
Truy cập vào phần Tích hợp để cấu hình kết nối với các ứng dụng bên ngoài như Webhooks, Google Translate, OpenAI,…
Và còn nhiều tính năng khác như Macros, Tự động hóa,…
Ngoài ra, Chatwoot còn có thêm ứng dụng trên cả iOS và Android, giúp bạn có thể phản hồi khách hàng mọi lúc mọi nơi.
5. Lời kết
Chatwoot là giải pháp tuyệt vời cho doanh nghiệp muốn nâng cao trải nghiệm khách hàng và tối ưu hóa quy trình giao tiếp.
Nếu bạn cần hỗ trợ cài đặt và cấu hình Chatwoot, hãy liên hệ với mình qua dịch vụ tư vấn để nhận được sự hỗ trợ chuyên nghiệp và nhanh chóng. Cùng xây dựng hệ thống giao tiếp hiệu quả cho doanh nghiệp của bạn ngay hôm nay!
