
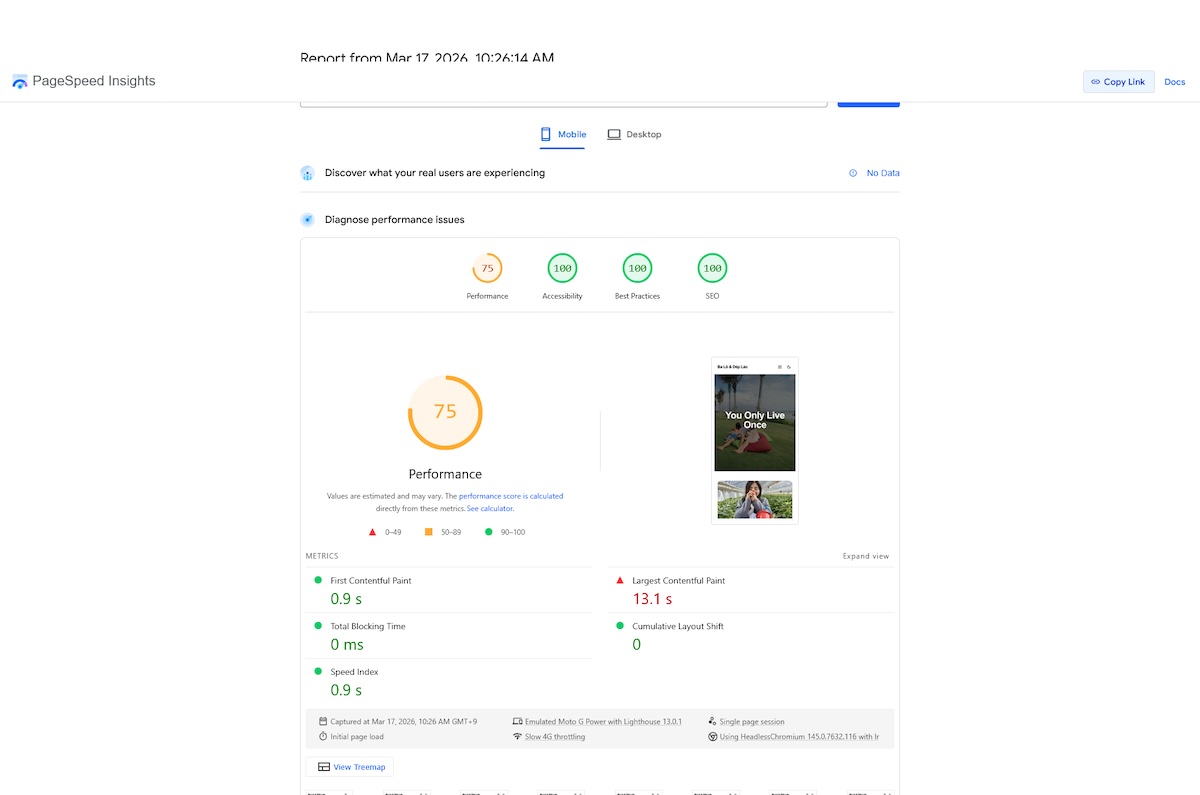
Sau khi chuyển blog BLDL từ WordPress sang Astro và chuyển toàn bộ hình ảnh lên Cloudflare R2 lưu trữ, mình có 3 vấn đề cần giải quyết với thiết lập hình ảnh hiện tại
- Các file Markdown lưu link hình ảnh dưới dạng full link CDN, ví dụ
https://images.balodeplao.com/images/image.jpg. Hiện tại thì không sao, nhưng nếu sau này cần đổi dịch vụ khác, bắt buộc phải cập nhật lại tất cả các file. Giải pháp tốt hơn là chuyển link ảnh trở lại thành relative path dạng/images/..., khi build sẽ tự động chuyển thành CDN URL. Sau này nếu có đổi CDN chỉ cần chỉnh sửa trong các file cấu hình, không cần chỉnh sửa file markdown. - Hình ảnh không có cache lâu dài, browser phải tải file nặng không cần thiết, ảnh hưởng đến tốc độ tải trang. Cần thiết lập header cache cho tất cả các file ảnh.
- Chưa hỗ trợ responsive image, browser luôn tải ảnh gốc kích thước lớn với mọi thiết bị, lãng phí băng thông hoàn toàn không cần thiết, nhất là khi truy cập bằng điện thoại. Cần hiển thị đúng kích thước theo từng viewport, đồng thời chuyển đổi hình ảnh sang WebP/AVIF để giảm dung lượng.
Bài viết này sẽ tổng hợp lại các mình tối ưu hình ảnh cho Astro blog, sử dụng Cloudflare Worker và Cloudflare Image Transformation, gồm 4 bước như sau:
- Cập nhập link hình ảnh về relative path – sử dụng command line
- Cài đặt remark plugin – tự động chuyển relative path thành CDN URL khi build
- Thiết lập Cloudflare Worker – thiết lập header cache, browser cache ảnh 1 năm
- Cài đặt rehype plugin — tự động tạo
<picture>với srcset responsive + WebP qua Cloudflare Image Transformations
Mục Lục
I. Cập nhập link hình ảnh về relative path
Tong bài viết [Phần 3] Upload ảnh lên Cloudflare R2, mình đã chia sẻ về 2 cách cập nhật markdown để sử dụng ảnh từ Cloudflare R2
- Cập nhật tất cả link ảnh trong file markdown thành link Cloudflare R2.
- Sử dụng remark plugin để tự động chuyển đổi link relative
, thànhkhi chạynpm run devhoặcnpm run build. Cách này không cần phải cập nhật file markdown.
Trước đó mình đã hướng dẫn sử dụng cách 1, các link ảnh đã được cập nhật thành link Cloudflare R2. Do đó, bây giờ cần phải chuyển ngược về lại relative path như cũ.
Chạy lệnh sau để xử lý toàn bộ file markdown lưu trong thư mục src/content:
# Kiểm tra những file nào cần xử lý
grep -r "images.balodeplao.com" ./src/content --include="*.md" -l

# Cập nhật link file
find ./src/content -name "*.md" | xargs perl -i -pe 's|https://images\.balodeplao\.com(/images/[^\")\s]+)|$1|g'Code language: Nginx (nginx)Sau bước này, tất cả các file Markdown sẽ được chuyển về sử dụng đường dẫn tương đối relative path /images/... thay vì sử dụng CDN URL.
II. Cài đặt remark plugin – tự động chuyển relative path thành CDN URL
Thay vì sử dụng CDN URL trong file Markdown, mình sẽ cài đặt remark plugin để Astro tự động xử lý khi chạy npm run dev hoặc npm run build. Muốn đổi CDN sau này chỉ cần sửa thông số trong file cấu hình.
1. Cài đặt thêm package unist-util-visit
npm install unist-util-visitCode language: Nginx (nginx)2. Tạo file config R2
Tạo file src/config/r2.mjs để khai báo địa chỉ CDN
export const R2_BASE = 'https://images.balodeplao.com';Code language: JavaScript (javascript)3. Tạo file remark plugin
Tạo thêm file src/plugins/remark-r2-images.mjs:
import { visit } from 'unist-util-visit';
import { R2_BASE } from '../config/r2.mjs';
export function remarkR2Images() {
return (tree) => {
// Xử lý ảnh dạng Markdown: 
visit(tree, 'image', (node) => {
if (node.url.startsWith('/images/')) {
node.url = `${R2_BASE}${node.url}`;
}
});
// Xử lý ảnh dạng HTML inline trong Markdown: <img src="..." />
visit(tree, 'html', (node) => {
node.value = node.value.replace(
/src="(\/images\/[^"]+)"/g,
`src="${R2_BASE}$1"`
);
});
};
}Code language: TypeScript (typescript)4. Tạo utility cho frontmatter
Ảnh cover trong frontmatter (field coverImage) cần phải được xử lý riêng vì không đi qua phần xử lý Markdown của Astro. Tạo file src/utils/r2.ts:
import { R2_BASE } from '@/config/r2.mjs';

export function toR2Url(path?: string): string | undefined {
  if (!path) return undefined;
  if (path.startsWith('http')) return path;
  return `${R2_BASE}${path}`;
}Code language: TypeScript (typescript)5. Cấu hình plugin cho Astro
Cập nhật astro.config.mjs:
import { defineConfig } from 'astro/config';
import { remarkR2Images } from './src/plugins/remark-r2-images.mjs';

export default defineConfig({
  site: 'https://balodeplao.com',
  markdown: {
    remarkPlugins: [remarkR2Images],
  },
});
Code language: TypeScript (typescript)6. Cập nhật component
Cập nhật src/pages/[...slug].astro để xử lý cover image từ frontmatter:
// Thêm vào phần import
import { toR2Url } from "@/utils/r2";

// Thêm vào phần const
const coverImage = toR2Url(image);

// Cập nhật metadata
const metadata = {
  title: title,
  description: description,
  ogImage: coverImage,
};

// Hiển thị cover image
{coverImage && (
  <div class="reveal relative mb-8 h-96 w-full overflow-hidden rounded-xl shadow-lg">
    <img
      src={coverImage}
      alt={title}
      class="h-full w-full object-cover"
    />
  </div>
)}Code language: JavaScript (javascript)Cập nhật tương tự cho src/components/blog/PostItem.astro:
// Thêm vào phần import
import { toR2Url } from "@/utils/r2";

// Thêm vào phần const
const coverImage = toR2Url(post.data.image);

// Hiển thị cover image
<div class="relative h-48 w-full overflow-hidden">
  {coverImage && (
    <img
      src={coverImage}
      alt={post.data.title}
      class="h-full w-full object-cover transition-transform duration-300 group-hover:scale-105"
    />
  )}
</div>Code language: JavaScript (javascript)Từ lúc này, mọi relative path /images/... trong Markdown và frontmatter sẽ tự động được chuyển thành full CDN URL khi build.
III. Thiết lập Cloudflare Worker set cache headers
Mặc định, hình ảnh tải từ Cloudflare R2 không được thiết lập Cache-Control lâu dài. Mình sẽ tạo thêm một Worker mới để set cache headers cho hình ảnh.
1. Tạo Worker mới
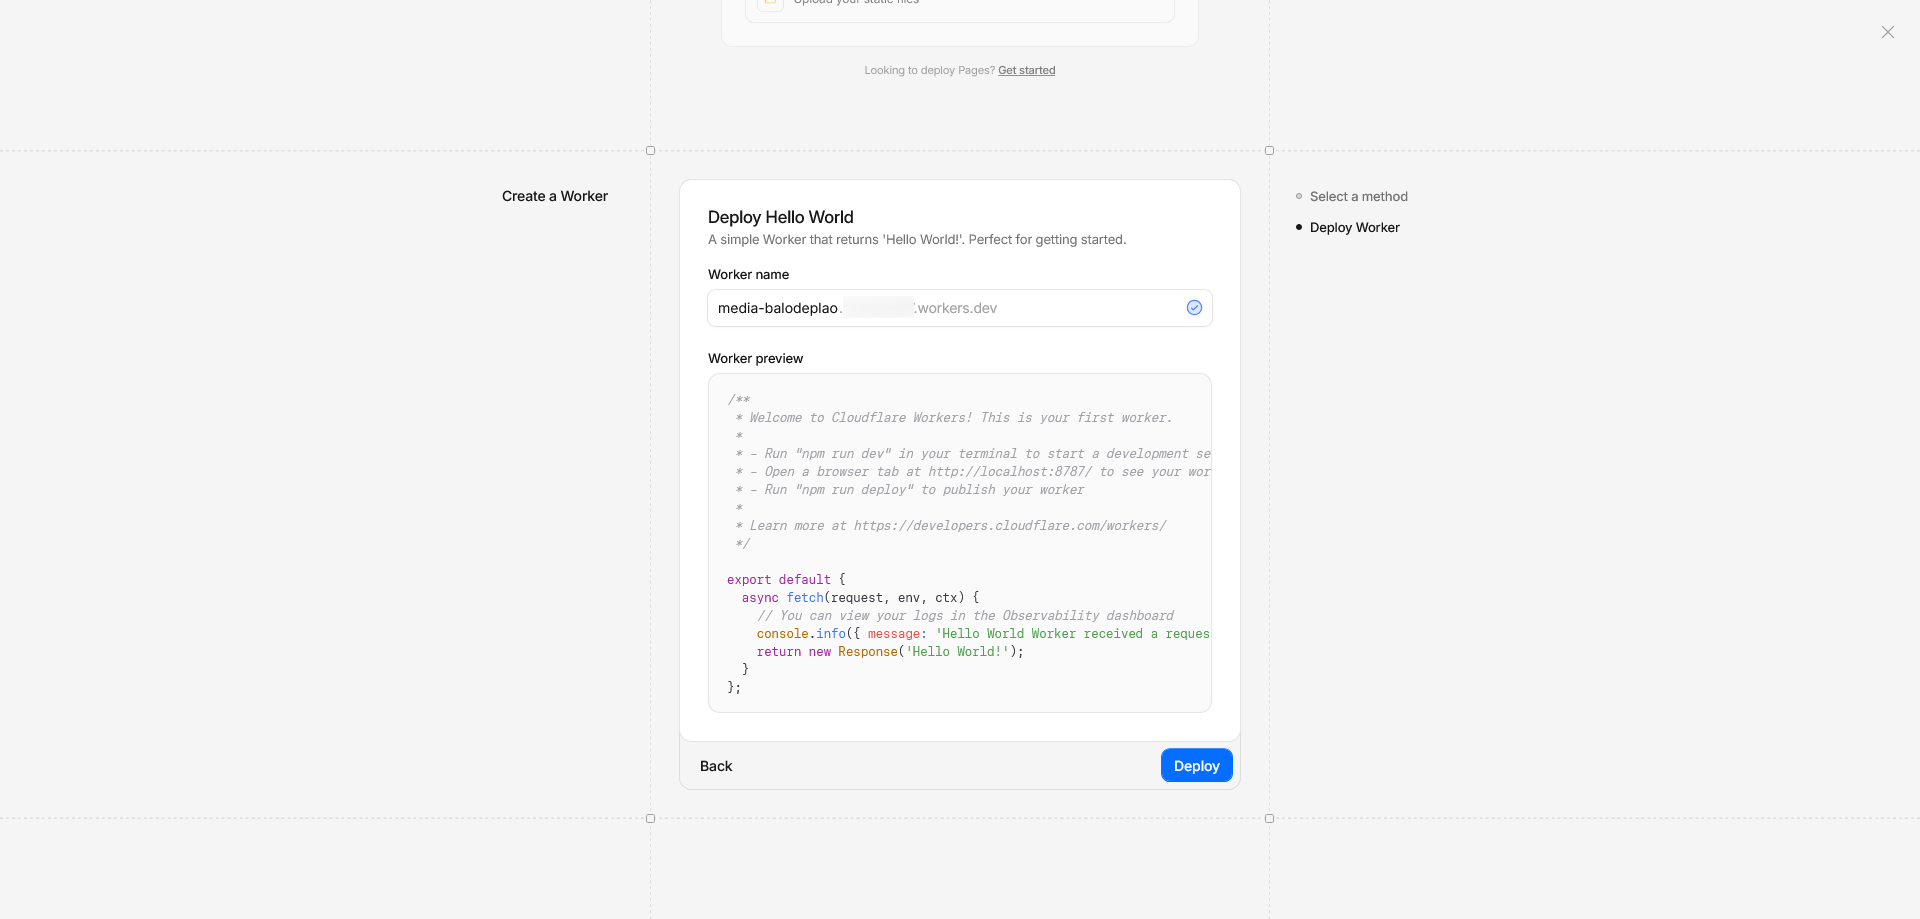
Vào Cloudflare Dashboard → Workers & Pages → Create Application → Start with Hello world! → Đặt tên cho Worker name và bấm Deploy
2. Chỉnh sửa code
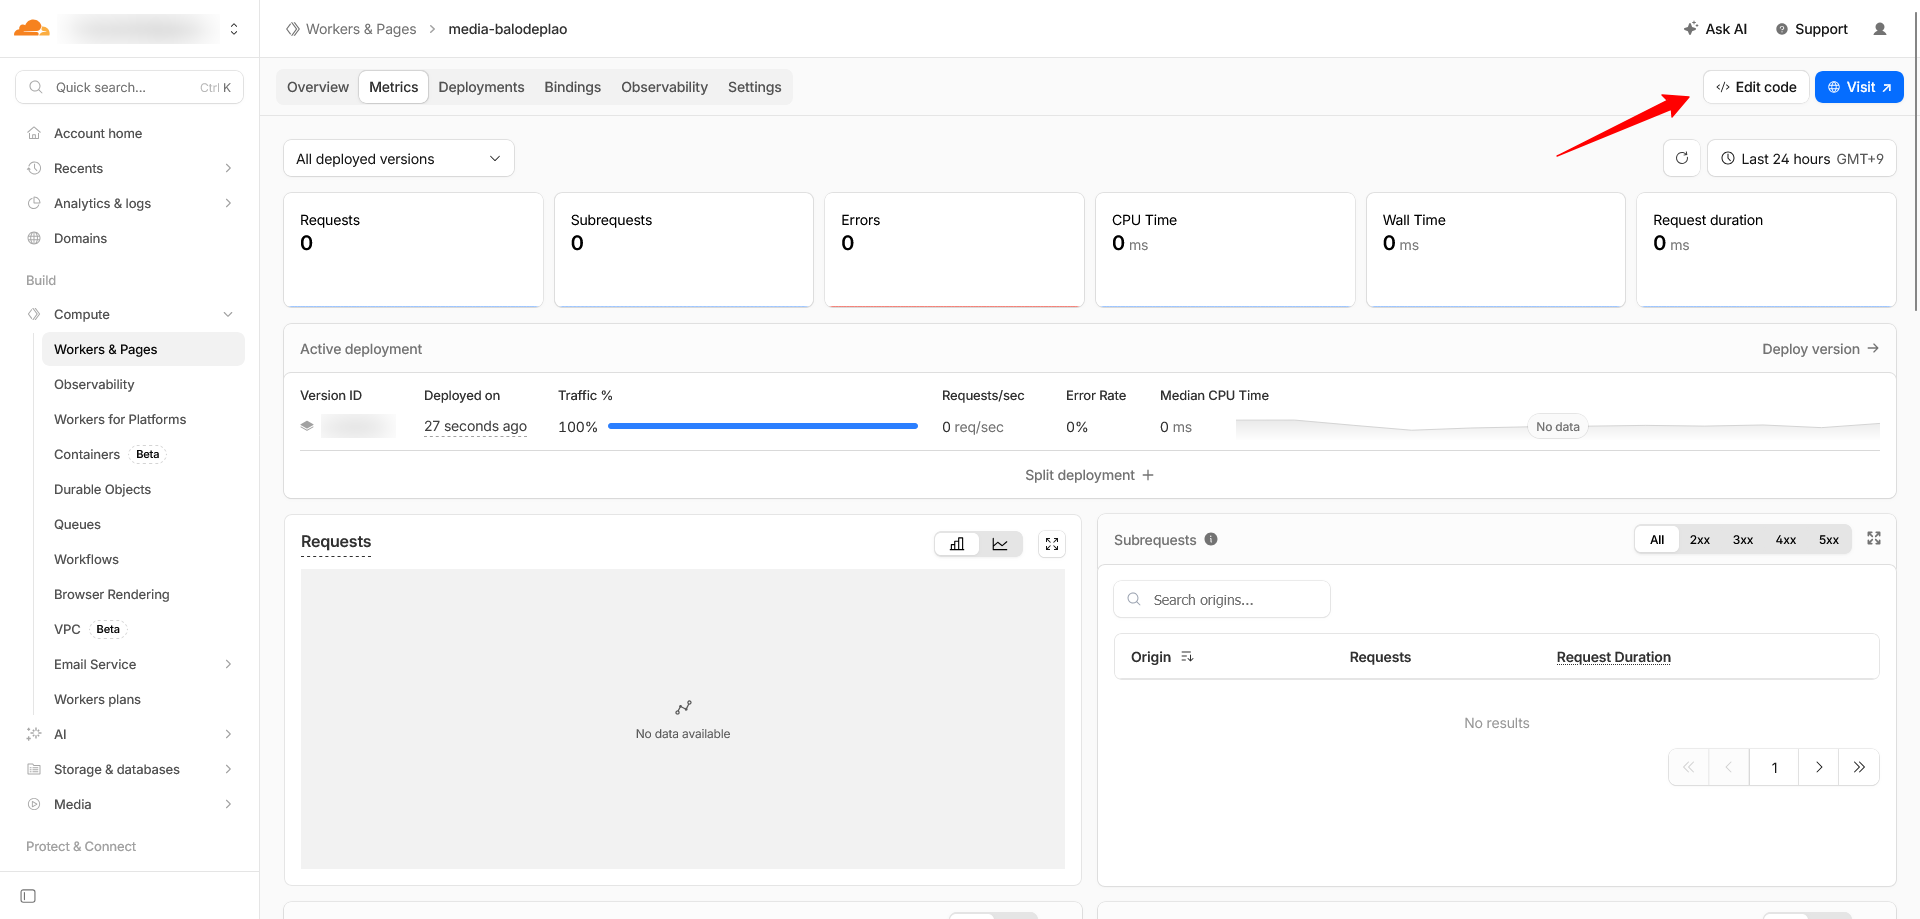
Xóa code mặc định và nhập vào nội dung bên dưới. Sau đó bấm Deploy
export default {
  async fetch(request) {
    const response = await fetch(request);

    if (!response.ok) return response;

    const url = new URL(request.url);
    const isImage = /\.(webp|jpe?g|png|gif|svg|avif)$/i.test(url.pathname);

    if (!isImage) return response;

    const headers = new Headers(response.headers);

    // Cache 1 năm tại browser + Cloudflare edge
    headers.set('Cache-Control', 'public, max-age=31536000, immutable');

    // Để Cloudflare cache riêng từng biến thể transform
    headers.set('Vary', 'Accept');

    return new Response(response.body, {
      status: response.status,
      headers,
    });
  },
};Code language: JavaScript (javascript)
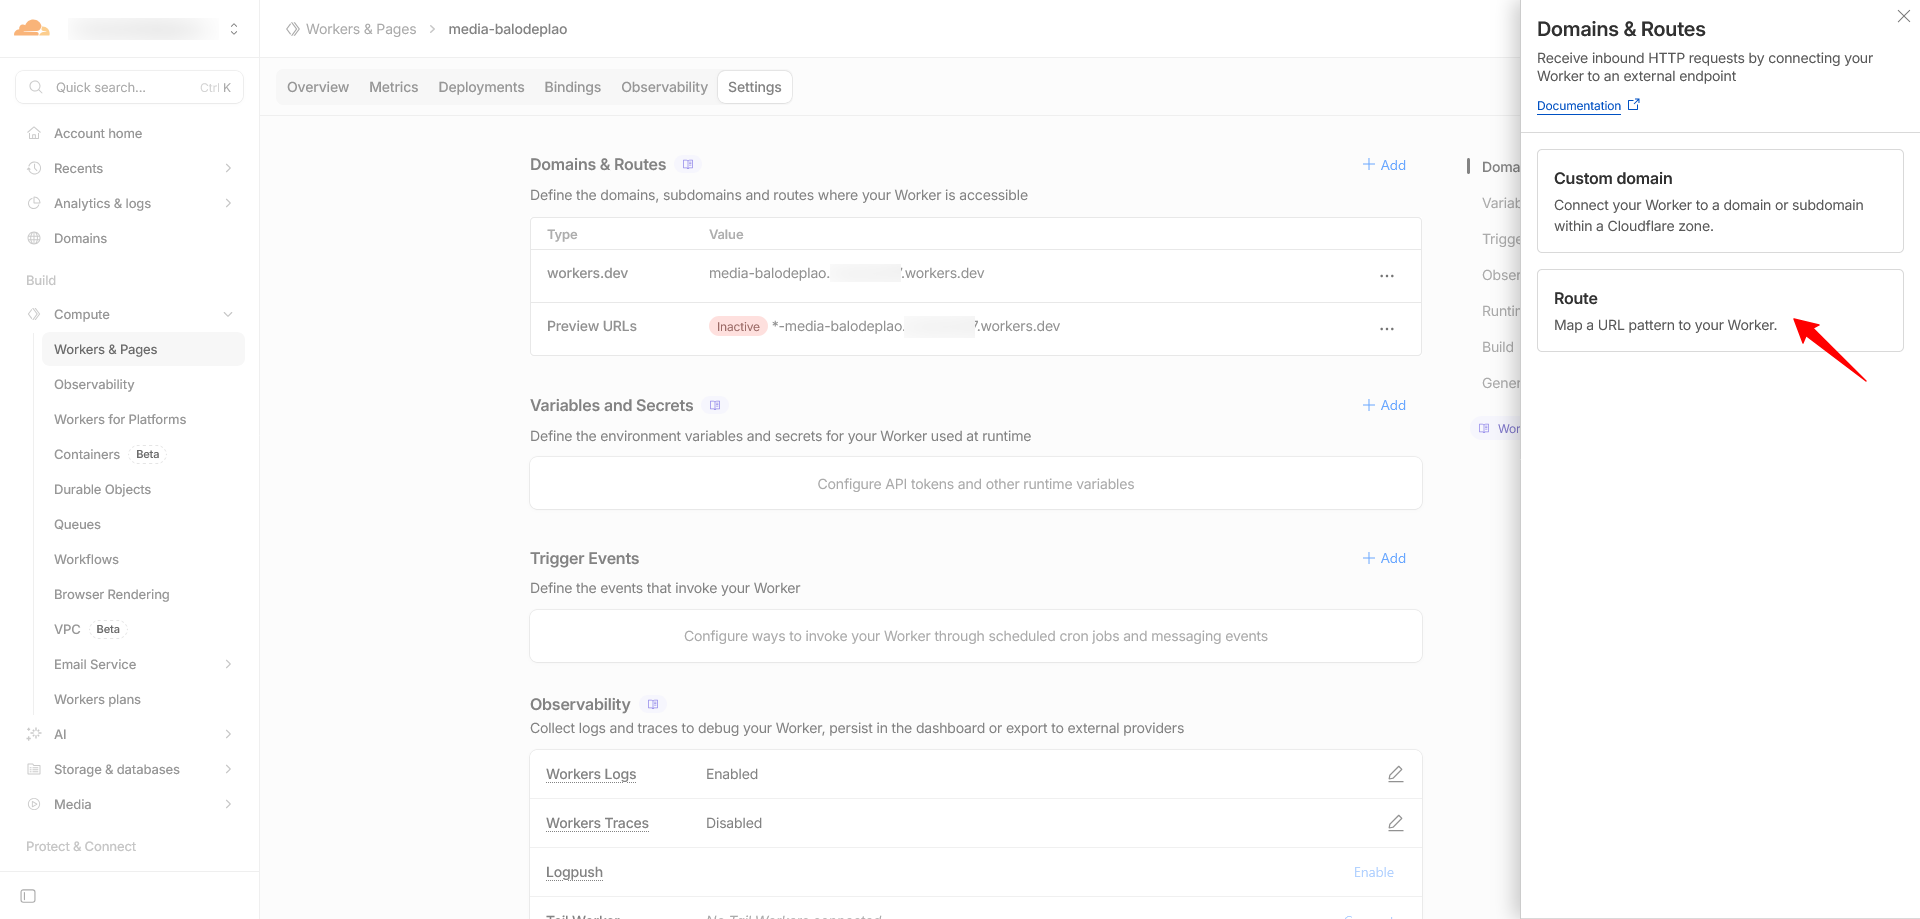
3. Cấu hình route
Vào phần Settings của Worker vừa tạo, bấm Add ở mục Domains and Routes, chọn Zone và nhập vào địa chỉ của Cloudflare R2 vào phần Route: ví dụ image.balodeplao.com/images/*, bấm Add Route
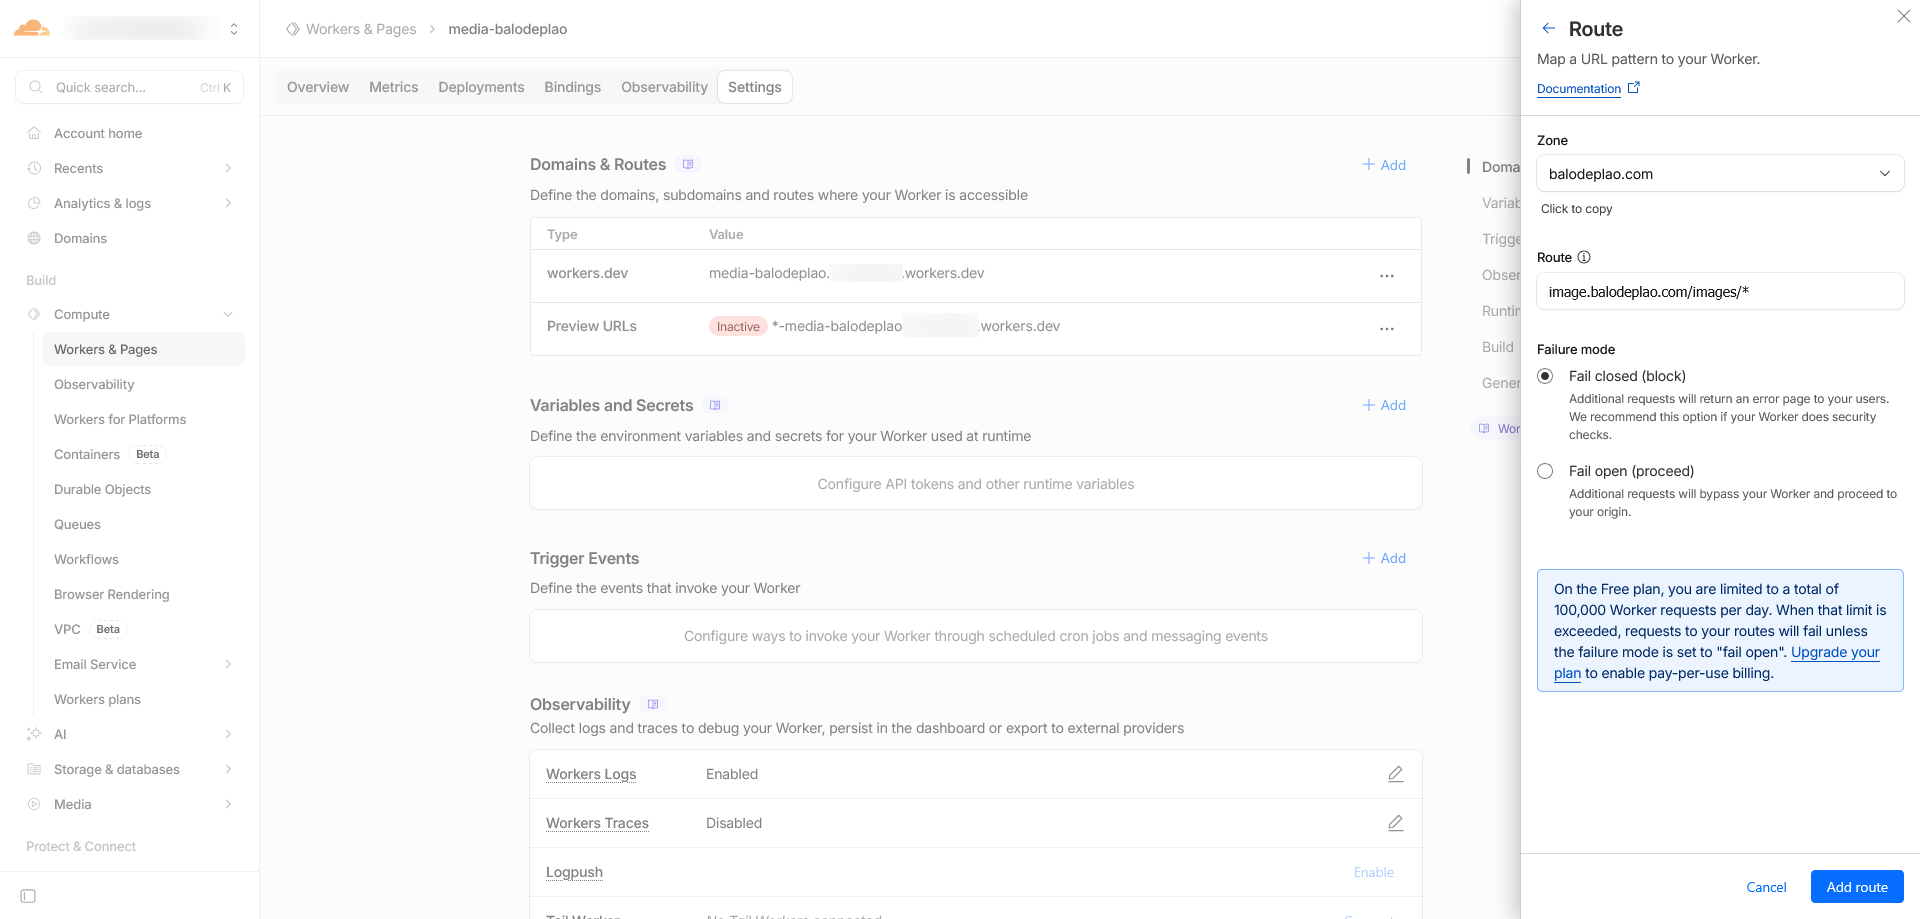
Với thiết lập này, khi trình duyệt tải ảnh từ địa chỉ image.balodeplao.com, worker sẽ tự động thiết lập header cache cho nó, lưu trữ trong vòng 1 năm.
Sau khi hoàn thành bước 3 này, mình đã giải quyết được 2 vấn đề nêu ở đầu bài. Còn vấn đề 3: responsive image, trên thực tế có thể bỏ qua vì nó không ảnh hưởng đáng kể. Nhưng đã tiện tay tối ưu rồi thì nên làm luôn cho tới.
IV. Cài đặt rehype plugin
Đây là bước cuối để tối ưu hình ảnh cho Astro blog. Mình sẽ cài đặt rehype plugin – xử lý file Markdown sau khi đã render thành HTML bằng cach tìmm tất cả các tag <img> và chuyển đổi thành <picture> với thông số lazy load.
Có 2 cách để thiết lập rehype plugin
Cách 1: Tự tạo và upload file webp
Cách này sẽ hiển thị webp thay cho jpg/png bằng cách chuyển hướng đến file .webp đã upload sẵn trên R2. Phù hợp nếu không muốn sử dụng dịch vụ của bên thứ ba. Tuy nhiên, cần thực hiện bước chuyển đổi tất cả file ảnh từ jpg/png qua webp và upload R2 trước (dùng cwebp + rclone).
Tạo file src/plugins/rehype-picture-webp.mjs:
import { visit } from 'unist-util-visit';
import { R2_BASE } from '../config/r2.mjs';

export function rehypePictureWebp() {
  return (tree) => {
    visit(tree, 'element', (node, index, parent) => {
      if (node.tagName !== 'img') return;
      if (!parent || index == null) return;

      const src = node.properties?.src || '';

      if (!src.startsWith(R2_BASE)) return;
      if (!/\.(jpe?g|png)$/i.test(src)) return;

      const webpSrc = src.replace(/\.(jpe?g|png)$/i, '.webp');

      parent.children[index] = {
        type: 'element',
        tagName: 'picture',
        properties: {},
        children: [
          {
            type: 'element',
            tagName: 'source',
            properties: { type: 'image/webp', srcSet: webpSrc },
            children: [],
          },
          {
            ...node,
            properties: {
              ...node.properties,
              loading: 'lazy',
              decoding: 'async',
            },
          },
        ],
      };
    });
  };
}
Code language: JavaScript (javascript)Với thiết lập này, sau khi build, các html tag <img> sẽ tự động chuyển đổi thành dạng <picture>
<picture>
  <source type="image/webp" srcset="https://image.balodeplao.com/images/.../photo.webp" />
  <img src="https://image.balodeplao.com/images/.../photo.jpg" loading="lazy" decoding="async" alt="..." />
</picture>
Code language: HTML, XML (xml)Các file webp sẽ được trình duyệt ưu tiên hiển thị. Nếu trình duyệt không hỗ trợ webp, nó sẽ tự động tải file jpg.
Cách 2: Sử dụng Cloudflare Image Transformations
Cách này sẽ sử dụng dịch vụ của Cloudflare để xử lý resize và convert WebP/AVIF on-the-fly thông qua tính năng Transform via URL. Không cần tạo và upload file WebP thủ công.
Trước tiên cần kích hoạt tính năng Image Resizing trong Dashboard: Truy cập vào phần Images → Transformation → Chọn tên miền → Enable for Zone
Tạo file src/plugins/rehype-picture-webp.mjs:
import { visit } from 'unist-util-visit';
import { R2_BASE } from '../config/r2.mjs';

const WIDTHS = [480, 800, 1200];
const SIZES = '(max-width: 640px) 100vw, (max-width: 1024px) 80vw, 1200px';

function buildTransformUrl(src, width) {
  const path = src.replace(R2_BASE, '');
  return `${R2_BASE}/cdn-cgi/image/width=${width},format=auto,onerror=redirect${path}`;
}

export function rehypePictureWebp() {
  return (tree) => {
    visit(tree, 'element', (node, index, parent) => {
      if (node.tagName !== 'img') return;
      if (!parent || index == null) return;

      const src = node.properties?.src || '';

      if (!src.startsWith(R2_BASE)) return;

      const srcset = WIDTHS
        .map(w => `${buildTransformUrl(src, w)} ${w}w`)
        .join(', ');

      const defaultSrc = buildTransformUrl(src, 800);

      parent.children[index] = {
        type: 'element',
        tagName: 'picture',
        properties: {},
        children: [
          {
            type: 'element',
            tagName: 'source',
            properties: {
              type: 'image/webp',
              srcSet: srcset,
              sizes: SIZES,
            },
            children: [],
          },
          {
            ...node,
            properties: {
              ...node.properties,
              src: defaultSrc,
              srcSet: srcset,
              sizes: SIZES,
              loading: 'lazy',
              decoding: 'async',
            },
          },
        ],
      };
    });
  };
}
Code language: JavaScript (javascript)Với cấu hình này, output cho hình ảnh sẽ có dạng như sau
<picture>
  <source
    type="image/webp"
    srcset="
      https://image.balodeplao.com/cdn-cgi/image/width=480,format=auto,onerror=redirect/images/photo.jpg 480w,
      https://image.balodeplao.com/cdn-cgi/image/width=800,format=auto,onerror=redirect/images/photo.jpg 800w,
      https://image.balodeplao.com/cdn-cgi/image/width=1200,format=auto,onerror=redirect/images/photo.jpg 1200w
    "
    sizes="(max-width: 640px) 100vw, (max-width: 1024px) 80vw, 1200px"
  />
  <img
    src="https://image.balodeplao.com/cdn-cgi/image/width=800,format=auto,onerror=redirect/images/photo.jpg"
    loading="lazy"
    decoding="async"
    alt="..."
  />
</picture>
Code language: HTML, XML (xml)Tham số trong phần srcset
width=800– resize về kích thước 800pxformat=auto– tự chọn WebP hoặc AVIF tùy browseronerror=redirect– nếu vượt giới hạn miễn phí (5,000 transforms/tháng), tự chuyển về ảnh gốc
Browser tự chọn đúng kích thước theo viewport, Cloudflare tự convert sang WebP/AVIF. Nếu vượt hạn mức miễn phí, thông số onerror=redirect sẽ tự động chuyển về dùng ảnh gốc.
Cập nhật cấu hình Astro
Cập nhật lại file astro.config.mjs, bổ sung khai báo cho rehypePlugins
import { defineConfig } from 'astro/config';
import { remarkR2Images } from './src/plugins/remark-r2-images.mjs';
import { rehypePictureWebp } from './src/plugins/rehype-picture-webp.mjs';

export default defineConfig({
  site: 'https://balodeplao.com',
  markdown: {
    remarkPlugins: [remarkR2Images],
    rehypePlugins: [rehypePictureWebp],
  },
});

Code language: TypeScript (typescript)Sau đó push commit lên Github để Cloudflare tạo lại bản mới cho blog.
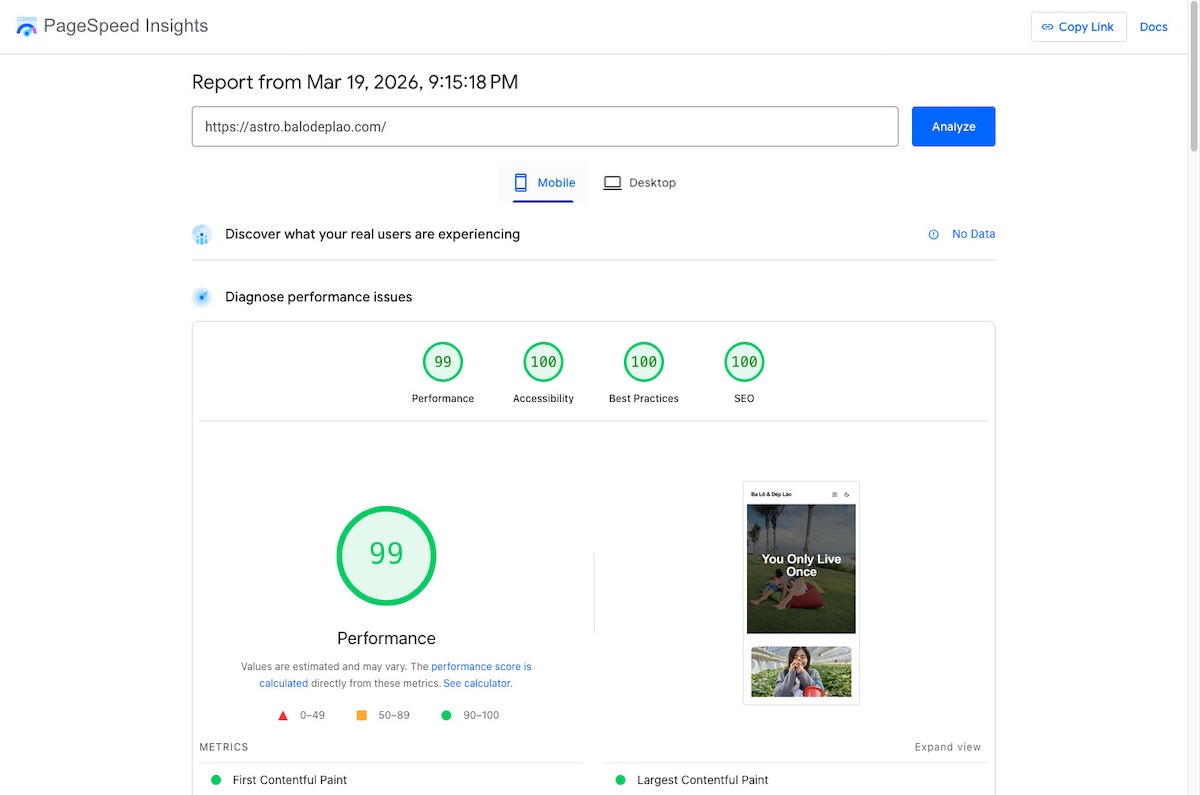
V. Kết quả
Sau khi hoàn thành, toàn bộ hệ thống xử lý ảnh sẽ hoạt động hoàn toàn tự động:
- Khi Cloudflare build: Relative path
/images/...trong file markdown sẽ tự chuyển thành CDN URL - Lần truy cập đầu tiên: Cloudflare sẽ xử lý ảnh → resize + convert WebP/AVIF → lưu cache tại edge
- Lần truy cập thứ hai trở đi: Ảnh được lấy từ edge cache – không cần xử lý lại, không tốn quota.
- Nếu số lượng xử lý vượt mức miễn phí: thông số
onerror=redirectsẽ giúp đưa về linh ảnh gốc – hình ảnh vẫn hiển thị bình thường
Tất cả hoạt động hoàn hảo với chi phí = 0! Quá tuyệt vời!
Dưới đây là sự khác biệt giữa trước và sau khi tối ưu hình ảnh
Astro + Cloudflare xứng đáng là combo để mình đầu tư thời gian nghiên cứu trong thời gian tới. Mình sẽ chuyển blog Thuanbui.me này qua Astro trong thời gian sớm nhất.
Hẹn gặp lại!