
Đây là bài viết Phần 6 nằm trong series: WordPress to Astro Migration
Sau khi hoàn thành [Phần 4], blog Astro của mình đã chạy ngon trên Cloudflare Workers. Nhưng như đã đề cập trong bài viết, vẫn còn một số việc cần xử lý trước khi chính thức “khai tử” WordPress:
- Trang category/tag đang hiển thị slug thay vì tên đầy đủ — ví dụ
du-lichthay vì “Du Lịch” - Custom taxonomy (như
destination) chưa được xuất ra khi chạy chuyển đổi từ xml qua markdown - Category chưa có cấu trúc phân cấp như bên WordPress
Bài viết [Phần 6] sẽ hướng dẫn cách mình khắc phục 3 vấn đề trên, sẵn sàng chính thức tắt WordPress và chuyển nhà cho blog balodeplao.com qua Astro.
Mục Lục
I. Chi tiết về các vấn đề hiện tại
Khi chạy công cụ wordpress-export-to-markdown để chuyển nội dung WordPress sang file Markdown, frontmatter của mỗi bài viết sẽ trông như thế này:
---
title: "3 ngày ở Tokyo"
date: 2024-11-10
categories:
  - du-lich
tags:
  - nhat-ban
---
Code language: YAML (yaml)Nhìn qua thì có thể tạm ổn, nhưng trên thực tế phần frontmatter đang thiếu khá nhiều thứ:
- Custom taxonomy bị bỏ qua hoàn toàn. Blog balodeplao.com của mình có taxonomy
destinationđể gắn địa điểm cho bài viết — ví dụ Japan, Taiwan, Việt Nam. Sau khi export, toàn bộ thông tin này biến mất. - Category và tag chỉ có slug, không có tên đầy đủ.
du-lichlà slug, còn tên thật là “Du Lịch”. Khi Astro render trang category, nó dùng slug để hiển thị tiêu đề → vừa không thân thiện, vừa ảnh hưởng SEO. - Không có metadata cho taxonomy. Bên WordPress, mỗi category/tag có đầy đủ thông tin: tên hiển thị, mô tả, category cha (parent). Toàn bộ thông tin đó nằm trong file XML xuất ra nhưng công cụ bỏ qua các thông tin khi xử lý chuyển đổi qua markdown.
Trên thực tế, thông tin về custom taxonomy và metadata cho taxonomy đều có sẵn trong file xml khi xuất nội dung từ WordPress.
<!-- Metadata của category, có thông tin parent để xây phân cấp -->
<wp:category>
  <wp:category_nicename>chau-a</wp:category_nicename>
  <wp:cat_name><![CDATA[Châu Á]]></wp:cat_name>
  <wp:category_parent>du-lich</wp:category_parent>
  <wp:category_description><![CDATA[Các bài viết du lịch Châu Á]]></wp:category_description>
</wp:category>

<!-- Metadata của tag -->
<wp:tag>
  <wp:tag_slug>nhat-ban</wp:tag_slug>
  <wp:tag_name><![CDATA[Nhật Bản]]></wp:tag_name>
</wp:tag>

<!-- Metadata của custom taxonomy term -->
<wp:term>
  <wp:term_taxonomy>destination</wp:term_taxonomy>
  <wp:term_slug>japan</wp:term_slug>
  <wp:term_name><![CDATA[Japan]]></wp:term_name>
  <wp:term_parent></wp:term_parent>
</wp:term>
Code language: HTML, XML (xml)Vấn đề nằm ở chỗ công cụ wordpress-export-to-markdown không hỗ trợ xử lý custom taxonomy và metadata cho custom taxonomy.
II. Giải pháp: fork và bổ sung tính năng
Để giải quyết những vấn đề kể trên, mình quyết định fork công cụ wordpress-export-to-markdown và bổ sung thêm 2 tính năng cần thiết:
- Hỗ trợ xử lý custom taxonomy cho từng bài viết: ghi vào frontmatter tương ứng.
- Xử lý thông ting metadata cho taxonomy: đọc các block
<wp:category>,<wp:tag>,<wp:term>và xuất ra filetaxonomies.json.
Mọi người có thể tham khảo bản fork của mình ở đây:
https://github.com/10h30/wordpress-export-to-markdown/tree/feat/add_custom_taxonomy
1. Xử lý lại file xml
Để xử lý lại file markdown, cần phải clone repo này về máy
git clone -b feat/add_custom_taxonomy https://github.com/10h30/wordpress-export-to-markdown.gitCode language: PHP (php)Truy cập vào thư mục và cài đặt package
cd wordpress-export-to-markdown
npm installCode language: JavaScript (javascript)Sau đó chạy lệnh sau để chuyển đổi file xml qua markdown.
node app \
  --prefix-date=true \
  --post-folders=false \
  --frontmatter-fields=title,author,date:pubDate,categories,tags,coverImage:image,draft,slug \
  --save-images=all \
  --date-folders=none
  --include-custom-taxonomies=true
  --save-taxonomy-data=true
Code language: Nginx (nginx)2. Kết quả frontmatter sau khi sửa
Phần frontmatter của các file md giờ đã có thêm thông tin về Custom taxonomy destination
---
title: "3 ngày ở Tokyo"
date: 2024-11-10
categories:
  - du-lich
tags:
  - nhat-ban
destination:
  - japan
  - tokyo
---
Code language: YAML (yaml)3. Kết quả taxonomies.json
Trong thư mục output giờ sẽ có thêm thư mục taxonomies, gồm các file json của từng custom taxonomy.
taxonomies
├── advanced_ads_groups.json
├── category.json
├── cp_campaign.json
├── cp_connections.json
├── destination.json
├── nav_menu.json
└── post_tag.jsonCode language: CSS (css)Và đây là nội dung của file category.json
[
        {
                "slug": "an-uong",
                "name": "Ẩm Thực",
                "description": "Cẩm nang trải nghiệm ẩm thực, giới thiệu các quán ăn ngon của Ba Lô Dép Lào"
        },
        {
                "slug": "cong-viec",
                "name": "Công Việc"
        },
        {
                "slug": "du-lich",
                "name": "Du Lịch",
                "description": "Chia sẻ trải nghiệm, kinh nghiệm du lịch khám phá thế giới của Ba Lô & Dép Lào"
        },
        {
                "slug": "gia-dinh",
                "name": "Gia Đình"
        },
        {
                "slug": "kham-pha-cuoi-tuan",
                "name": "Khám Phá Cuối Tuần"
        },
        {
                "slug": "khuyen-mai",
                "name": "Khuyến Mãi",
                "description": "Tổng hợp các thông tin khuyến mãi khách sạn, vé máy bay, ăn uống,..."
        },
        {
                "slug": "lam-dep",
                "name": "Làm Đẹp",
                "description": "Chia sẻ kinh nghiệm làm đẹp từ các nguyên liệu tự nhiên :)"
        },
        {
                "slug": "me-con",
                "name": "Mẹ và Con",
                "description": "Các bài viết chia sẻ kinh nghiệm làm mẹ và nuôi con"
        },
        {
                "slug": "meo-hay",
                "name": "Mẹo Hay"
        },
        {
                "slug": "qua-tang",
                "name": "Quà Tặng"
        },
        {
                "slug": "tam-su",
                "name": "Tâm Sự"
        },
        {
                "slug": "thu-cung",
                "name": "Thú Cưng",
                "description": "Các bài viết về cách huấn luyện, nuôi dưỡng và vui chơi cùng thú cưng"
        },
        {
                "slug": "tin-tuc",
                "name": "Tin Tức"
        },
        {
                "slug": "yoga",
                "name": "Yoga",
                "description": "Chia sẻ kinh nghiệm tập Yoga."
        }
]Code language: JSON / JSON with Comments (json)Mình sẽ xóa các file không cần thiết, chỉ giữ lại category, post_tag và destination là những custom taxonomy sử dụng trong bài viết. Các file này sẽ là nguồn dữ liệu cho taxonomy trên Astro blog — từ tên hiển thị, mô tả, đến cấu trúc phân cấp.
III. Tích hợp vào Astro
Việc cần làm tiếp theo là tích hợp các thông tin mới vào Astro
- Tạo util
taxonomy.tsđể xử lý thông tin metadata cho taxonomy, lấy từ các file json. - Cập nhật component
Category.astro,Tag.astrođể hiển thị tên đầy đủ cho taxonomy thay vì slug - Tạo component
Destination.astrocho custom taxonomy `destination, chèn vào[...slug].astrovàPostItem.astro - Cập nhật lại URL cho category / destination hỗ trợ phân cấp, ví dụ:
/destination/nhat-ban/tokyo
1. Copy các file json vào Astro
Copy các thư mục taxonomies vào thư mục src/content/ trong project Astro. Cấu trúc thư mục content giờ sẽ như sau
content
├── blog
└── taxonomies
Code language: Nginx (nginx)2. Khai báo custom taxonomy
Cập nhật file content.config.ts, bổ sung khai báo cho custom taxonomy mới: destination
import { defineCollection, z } from "astro:content";
import { glob } from "astro/loaders";

const blog = defineCollection({
  loader: glob({ pattern: "**/*.{md,mdx}", base: "./src/content/blog" }),
  schema: z.object({
    title: z.string(),
    description: z.string().optional(),
    pubDate: z.coerce.date(),
    author: z.string(),
    image: z.string().optional(),
    tags: z.array(z.string()).optional(),
    categories: z.array(z.string()).optional(),
    destination: z.array(z.string()).optional(),
  }),
});

export const collections = { blog };
Code language: YAML (yaml)3. Tạo util xử lý taxonomy
Tạo file src/util/taxonomy.ts:
import categoryData from "@/content/taxonomies/category.json";
import destinationData from "@/content/taxonomies/destination.json";
import tagData from "@/content/taxonomies/tag.json";

export type TaxonomyItem = {
  slug: string;
  name: string;
  parent?: string;
  description?: string;
};

export type TaxonomyMap = Map<string, TaxonomyItem>;

export type TaxonomyType = "category" | "destination" | "tag";

function isTaxonomyItem(value: unknown): value is TaxonomyItem {
  if (typeof value !== "object" || value === null) return false;
  const v = value as Record<string, unknown>;
  return (
    typeof v.slug === "string" &&
    typeof v.name === "string" &&
    (v.parent === undefined || typeof v.parent === "string") &&
    (v.description === undefined || typeof v.description === "string")
  );
}

function buildMap(data: TaxonomyItem[]): TaxonomyMap {
  if (!Array.isArray(data)) {
    throw new Error(`[taxonomy] expected an array but received ${typeof data}`);
  }
  return new Map(
    data.map((item, i) => {
      if (!isTaxonomyItem(item)) {
        throw new Error(
          `[taxonomy] invalid item at index ${i}: ${JSON.stringify(item)}`,
        );
      }
      return [item.slug, item];
    }),
  );
}

const taxonomies: Record<TaxonomyType, TaxonomyMap> = {
  category: buildMap(categoryData as TaxonomyItem[]),
  destination: buildMap(destinationData as TaxonomyItem[]),
  tag: buildMap(tagData as TaxonomyItem[]),
};

export function getTaxonomyMap(type: TaxonomyType): TaxonomyMap {
  if (!(type in taxonomies)) {
    throw new Error(
      `[taxonomy] unknown taxonomy type "${type}". Expected one of: ${Object.keys(taxonomies).join(", ")}`,
    );
  }
  return taxonomies[type];
}

function buildHierarchicalPath(
  slug: string,
  map: TaxonomyMap,
  visited = new Set<string>(),
): string {
  if (visited.has(slug)) return slug; // cycle protection
  visited.add(slug);
  const item = map.get(slug);
  if (!item?.parent) return slug;
  return `${buildHierarchicalPath(item.parent, map, visited)}/${slug}`;
}

export function getTaxonomyPath(type: TaxonomyType, slug: string): string {
  return buildHierarchicalPath(slug, getTaxonomyMap(type));
}

export function getTaxonomyItem(
  type: TaxonomyType,
  slug: string,
): TaxonomyItem | undefined {
  return getTaxonomyMap(type).get(slug);
}

export function getDescendantSlugs(
  taxonomyType: string,
  slug: string
): string[] {
  const map = getTaxonomyMap(taxonomyType);
  const result: string[] = [];

  for (const [key, item] of map.entries()) {
    if (key === slug) continue;
    // Đi ngược từ node này lên root, kiểm tra xem có qua slug không
    let current: TaxonomyItem | undefined = item;
    while (current?.parent) {
      if (current.parent === slug) {
        result.push(key);
        break;
      }
      current = map.get(current.parent);
    }
  }

  return result;
}
Code language: TypeScript (typescript)3. Cập nhật Component để hiển thị tên đầy đủ
Mình cần cập nhật các file s và rc/components/ui/Categories.astrosrc/components/ui/Tags.astro để cập nhật đường dẫn URL (sử dụng hàm getTaxonomyPath) và tên hiển thị (sử dụng hàm getTaxonomyMap)
---
import { getTaxonomyMap, getTaxonomyPath } from "@/utils/taxonomy";

export interface Props {
  categories: string[];
  class?: string;
}

const { categories, class: className = "text-sm" } = Astro.props;
const categoryMap = getTaxonomyMap("category");
---

{
  categories && Array.isArray(categories) && (
    <ul class:list={["flex flex-wrap gap-2", className]}>
      {categories.map((category) => (
        <li class="inline-block relative">
          <a
            href={`/category/${getTaxonomyPath("category", category)}`}
            class="inline-block bg-primary/10 hover:bg-primary/20 text-primary hover:text-primary px-3 py-1 rounded-full border border-primary/20 transition-colors duration-200"
          >
            {categoryMap.get(category)?.name ?? category}
          </a>
        </li>
      ))}
    </ul>
  )
}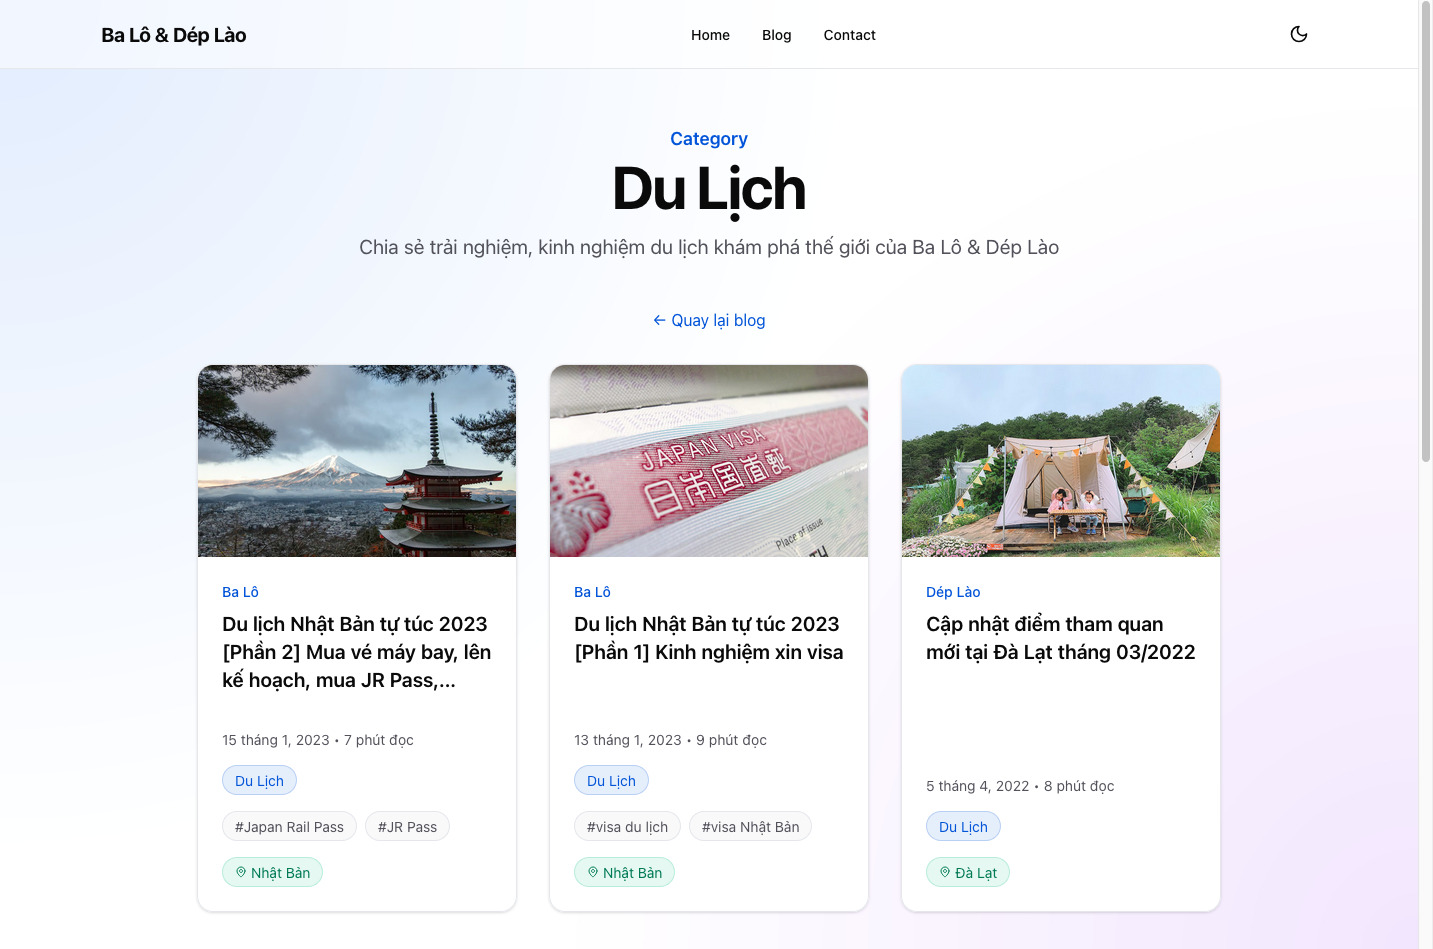
Code language: TypeScript (typescript)Kết quả: phần tên của Category, thay vì hiện du-lich, sẽ hiện ra tên đầy đủ “Du Lịch” và trỏ đúng đến /category/du-lich.
4. Tạo component Destination.astro
Tạo file src/components/uiDestinations.astro — về cơ bản giống hệt file Categories.astro, chỉ thay taxonomy type từ "category" sang "destination" và prefix URL thành /destination/:
---
import { getTaxonomyMap, getTaxonomyPath } from "@/utils/taxonomy";

export interface Props {
  destinations: string[];
  class?: string;
}

const { destinations, class: className = "text-sm" } = Astro.props;
const destinationMap = getTaxonomyMap("destination");
---

{
  destinations && Array.isArray(destinations) && (
    <ul class:list={["flex flex-wrap gap-2", className]}>
      {destinations.map((destination) => (
        <li class="inline-block relative">
          <a
            href={`/destination/${getTaxonomyPath("destination", destination)}`}
            class="inline-flex items-center gap-1 bg-emerald-500/10 hover:bg-emerald-500/20 text-emerald-700 dark:text-emerald-400 hover:text-emerald-800 dark:hover:text-emerald-300 px-3 py-1 rounded-full border border-emerald-500/20 transition-colors duration-200"
          >
            <svg
              xmlns="http://www.w3.org/2000/svg"
              class="w-3 h-3"
              viewBox="0 0 24 24"
              fill="none"
              stroke="currentColor"
              stroke-width="2"
              stroke-linecap="round"
              stroke-linejoin="round"
              aria-hidden="true"
            >
              <path d="M20 10c0 6-8 12-8 12s-8-6-8-12a8 8 0 0 1 16 0Z" />
              <circle cx="12" cy="10" r="3" />
            </svg>
            {destinationMap.get(destination)?.name ?? destination}
          </a>
        </li>
      ))}
    </ul>
  )
}
Code language: TypeScript (typescript)Sau đó chèn component này vào hai nơi:
Trong [...slug].astro (trang bài viết đầy đủ):
---
import Destinations from "@/components/ui/Destinations.astro";

// ...
const {
  title,
  description,
  pubDate,
  author,
  image,
  categories,
  tags,
  destination, // thêm destination vào danh sách
} = post.data;
---

<BaseLayout metadata={metadata}>
// ...
        <h1 class="font-heading mt-2 text-3xl font-bold leading-tight tracking-tighter text-foreground sm:text-4xl md:text-5xl">{title}</h1>
        // Hiển thị dưới tên bài viết
        {
          destination && destination.length > 0 && (
            <div class="flex flex-wrap justify-center gap-2 mt-4">
              <Destinations destinations={destination} />
            </div>
          )
        }
// ...
</BaseLayout>
Code language: TypeScript (typescript)Trong PostItem.astro (card bài viết trong listing)
---
import Destinations from "@/components/ui/Destinations.astro";
// ...
---

{/* Trong phần meta của card */}
    {
      post.data.destination && post.data.destination.length > 0 && (
        <div class="mt-4 relative z-20">
          <Destinations destinations={post.data.destination} />
        </div>
      )
    }
Code language: YAML (yaml)5. Trang category với URL phân cấp
Đây là phần rắc rối nhất, vì mình vừa muốn URL hỗ trợ phân cấp (/desitnation/nhat-ban/tokyo), vừa muốn sử dụng pagination chia bài viết theo trang (/desitnation/nhat-ban/tokyo/page/2
Nếu dùng route [...slug].astro thông thường sẽ không xử lý được pagination.. Nếu dùng [page].astro thì không tùy chỉnh được cấu trúc URL.
Giải pháp là dùng [...rest].astro giữ toàn bộ phần URL sau taxonomy prefix (/destination hoặc /category/) – bao gồm cả path phân cấp lẫn số trang, rồi tự build danh sách path trong getStaticPaths thông qua hàm buildPaginatedPaths có sẵn.
Tạo file src/pages/category/[...rest].astro với nội dung sau
---
import BaseLayout from "@/layouts/BaseLayout.astro";
import { getCollection } from "astro:content";
import type { CollectionEntry } from "astro:content";
import Headline from "@/components/ui/Headline.astro";
import PostItem from "@/components/blog/PostItem.astro";
import Pagination from "@/components/ui/Pagination.astro";
import {
  getTaxonomyMap,
  getTaxonomyPath,
  getDescendantSlugs,
  type TaxonomyItem,
} from "@/utils/taxonomy";
import { buildPaginatedPaths } from "@/utils/paginate";

interface Props {
  cat: TaxonomyItem;
  posts: CollectionEntry<"blog">[];
  currentPage: number;
  lastPage: number;
  total: number;
  prevUrl?: string;
  nextUrl?: string;
}

export async function getStaticPaths() {
  const allPosts = await getCollection("blog");
  const posts = allPosts.filter((post) => post.data && post.data.pubDate);

  const catSlugs = new Set<string>();
  posts.forEach((post) =>
    post.data.categories?.forEach((c) => catSlugs.add(c)),
  );

  return Array.from(catSlugs).flatMap((slug) => {
    const descendants = getDescendantSlugs("category", slug);
    const allSlugs = [slug, ...descendants];

    const catPosts = posts
      .filter((post) => post.data.categories?.some((d) => allSlugs.includes(d)))
      .sort((a, b) => b.data.pubDate.valueOf() - a.data.pubDate.valueOf());

    const fullPath = getTaxonomyPath("category", slug);
    const cat =
      getTaxonomyMap("category").get(slug) ??
      ({ slug, name: slug } as TaxonomyItem);

    return buildPaginatedPaths(catPosts, `/category/${fullPath}`).map(
      ({ pageParam, page }) => ({
        params: { rest: pageParam ? `${fullPath}/${pageParam}` : fullPath },
        props: {
          cat,
          posts: page.data,
          currentPage: page.currentPage,
          lastPage: page.lastPage,
          total: page.total,
          prevUrl: page.url.prev,
          nextUrl: page.url.next,
        },
      }),
    );
  });
}

const { cat, posts, currentPage, lastPage, total, prevUrl, nextUrl } =
  Astro.props as Props;

const page = {
  currentPage,
  lastPage,
  url: { prev: prevUrl, next: nextUrl },
};

const metadata = {
  title: cat.name,
  description: cat.description ?? `Các bài viết trong danh mục ${cat.name}.`,
};
---

<BaseLayout metadata={metadata}>
  <section class="relative px-4 py-8 sm:px-6 lg:px-8 md:py-12">
    <div class="relative mx-auto max-w-5xl">
      <Headline
        tagline="Category"
        title={cat.name}
        subtitle={cat.description ?? `Hiển thị ${total} bài viết.`}
        classes={{
          container: "mb-12 text-center",
          title:
            "font-heading mb-4 text-4xl font-bold tracking-tight text-foreground md:text-6xl capitalized",
          subtitle: "mx-auto max-w-3xl text-xl text-muted-foreground",
        }}
      />

      <div class="mb-8 text-center">
        <a href="/blog" class="text-primary hover:underline">← Quay lại blog</a>
      </div>

      <div class="grid gap-8 md:grid-cols-2 lg:grid-cols-3">
        {posts.map((post) => <PostItem post={post} />)}
      </div>
      <Pagination page={page} />
    </div>
  </section>
</BaseLayout>
Code language: JavaScript (javascript)Với cách này, Astro sẽ tự sinh ra đầy đủ các URL tại build time:
/category/du-lich/category/du-lich/page/2,/category/du-lich//page/3…/category/du-lich/chau-a/category/du-lich/chau-a/nhat-ban/page/2
Áp dụng tương tự cho destination, đổi taxonomy type từ category sang destination
Tổng kết
Đến đây, toàn bộ những việc cần làm mình đã liệt kê ở [Phần 4] đã được giải quyết xong – custom taxonomy đã có trong frontmatter, tên taxonomy hiển thị đầy đủ, URL phân cấp hoạt động đúng, pagination chạy ngon.
Blog balodeplao.com đã được chính thức được chuyển qua sử dụng Astro. Bye bye WordPress!
Ngay sau đó, mình cũng đã chuyển blog supersilk.vn qua Astro dựa theo kinh nghiệm đúc kết từ lần đầu tiên. Lần này chỉ mất khoảng 30′ là xong việc dọn nhà so với lần đầu tiên tốn gần cả tuần mày mò.
Series hướng dẫn WordPress to Astro Migration đến đây xin hết. Các bạn có thể tham khảo toàn bộ mã nguồn mình đã chia sẻ trong 6 phần vừa qua ở đây: https://github.com/10h30/blog-balodeplao
Nhìn lại cả quá trình, mình cực kỳ hài lòng với kết quả đạt được: blog tải siêu nhanh, dễ dàng tùy biến tính năng qua VS Code, không phải bận tâm quản lý server hay database, toàn bộ nội dung và hình ảnh được lưu trữ trên Cloudflare miễn phí.
Quan trọng hơn, mình học được rất nhiều kiến thức mới trong quá trình này: Jamstack, CI/CD, Cloudflare Workers, Cloudflare Image Transformation, Astro framework – những công nghệ web hiện đại mà trước giờ chưa có dịp đụng tới. Các kiến thức này chắc chắn không chỉ hữu ích cho việc xây dựng, mà còn mở ra khá nhiều hướng để áp dụng vào công việc về sau.
Nếu bạn đang cân nhắc chuyển blog từ WordPress sang Astro, hy vọng series này giúp ích được phần nào.
Hẹn gặp lại ở các bài viết tiếp theo!
Bạn đang xem loạt bài viết: WordPress to Astro Migration
- Phần 1: [WordPress → Astro] Phần 1 – Chuyển bài viết từ Database qua file Markdown
- Phần 2: [WordPress → Astro] Phần 2 – Cài đặt và cấu hình Astro làm blog
- Phần 3: [WordPress → Astro] Phần 3 – Upload ảnh lên Cloudflare R2
- Phần 4: [WordPress → Astro] Phần 4 – Đưa blog lên Cloudflare Workers (CI/CD)
- Phần 5: [WordPress → Astro] Phần 5 – Tối ưu hình ảnh cho blog
- Phần 6: [WordPress → Astro] Phần 6 – Xuất custom taxonomy và hỗ trợ phân cấp