Mình mới mò qua nghiên cứu thử Arch Linux sau nhiều năm chỉ biết đến Ubuntu và CentOS. Cứ tưởng có kinh nghiệm sử dụng Linux nên cài đặt Arch không có gì khó, ai ngờ khó không tưởng.
Arch Linux cung cấp nguyên 1 trang hướng dẫn cài đặt cực kỳ chi tiết ở đây: Installation Guide. Nhưng chi tiết quá đến mức rối não, càng xem càng không biết làm cài đặt sao mới đúng.
Bài viết này mình chia sẻ lại toàn bộ các bước cài đặt Arch Linux lên máy ảo Hyper-V. Để dành sau này cần dùng còn có tài liệu để tham khảo lại.
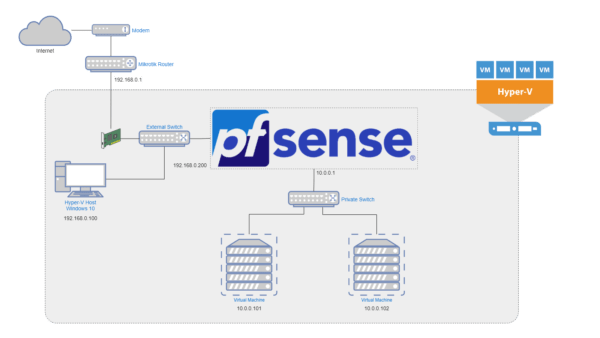
Hướng dẫn này mình sử dụng máy ảo Hyper-V, nhưng bạn hoàn toàn có thể áp dụng các bước dưới đây để cài đặt Arch Linux lên máy ảo VirtualBox, ESXi, Promox hay cài trực tiếp lên Desktop / Laptop.
Cảnh cáo: Nếu bạn mới tìm hiểu Linux, tốt nhất nên chuyển qua dùng Ubuntu hoặc Mint cho nhẹ đầu. Đụng vô anh Arch Linux này sẽ cực kỳ thử thách cho những người chưa quen comand-line.
Mục Lục
1. Tạo máy ảo mới
Việc tạo máy ảo mới trên Hyper-V mình đã chia sẻ trong bài viết trước. Bạn có thể tham khảo bên dưới.
Chú ý: Nhớ chọn máy ảo Generation 2 và kết nối vào External Switch hoặc Default Switch để có thể kết nối Internet trong khi cài đặt.
2. Tải Arch Linux ISO
Bạn cần tải file iso cài đặt Arch Linux từ trang Download. Hoặc truy cập thằng vào Mirror nằm trên server Việt Nam của Bizflycloud để tải cho nhanh: http://mirror.bizflycloud.vn/archlinux/iso/latest/
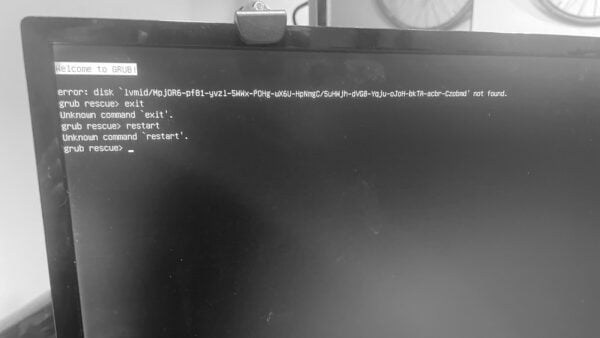
2. Sửa lỗi không thể boot từ file ISO
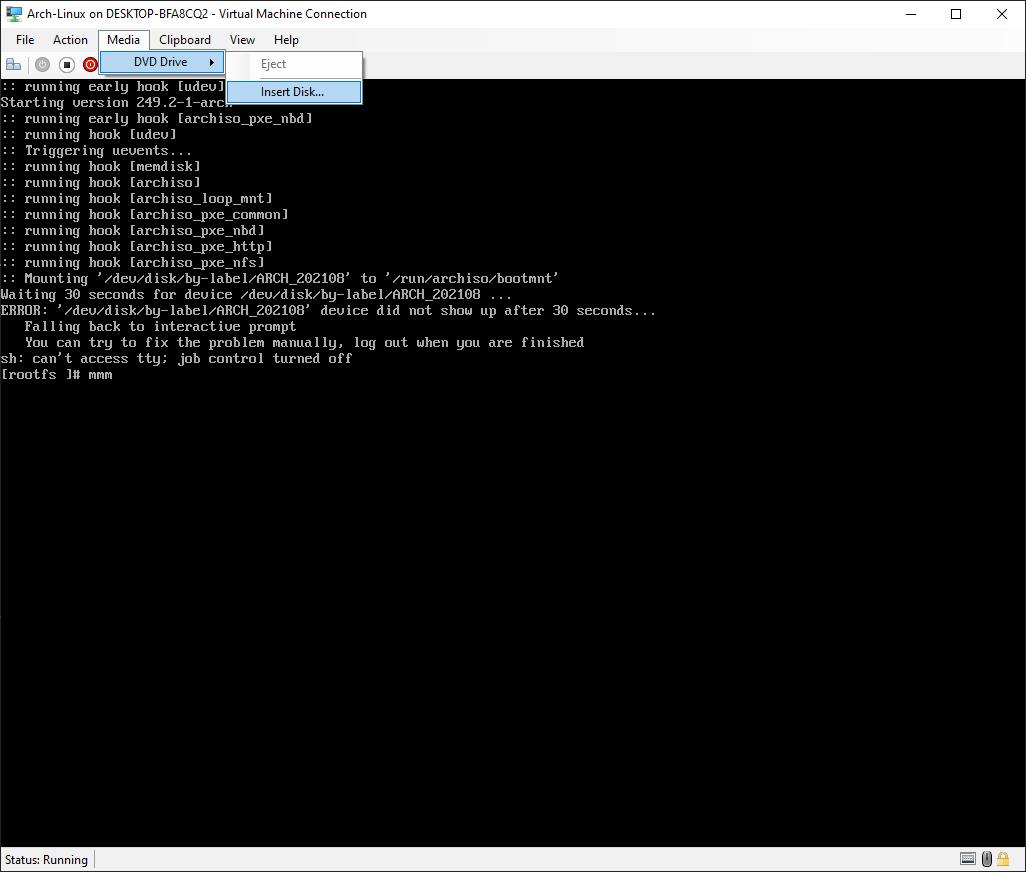
Phiên bản ISO Arch Linux 202108 (archlinux-2021.08.01-x86_64.iso) gặp lỗi khi cài đặt trên Hyper-V như sau:
ERROR: '/dev/disk/by-label/ARCH_202108' device did not show up after 30 seconds...Code language: YAML (yaml)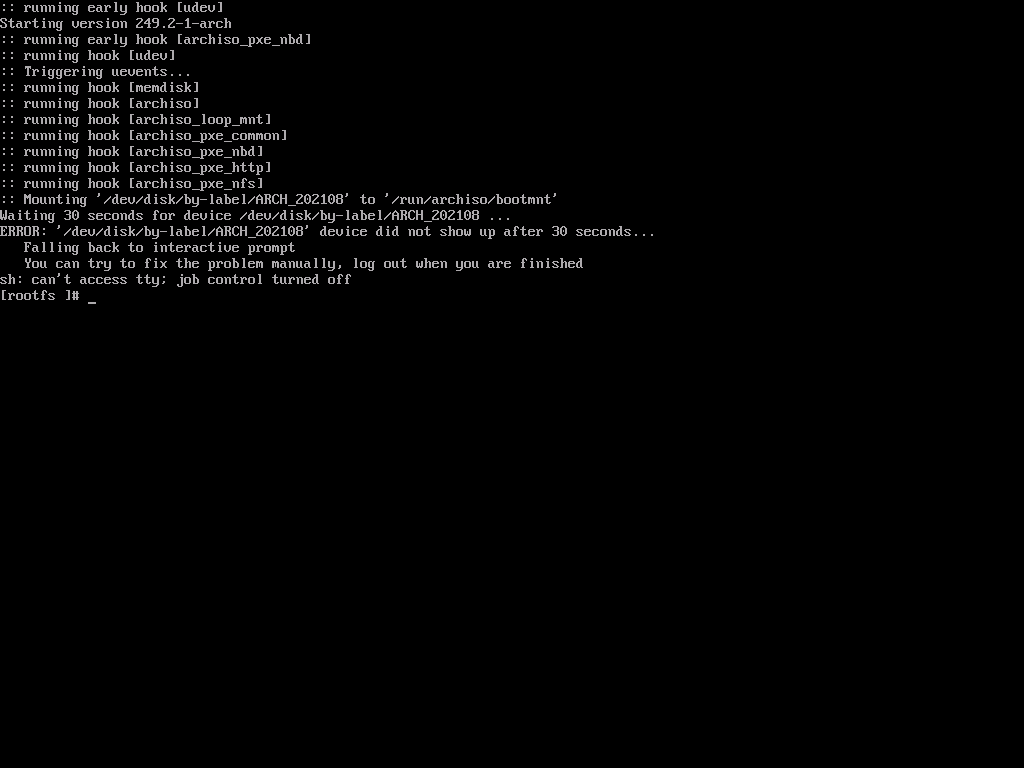
Lý do vì Hyper-V tự động nhả ổ đĩa sau khi khởi động, khiến tiến trình cài đặt gặp lỗi (FS#71934 : archlinux-2021.08.01-x86_64.iso fails to boot on hyper-v) Để sửa lỗi này, mình bấm vào mục Media -> DVD Drive -> Insert Disk để chọn lại file ISO cài đặt.
Sau đó quay lại console gõ lệnh
udevadm trigger
exitCode language: Bash (bash)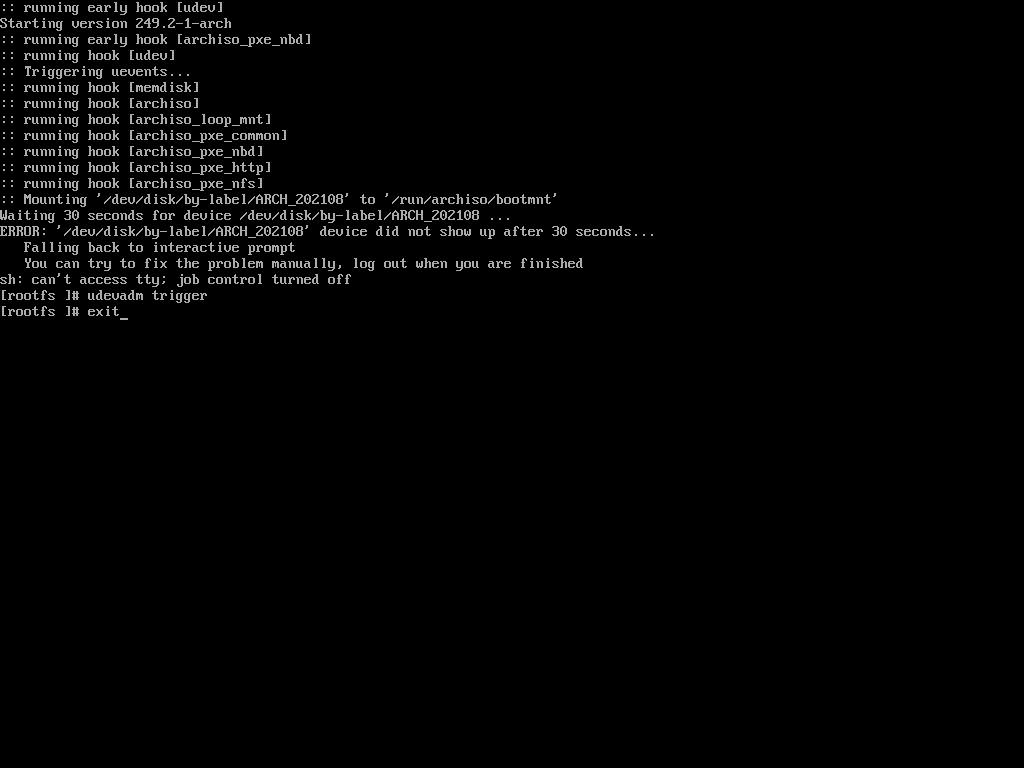
Quá trình cài đặt sẽ chạy tiếp tục
Hiện tại file iso bản mới archlinux-2021.09.01-x86_64.iso khắc phục lỗi này. Mình chia sẻ lại lỗi ở đây, biết đâu trong tương lai có bản nào bị lỗi tiếp còn nhớ cách sửa.
3. Thiết lập hệ thống trước khi cài đặt
Kiểm tra kết nối mạng
Arch Linux cần phải kết nối Internet để tải các package trong quá trình cài đặt. Kiểm tra máy ảo có kết nối Internet chưa bằng lệnh ping
ping gooogle.com
Code language: CSS (css)Nếu thấy nhận được tín hiệu phản hồi nghĩa là máy ảo đang kết nối Internet OK.
Tiếp theo kiểm tra địa chỉ IP hiện tại của máy ảo. Bạn cần ghi nhớ lại IP này để kết nối SSH vào máy ảo ở bước sau
ip aCode language: Nginx (nginx)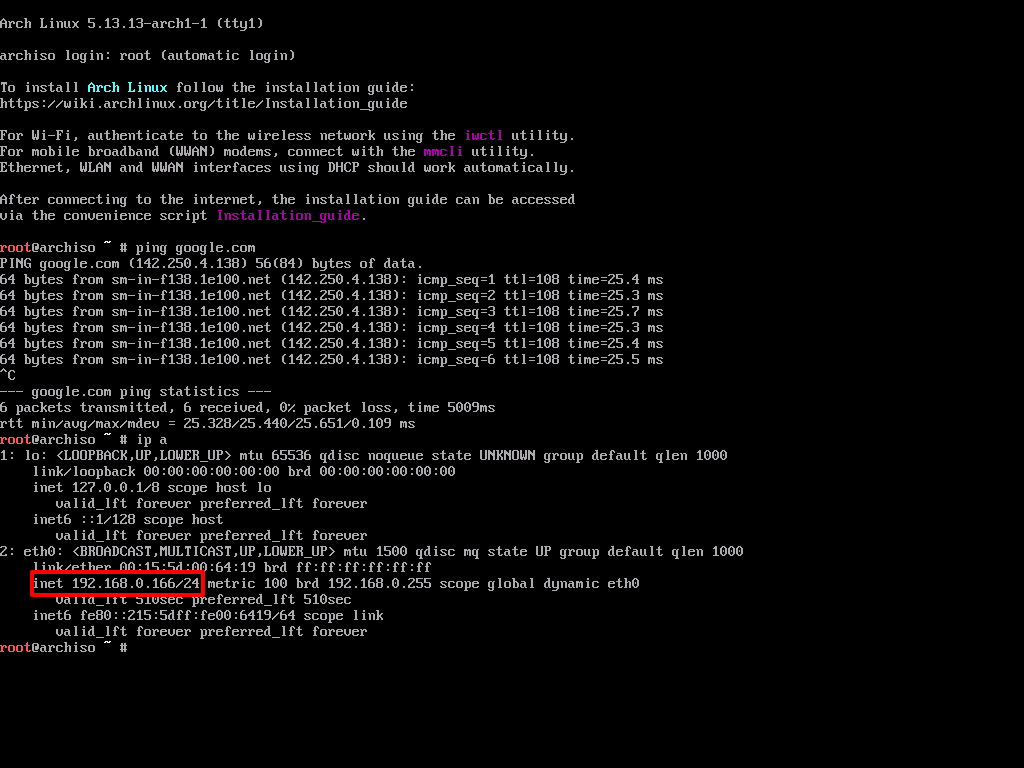
IP của máy ảo: 192.168.0.166
Thiết lập SSH, Root Password
Việc thao tác trực tiếp trên giao diện của Hyper-V không tiện lợi cho việc cài đặt vì nó không cho phép copy / paste dòng lệnh. Do đó, bạn nên thiết lập SSH Server để dùng Terminal / Putty kết nối vào sẽ dễ sử dụng hơn.
Thiết lập mật khẩu cho tài khoản root
passwdKích hoạt SSH Service
systemctl start sshd
Code language: Nginx (nginx)Kết nối SSH vào máy ảo
Sử dụng Putty (Windows) hoặc Terminal (MacOS / Linux) để kết nối SSH vào máy ảo theo địa chỉ IP với tài khoản root và password đã thiết lập.
ssh root@192.168.0.166
Code language: Nginx (nginx)login as:root
Keyboard-interactive authentication prompts from server:
| Password:
End of keyboard-interactive prompts from server
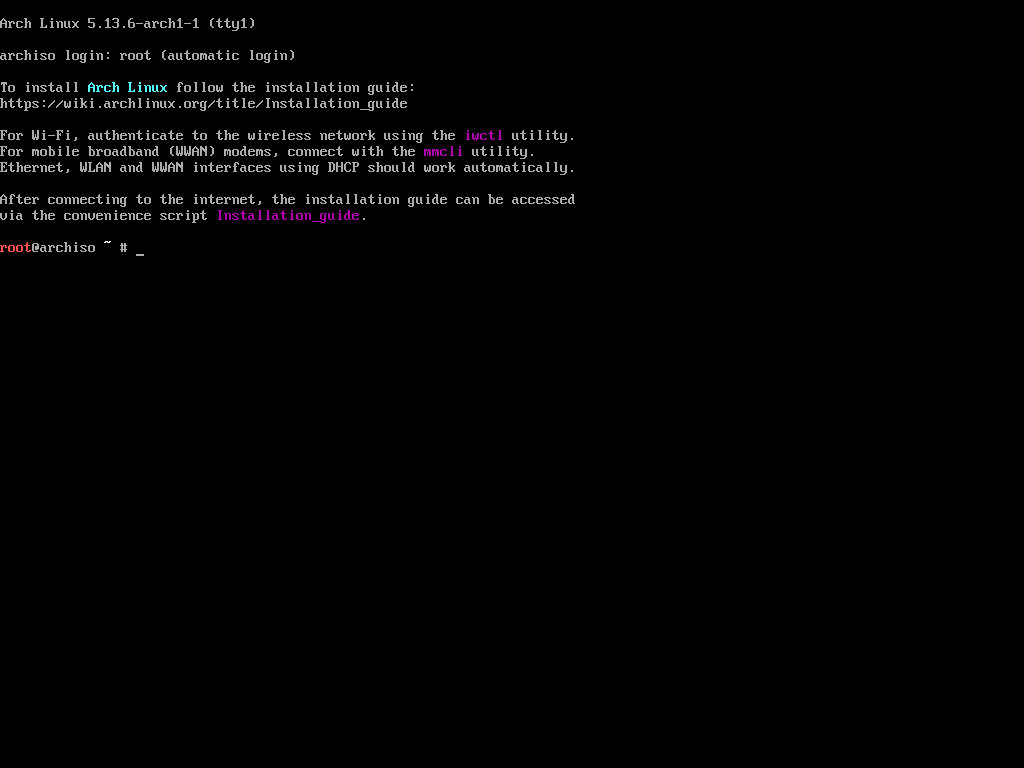
To install Arch Linux follow the installation guide:
https://wiki.archlinux.org/title/Installation_guide
For Wi-Fi, authenticate to the wireless network using the iwctl utility.
For mobile broadband (WWAN) modems, connect with the mmcli utility.
Ethernet, WLAN and WWAN interfaces using DHCP should work automatically.
After connecting to the internet, the installation guide can be accessed
via the convenience script Installation_guide.
Last login: Thu Sep 2 08:56:22 2021
root@archiso ~ #
Code language: YAML (yaml)Thiết lập layout bàn phím
Mặc định Arch Linux đã kích hoạt layout bàn phím US – là loại đang sử dụng phổ biến ở Việt Nam. Nên bước này không cần làm gì thêm. Nếu bạn dùng layout bàn phím kiểu khác thì tham khảo hướng dẫn ở đây: https://wiki.archlinux.org/title/Installation_guide#Set_the_keyboard_layout
Cập nhật thời gian cho hệ thống
timedatectl set-ntp trueCode language: Bash (bash)Kiểm tra lại bằng lệnh
<code>timedatectl statu<span style="background-color: inherit; font-size: inherit; color: inherit; letter-spacing: -0.015em;">s</span></code>Code language: HTML, XML (xml)root@archiso ~ # timedatectl status
Local time: Thu 2021-09-02 09:11:39 UTC
Universal time: Thu 2021-09-02 09:11:39 UTC
RTC time: Thu 2021-09-02 09:11:39
Time zone: UTC (UTC, +0000)
System clock synchronized: yes
NTP service: active
RTC in local TZ: noCode language: YAML (yaml)Thiết lập mirrorlist
Mirror List là danh sách repo mà Arch Linux sử dụng để tải các package cài đặt. Để tối ưu tốc độ tải, mình sử dụng các mirror từ Việt Nam và Hongkong.
##
## Arch Linux repository mirrorlist
## Generated on 2021-09-02
##

## Vietnam
Server = <http://mirror.bizflycloud.vn/archlinux/$repo/os/$arch>

## Hong Kong
Server = <https://asia.mirror.pkgbuild.com/$repo/os/$arch>
Server = <http://mirror-hk.koddos.net/archlinux/$repo/os/$arch>
Server = <https://mirror-hk.koddos.net/archlinux/$repo/os/$arch>
Server = <http://hkg.mirror.rackspace.com/archlinux/$repo/os/$arch>
Server = <https://hkg.mirror.rackspace.com/archlinux/$repo/os/$arch>
Server = <https://arch-mirror.wtako.net/$repo/os/$arch>
Server = <http://mirror.xtom.com.hk/archlinux/$repo/os/$arch>
Server = <https://mirror.xtom.com.hk/archlinux/$repo/os/$arch>Code language: Nginx (nginx)Bạn có thể truy cập vào https://archlinux.org/mirrorlist/ để tạo danh sách mirror.
Lưu lại mirrorlist mặc định
mv /etc/pacman.d/mirrorlist /etc/pacman.d/mirrorlist.bkCode language: Nginx (nginx)Tạo lại danh sách mới /etc/pacman.d/mirrorlist
sudo nano /etc/pacman.d/mirrorlistCode language: Nginx (nginx)Thêm vào mirrorlist ở trên, lưu lại và thoát ra (Ctrl+O, Ctrl + X)
##
## Arch Linux repository mirrorlist
## Generated on 2021-09-02
##

## Vietnam
Server = <http://mirror.bizflycloud.vn/archlinux/$repo/os/$arch>

## Hong Kong
Server = <https://asia.mirror.pkgbuild.com/$repo/os/$arch>
Server = <http://mirror-hk.koddos.net/archlinux/$repo/os/$arch>
Server = <https://mirror-hk.koddos.net/archlinux/$repo/os/$arch>
Server = <http://hkg.mirror.rackspace.com/archlinux/$repo/os/$arch>
Server = <https://hkg.mirror.rackspace.com/archlinux/$repo/os/$arch>
Server = <https://arch-mirror.wtako.net/$repo/os/$arch>
Server = <http://mirror.xtom.com.hk/archlinux/$repo/os/$arch>
Server = <https://mirror.xtom.com.hk/archlinux/$repo/os/$arch>Code language: Nginx (nginx)Phân vùng ổ cứng
Kiểm tra ổ đĩa bằng lệnh lsblk
root@archiso ~ # lsblk
NAME  MAJ:MIN RM   SIZE RO TYPE MOUNTPOINTS
loop0   7:0    0 662.7M  1 loop /run/archiso/airootfs
sda     8:0    0    30G  0 disk
sr0 11:0 1 832.3M 0 rom /run/archiso/bootmntCode language: YAML (yaml)Sử dụng gdisk để thiết lập phân vùng cho ổ đĩa /dev/sda
gdisk /dev/sda
Code language: Nginx (nginx)root@archiso ~ # gdisk /dev/sda
GPT fdisk (gdisk) version 1.0.8
Partition table scan:
MBR: not present
BSD: not present
APM: not present
GPT: not present
Creating new GPT entries in memory.
Command (? for help):Code language: YAML (yaml)Nếu ổ cứng có sẵn dữ liệu và bạn muốn xoá sạch sẽ để cài mới hoàn toàn, sử dụng command o
Command (? for help): o
This option deletes all partitions and creates a new protective MBR.
Proceed? (Y/N): YCode language: JavaScript (javascript)Tạo phân vùng EFI bằng command n, dung lượng 512MB
Command (? for help): n
Partition number (1-128, default 1): 1
First sector (34-62914526, default = 2048) or {+-}size{KMGTP}:
Last sector (2048-62914526, default = 62914526) or {+-}size{KMGTP}: +512M
Current type is 8300 (Linux filesystem)
Hex code or GUID (L to show codes, Enter = 8300): EF00
Changed type of partition to 'EFI system partition'Code language: YAML (yaml)Tạo tiếp phân vùng root sử dụng toàn bộ dung lượng còn lại của ổ cứng
Command (? for help): n
Partition number (2-128, default 2): n
First sector (34-62914526, default = 1050624) or {+-}size{KMGTP}:
Last sector (1050624-62914526, default = 62914526) or {+-}size{KMGTP}:
Current type is 8300 (Linux filesystem)
Hex code or GUID (L to show codes, Enter = 8300):
Changed type of partition to 'Linux filesystem'Code language: YAML (yaml)Mình không tạo phân vùng swap như hướng dẫn của Arch Linux Wiki. Swap có thể tạo bằng file trên phân vùng root, không cần phải dùng phân vùng riêng.
Kiểm tra lại thông tin trước khi xác nhận thiết lập phân vùng bằng lệnh p
Command (? for help): p
Disk /dev/sda: 62914560 sectors, 30.0 GiB
Model: Virtual Disk
Sector size (logical/physical): 512/4096 bytes
Disk identifier (GUID): 18CFC37F-8E65-4FFE-B997-8C48BBE241E5
Partition table holds up to 128 entries
Main partition table begins at sector 2 and ends at sector 33
First usable sector is 34, last usable sector is 62914526
Partitions will be aligned on 2048-sector boundaries
Total free space is 2014 sectors (1007.0 KiB)

Number  Start (sector)    End (sector)  Size       Code  Name
   1            2048         1050623   512.0 MiB   EF00  EFI system partition
2 1050624 62914526 29.5 GiB 8300 Linux filesystemCode language: YAML (yaml)Lưu lại thiết lập phân vùng lên ổ cứng bằng lệnh w
Command (? for help): w

Final checks complete. About to write GPT data. THIS WILL OVERWRITE EXISTING
PARTITIONS!!

Do you want to proceed? (Y/N): Y
OK; writing new GUID partition table (GPT) to /dev/sda.
The operation has completed successfully.Code language: PHP (php)Format phân vùng
Kiểm tra lại hệ thống phân vùng bằng lệnh lsblk
root@archiso ~ # lsblk
NAME   MAJ:MIN RM   SIZE RO TYPE MOUNTPOINTS
loop0    7:0    0 662.7M  1 loop /run/archiso/airootfs
sda      8:0    0    30G  0 disk
├─sda1   8:1    0   512M  0 part
└─sda2   8:2    0  29.5G  0 part
sr0 11:0 1 832.3M 0 rom /run/archiso/bootmntCode language: YAML (yaml)Format phân vùng EFI
mkfs.fat -F32 /dev/sda1Format phân vùng root
mkfs.ext4 /dev/sda2Mount phân vùng vào hệ thống
mount /dev/sda2 /mnt
mkdir /mnt/boot
mount /dev/sda1 /mnt/bootCode language: Nginx (nginx)4. Cài đặt hệ thống
Cài đặt base system
Sử dụng pacstrap để cài đặt base system
pacstrap /mnt base linux linux-firmware base-develCode language: Nginx (nginx)Tạo fstab file
genfstab -U /mnt >> /mnt/etc/fstabCode language: JavaScript (javascript)Chroot
Truy cập vào hệ thống qua tài khoản root
arch-chroot /mntCài đặt thêm các package cần thiết
pacman -S openssh nano intel-ucode networkmanager
Code language: Nginx (nginx)Nếu máy sử dụng CPU AMD, bạn nhớ đổi intel-ucode thành amd-ucode
Cài đặt boot loader
bootctl installCode language: Nginx (nginx)Kết quả
[root@archiso /]# bootctl install
Created "/boot/EFI".
Created "/boot/EFI/systemd".
Created "/boot/EFI/BOOT".
Created "/boot/loader".
Created "/boot/loader/entries".
Created "/boot/EFI/Linux".
Copied "/usr/lib/systemd/boot/efi/systemd-bootx64.efi" to "/boot/EFI/systemd/systemd-bootx64.efi".
Copied "/usr/lib/systemd/boot/efi/systemd-bootx64.efi" to "/boot/EFI/BOOT/BOOTX64.EFI".
Created "/boot/d28ebfbb52b245528e50eff03fdd37e7".
Random seed file /boot/loader/random-seed successfully written (512 bytes).
Not installing system token, since we are running in a virtualized environment.
Created EFI boot entry "Linux Boot Manager".Code language: Bash (bash)Cấu hình boot loader
nano /boot/loader/loader.confCode language: Nginx (nginx)default arch
timeout 3
editor 0Code language: YAML (yaml)Cập nhật bootloader
bootctl updateCode language: Nginx (nginx)Tạo swap
Tạo file swap có kích thước tương đương với dung lượng RAM của máy.
fallocate -l 2GiB /swapfile
chmod 600 /swapfile
mkswap /swapfileCode language: Nginx (nginx)Kích hoạt swap
swapon /swapfileCode language: Nginx (nginx)Chỉnh sửa file fstab để bổ sung thông tin swap
nano /etc/fstabCode language: Nginx (nginx)Thêm dòng này vào dưới cùng
/swapfile none swap defaults 0 0Code language: YAML (yaml)Cấu hình múi giờ
Chỉnh hệ thống về múi giờ Việt Nam
ln -sf /usr/share/zoneinfo/Asia/Ho_Chi_Minh /etc/localtime
hwclock — systohcCode language: Nginx (nginx)Cấu hình ngôn ngữ
Chỉnh ngôn ngữ hệ thống thành en_US.UTF-8 UTF-8
echo 'en_US.UTF-8 UTF-8' > /etc/locale.gen
locale-gen
Code language: JavaScript (javascript)Chỉnh thông số LANG trong file /etc/locale.conf
echo 'LANG=en_US.UTF-8' > /etc/locale.conf
Code language: JavaScript (javascript)Thay đổi hostname
Sử dụng lệnh sau để đặt tên máy (hostname) thành ‘thuanbui-arch’
echo 'thuanbui-arch' > /etc/hostname
Code language: JavaScript (javascript)Thay đổi mật khẩu root
passwd
Code language: Nginx (nginx)Tạo tài khoản mới
Mình tạo tài khoản thuanbui mới dùng để quản lý hệ thống
useradd -m -G wheel -s /bin/bash -c "Thuan Bui" thuanbui
Code language: Nginx (nginx)Đặt mật khẩu cho tài khoản mới
passwd thuanbui
Code language: Nginx (nginx)Thiết lập quyền sudo cho tài khoản mới
EDITOR=nano visudo
Bỏ comment # ở phía trước đoạn %wheel ALL=(ALL) ALL để đưa quyền sudo cho thành viên thuộc group group
Kích hoạt network services
systemctl enable NetworkManagerCode language: Bash (bash)Kích hoạt SSH Service
systemctl enable sshdCode language: Bash (bash)Khởi động lại hệ thống
Thoát ra khỏi môi trường chroot
exitCode language: Bash (bash)Khởi động lại máy
reboot5. Cài đặt giao diện GUI
Nếu không có gì bất thường, máy ảo sẽ khởi động lại rất nhanh vào tty console. Bạn có thể đăng nhập bằng tài khoản đã tạo trước đó.
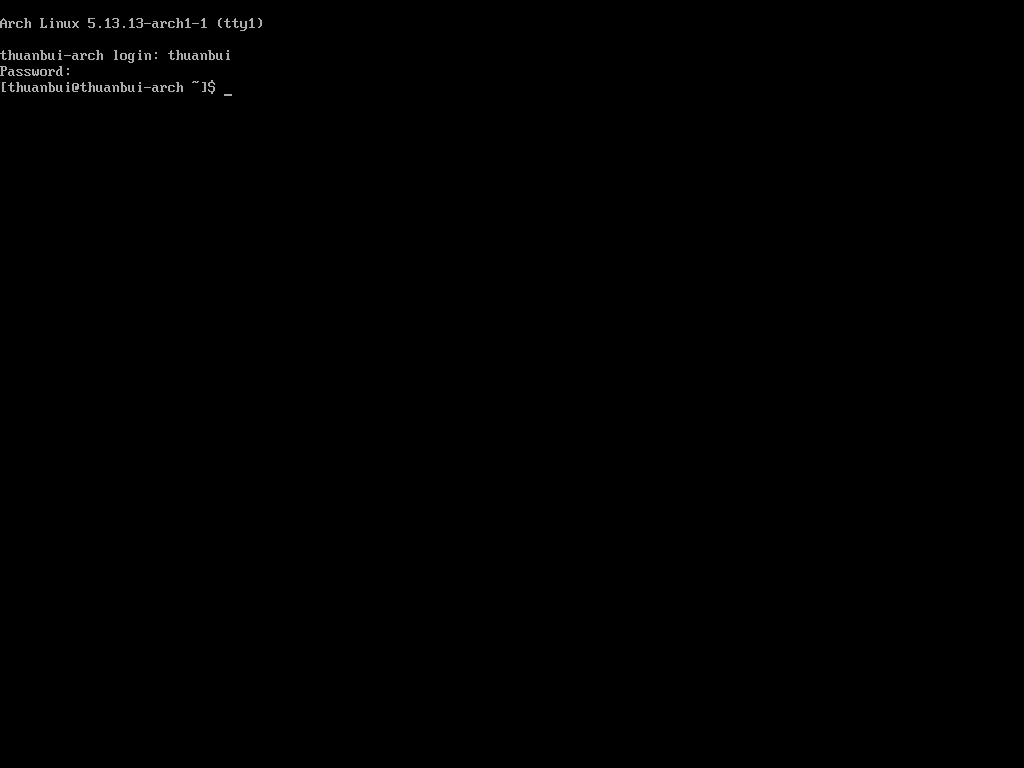
Chúc mừng bạn đã vượt qua được giai đoạn khó khăn nhất trong công cuộc cài đặt Arch Linux!
Arch Linux đã hoạt động ngon lành ở chế độ cli. Tuy nhiên, nếu muốn sử dụng giao diện GUI như Windows hay MacOS, cần phải cài đặt thêm các package quản lý Desktop Environment như GNOME, KDE, LXDE, i3,…
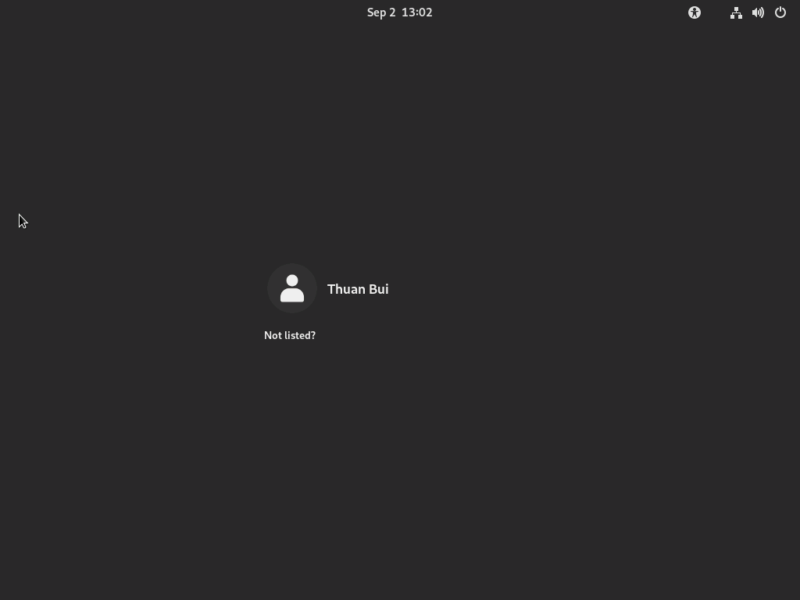
Cài đặt GNOME
Mình chọn cài đặt GNOME cho đơn giản
sudo pacman -S gnome
sudo systemctl enable --now gdmCode language: Bash (bash)Cài đặt video driver
Do mình đang dùng Hyper-V nên cần cài đặt thêm package xf86-video-fbdev để XORG hoạt động trơn tru.
sudo pacman -S xf86-video-fbdevCode language: Nginx (nginx)Điều chỉnh độ phân giải
Độ phân giải của máy ảo sẽ cố định sau khi khởi động. Để điều chỉnh độ phân giải, cần phải thêm thông số video=hyperv_fb:1600x900 vào boot kernel.
sudo nano /boot/loader/entries/arch.confCode language: Nginx (nginx)title Arch Linux
linux /vmlinuz-linux
initrd /intel-ucode.img
initrd /initramfs-linux.img
options video=hyperv_fb:1600x900 root=/dev/sda2 rwCode language: JavaScript (javascript)Bạn có thể thay đổi 1600x900 thành độ phân giải mong muốn. Độ phân giải cho phép tối đa là 1920x1080
Tận hưởng thành quả
sudo rebootCode language: Nginx (nginx)Tada! GNOME đã hiện ra!
Vậy là xong. Arch Linux đã được cài đặt thành công trên máy ảo Hyper-V để chờ bạn nghiên cứu.
Arch Linux Wiki có thêm một số hướng dẫn tối ưu cho Hyper-V ở đây: Hyper-V – ArchWiki (archlinux.org). Bạn nào quan tâm có thể tham khảo thêm.
Chúc bạn cài đặt êm xuôi!